
How to Make AI Employees Learn Advertising Information?
I. Function Introduction
When a customer contacts you via Facebook ads in Messenger or WhatsApp, HelpKnow can obtain the customer's referral ad ID.
After enabling "Learning Advertising Information", the AI employee will search for the corresponding product in the "Ad & Product Mapping Table" based on the source ad ID, and reply to the customer with information such as product name, price, image and description.
This feature only works for Messenger and WhatsApp channels accessed through SaleSmartly. Before using it, you need to maintain the mapping relationship between the ad ID and product information in the mapping table.
This article's link: "How to Make AI Employees Learn Advertising Information?"
II. Applicable Scenarios
- Improve Facebook ad inquiry conversion: When customers inquire via Facebook ads through Messenger or WhatsApp, AI employees can directly identify the products the customer is interested in based on the source ad ID and accurately reply with the corresponding product information, reducing repetitive explanations from customers and improving inquiry and order conversion efficiency.
- Managing multiple product ads: When the same Messenger or WhatsApp account receives inquiries from multiple Facebook product ads simultaneously, you can maintain product information corresponding to different ad IDs in a mapping table, allowing AI to respond with appropriate content based on the source of the customer's ad.
III. Configure learning advertising information
1. Enable learning advertising information
Enter the AI employee that needs to be configured, and click "Configure" on the left.
In the "Skills" section, click "Learn Advertising Information" to turn on the feature.
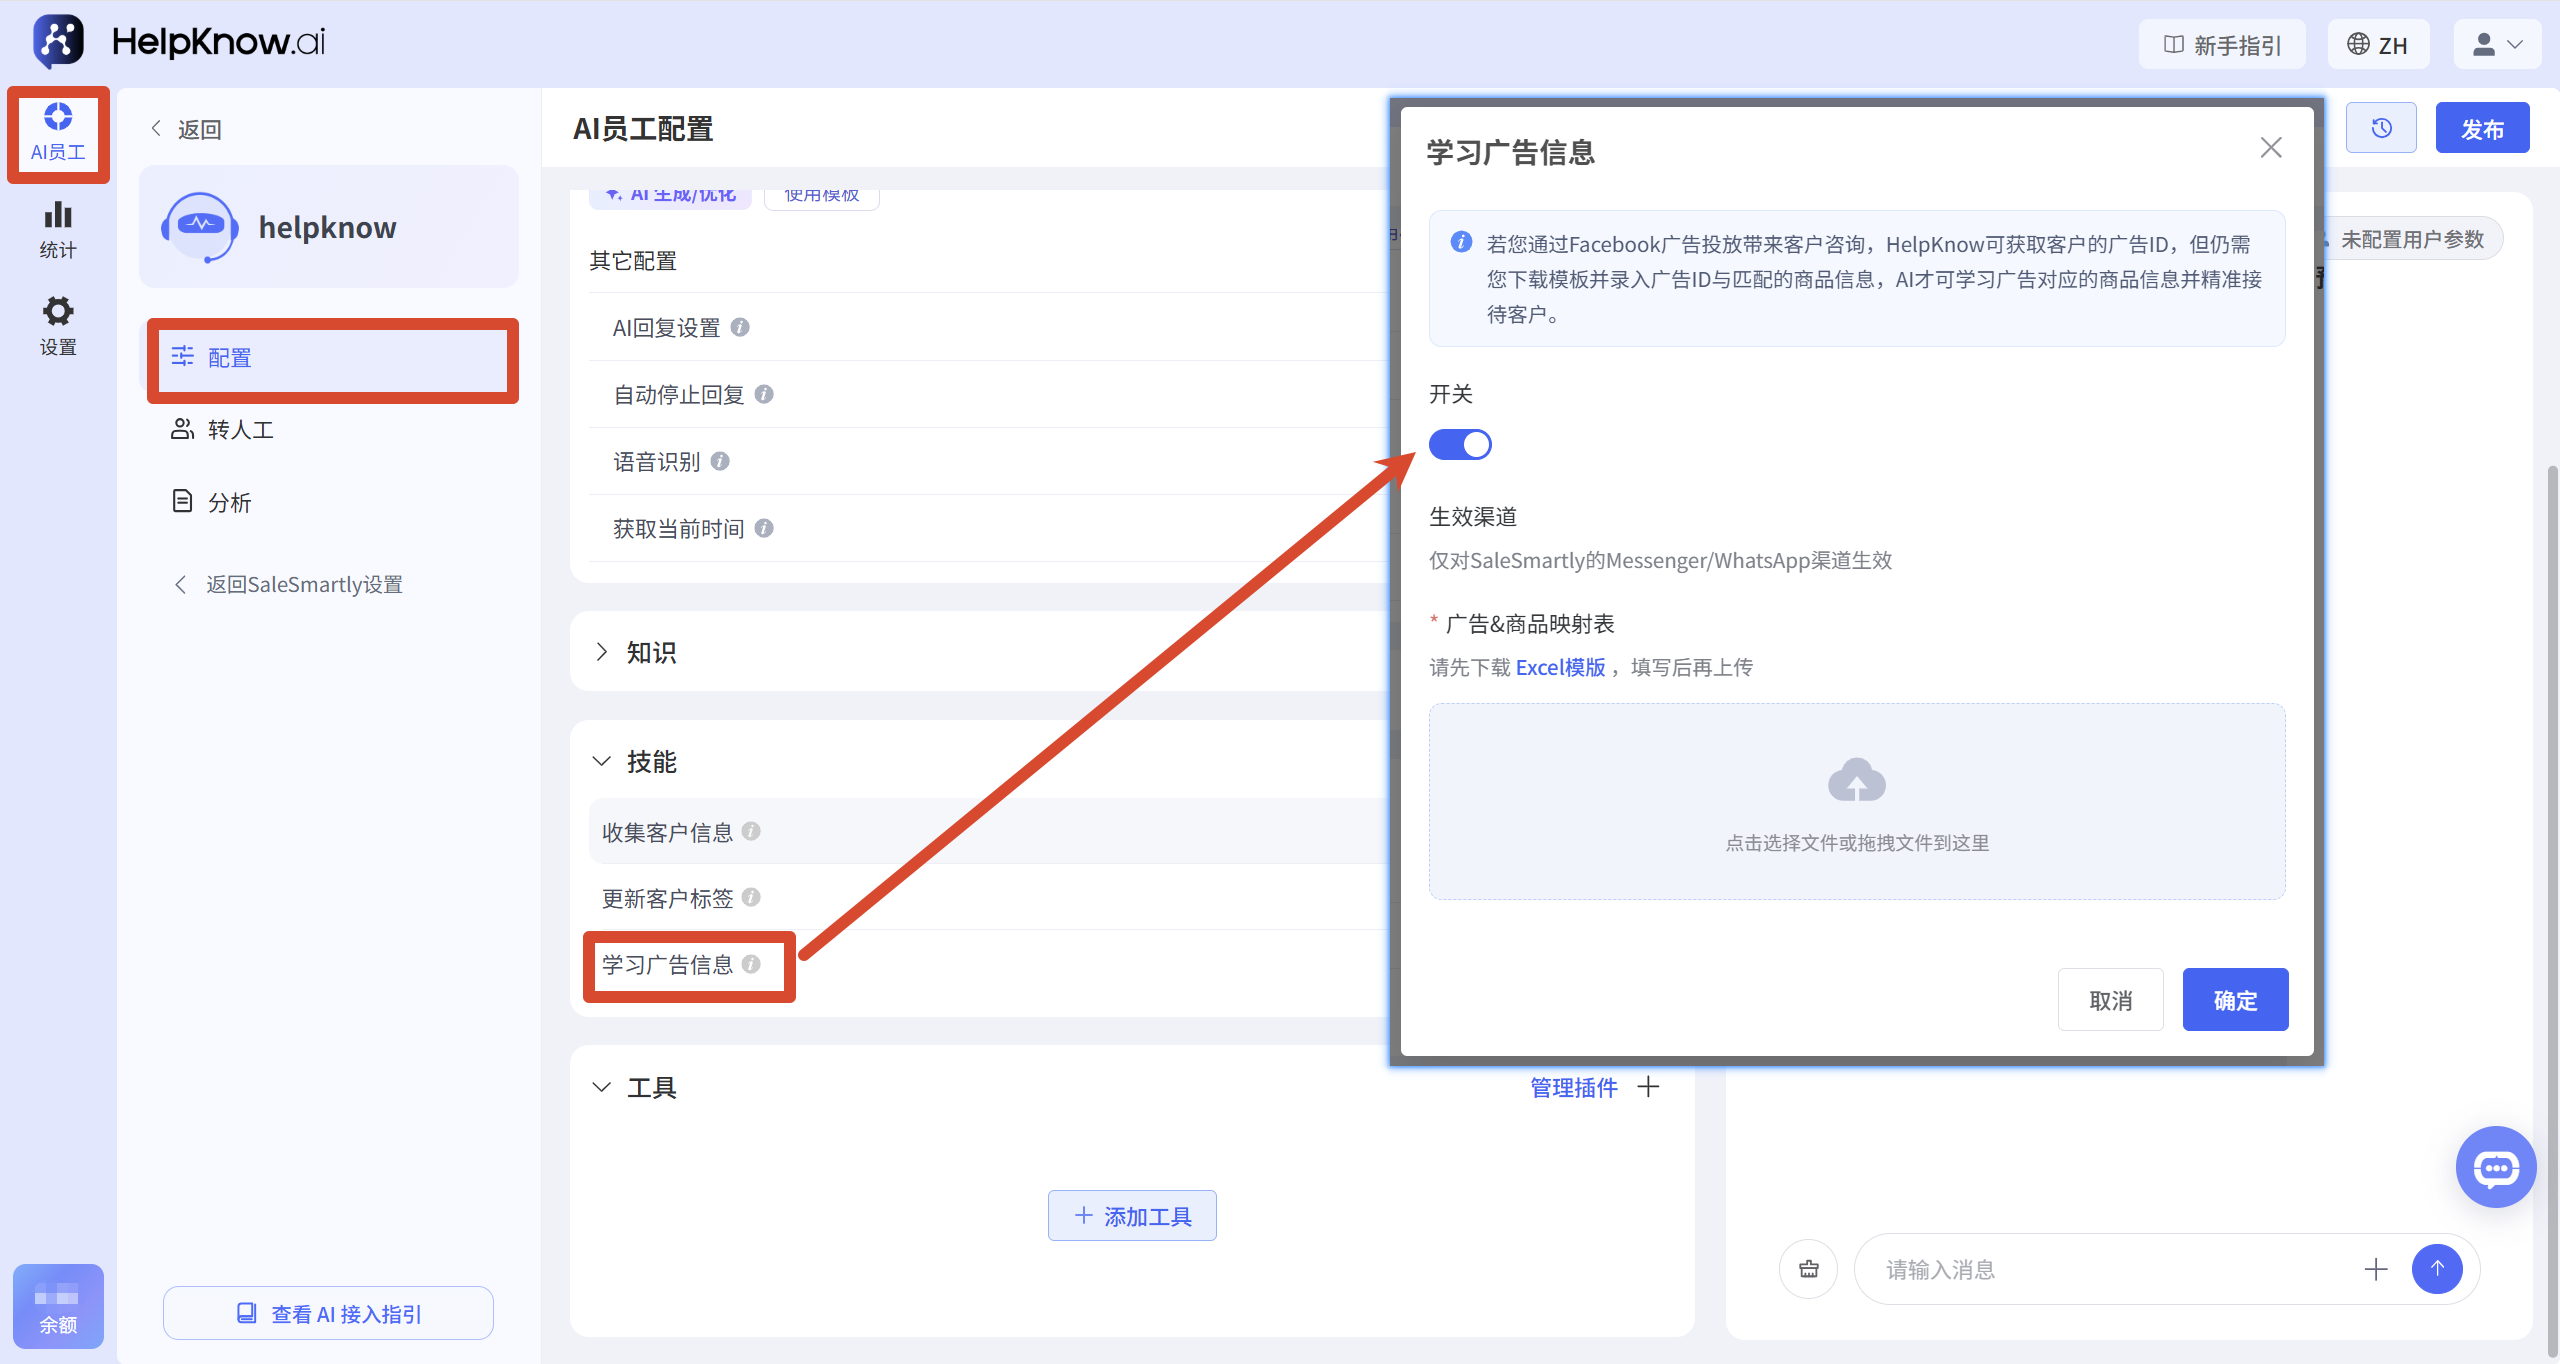
2. Download and fill in the mapping table.
Click "Excel Template" to download the "Advertisement & Product Mapping Table", and then fill in the advertisement and product information according to the instructions in the template.
Please pay special attention when filling out the form:
- The first column must be "Ad ID" and the column name cannot be changed.
- Except for "Ad ID", the header names and number of fields for other fields can be flexibly adjusted according to business needs.
- For image-related information, you need to fill in an accessible image link; you cannot fill in a local file path.
- Each row should contain an advertisement ID and its corresponding product information. To manage multiple products, continue adding data rows to the table.
- Before uploading, delete the filling instructions and sample data in the template, and only keep the table header and actual product data.
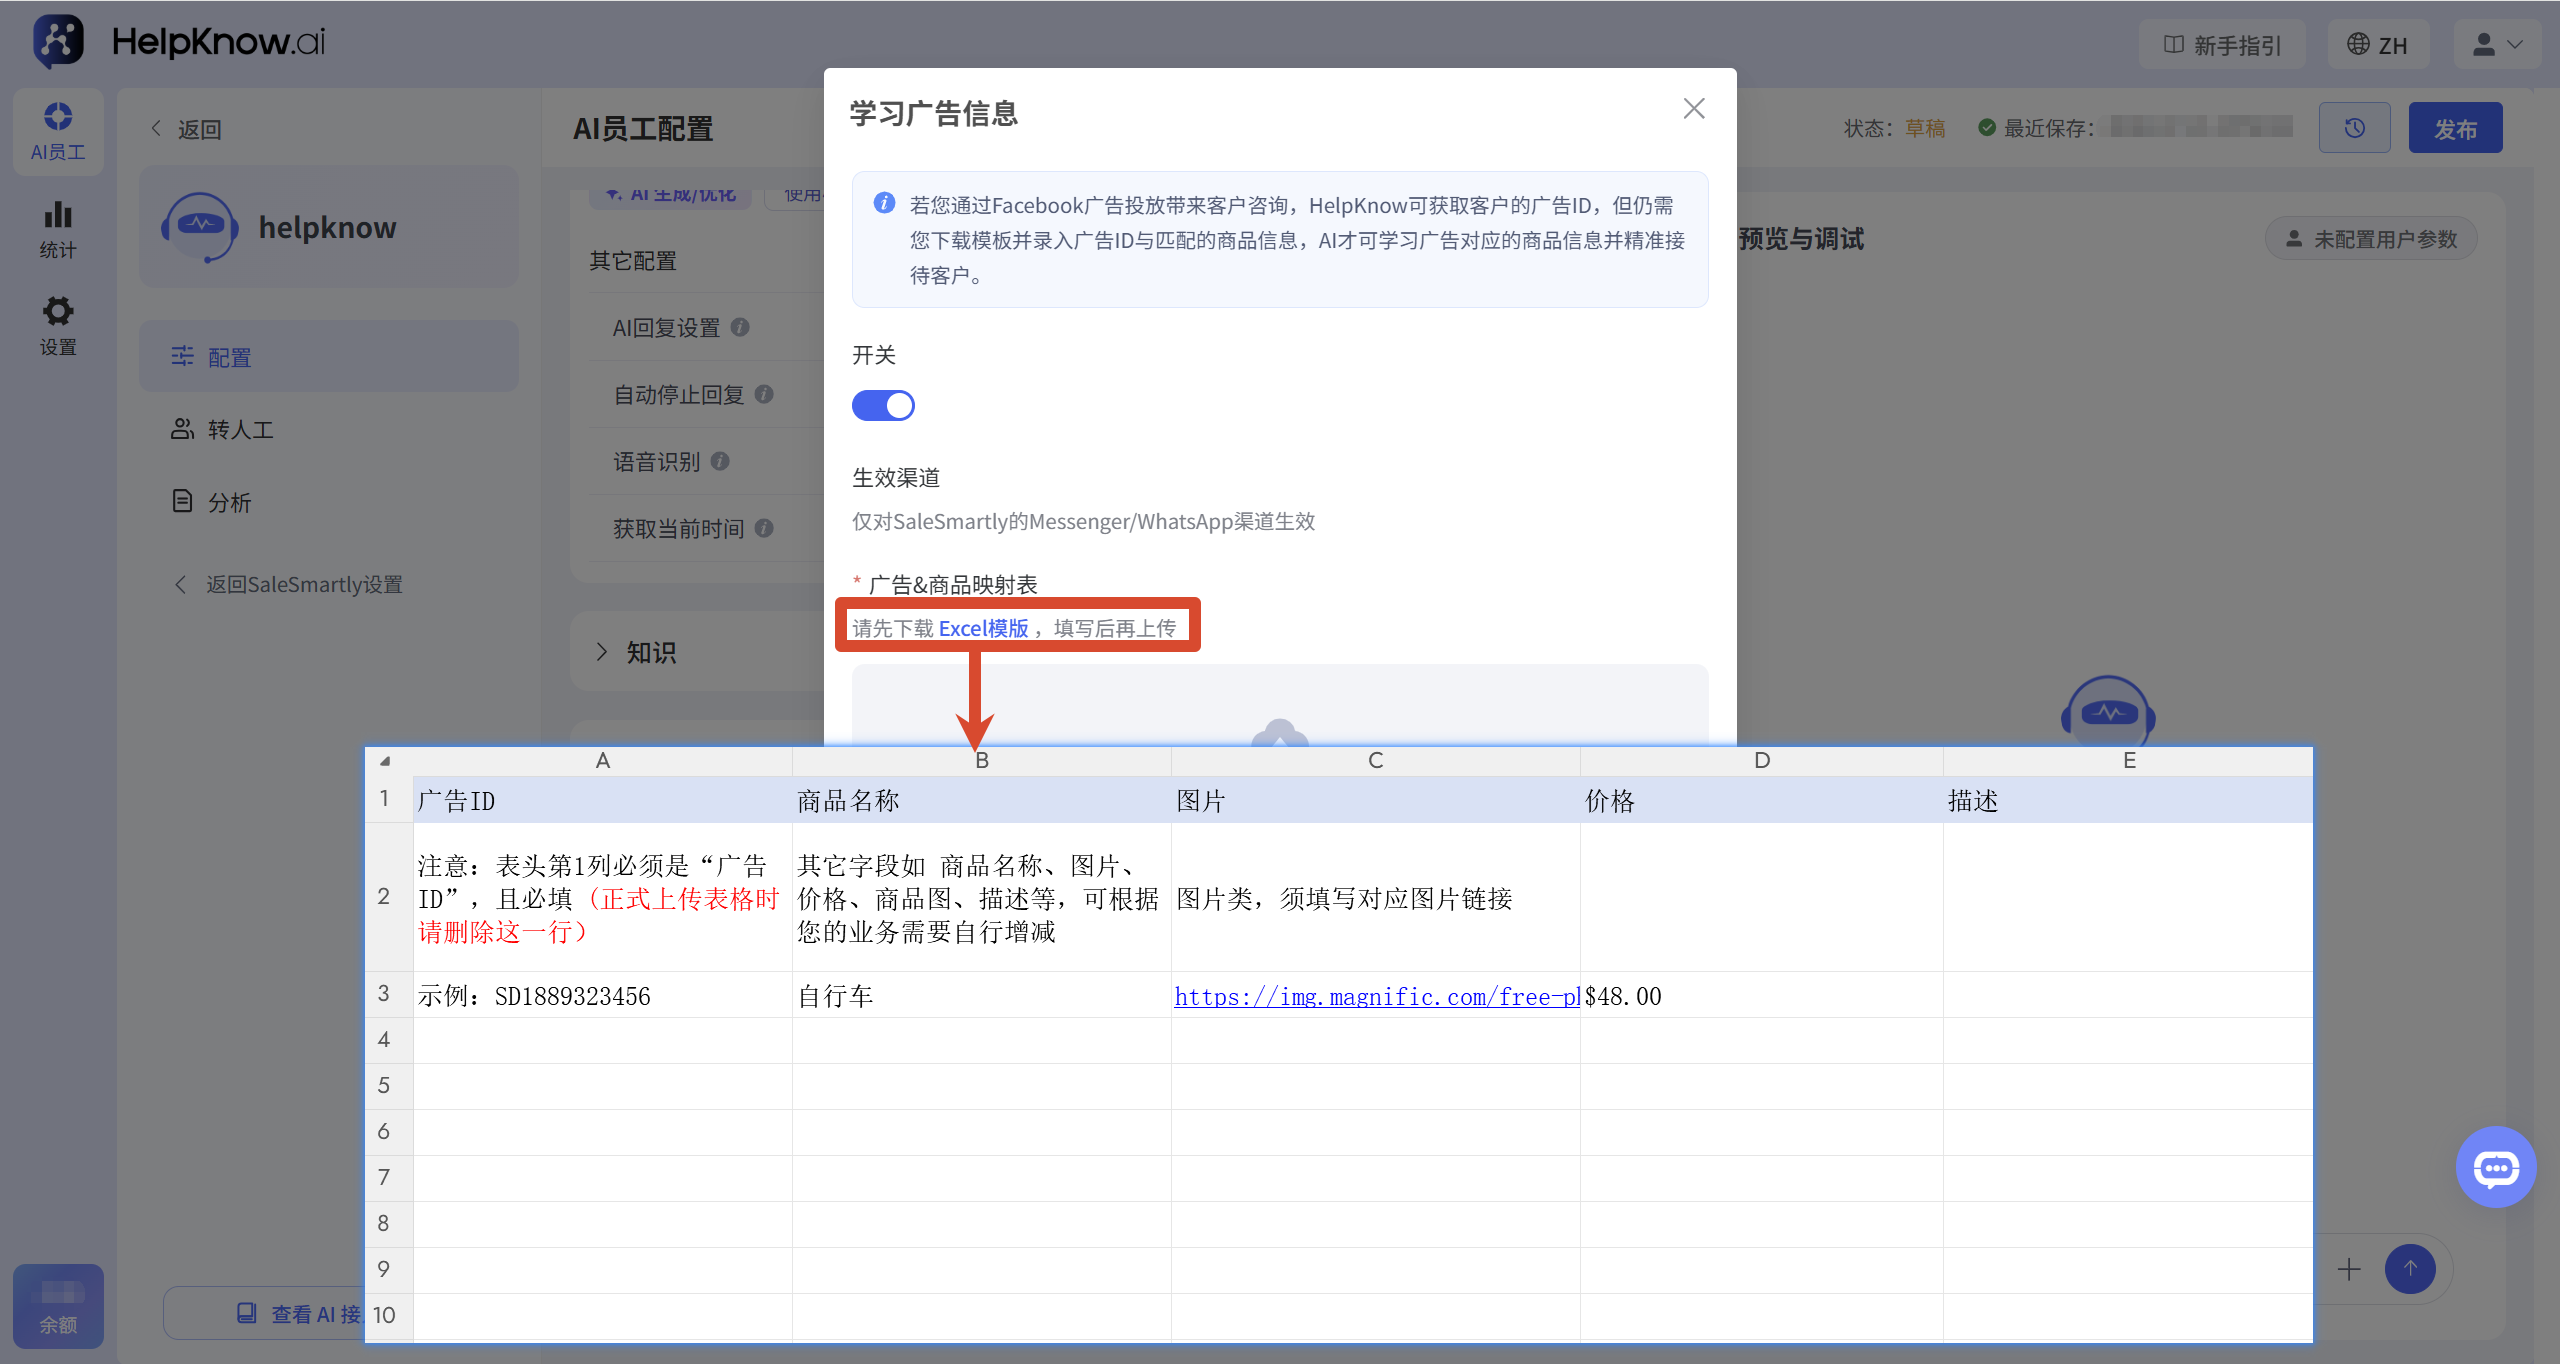
3. Upload the mapping table
Return to the "Learning Ad Information" settings pop-up window, click the upload area, select the completed mapping table, and then click "OK".
Each AI employee can only upload one mapping table. Information for multiple advertisements and products needs to be entered into the same table.
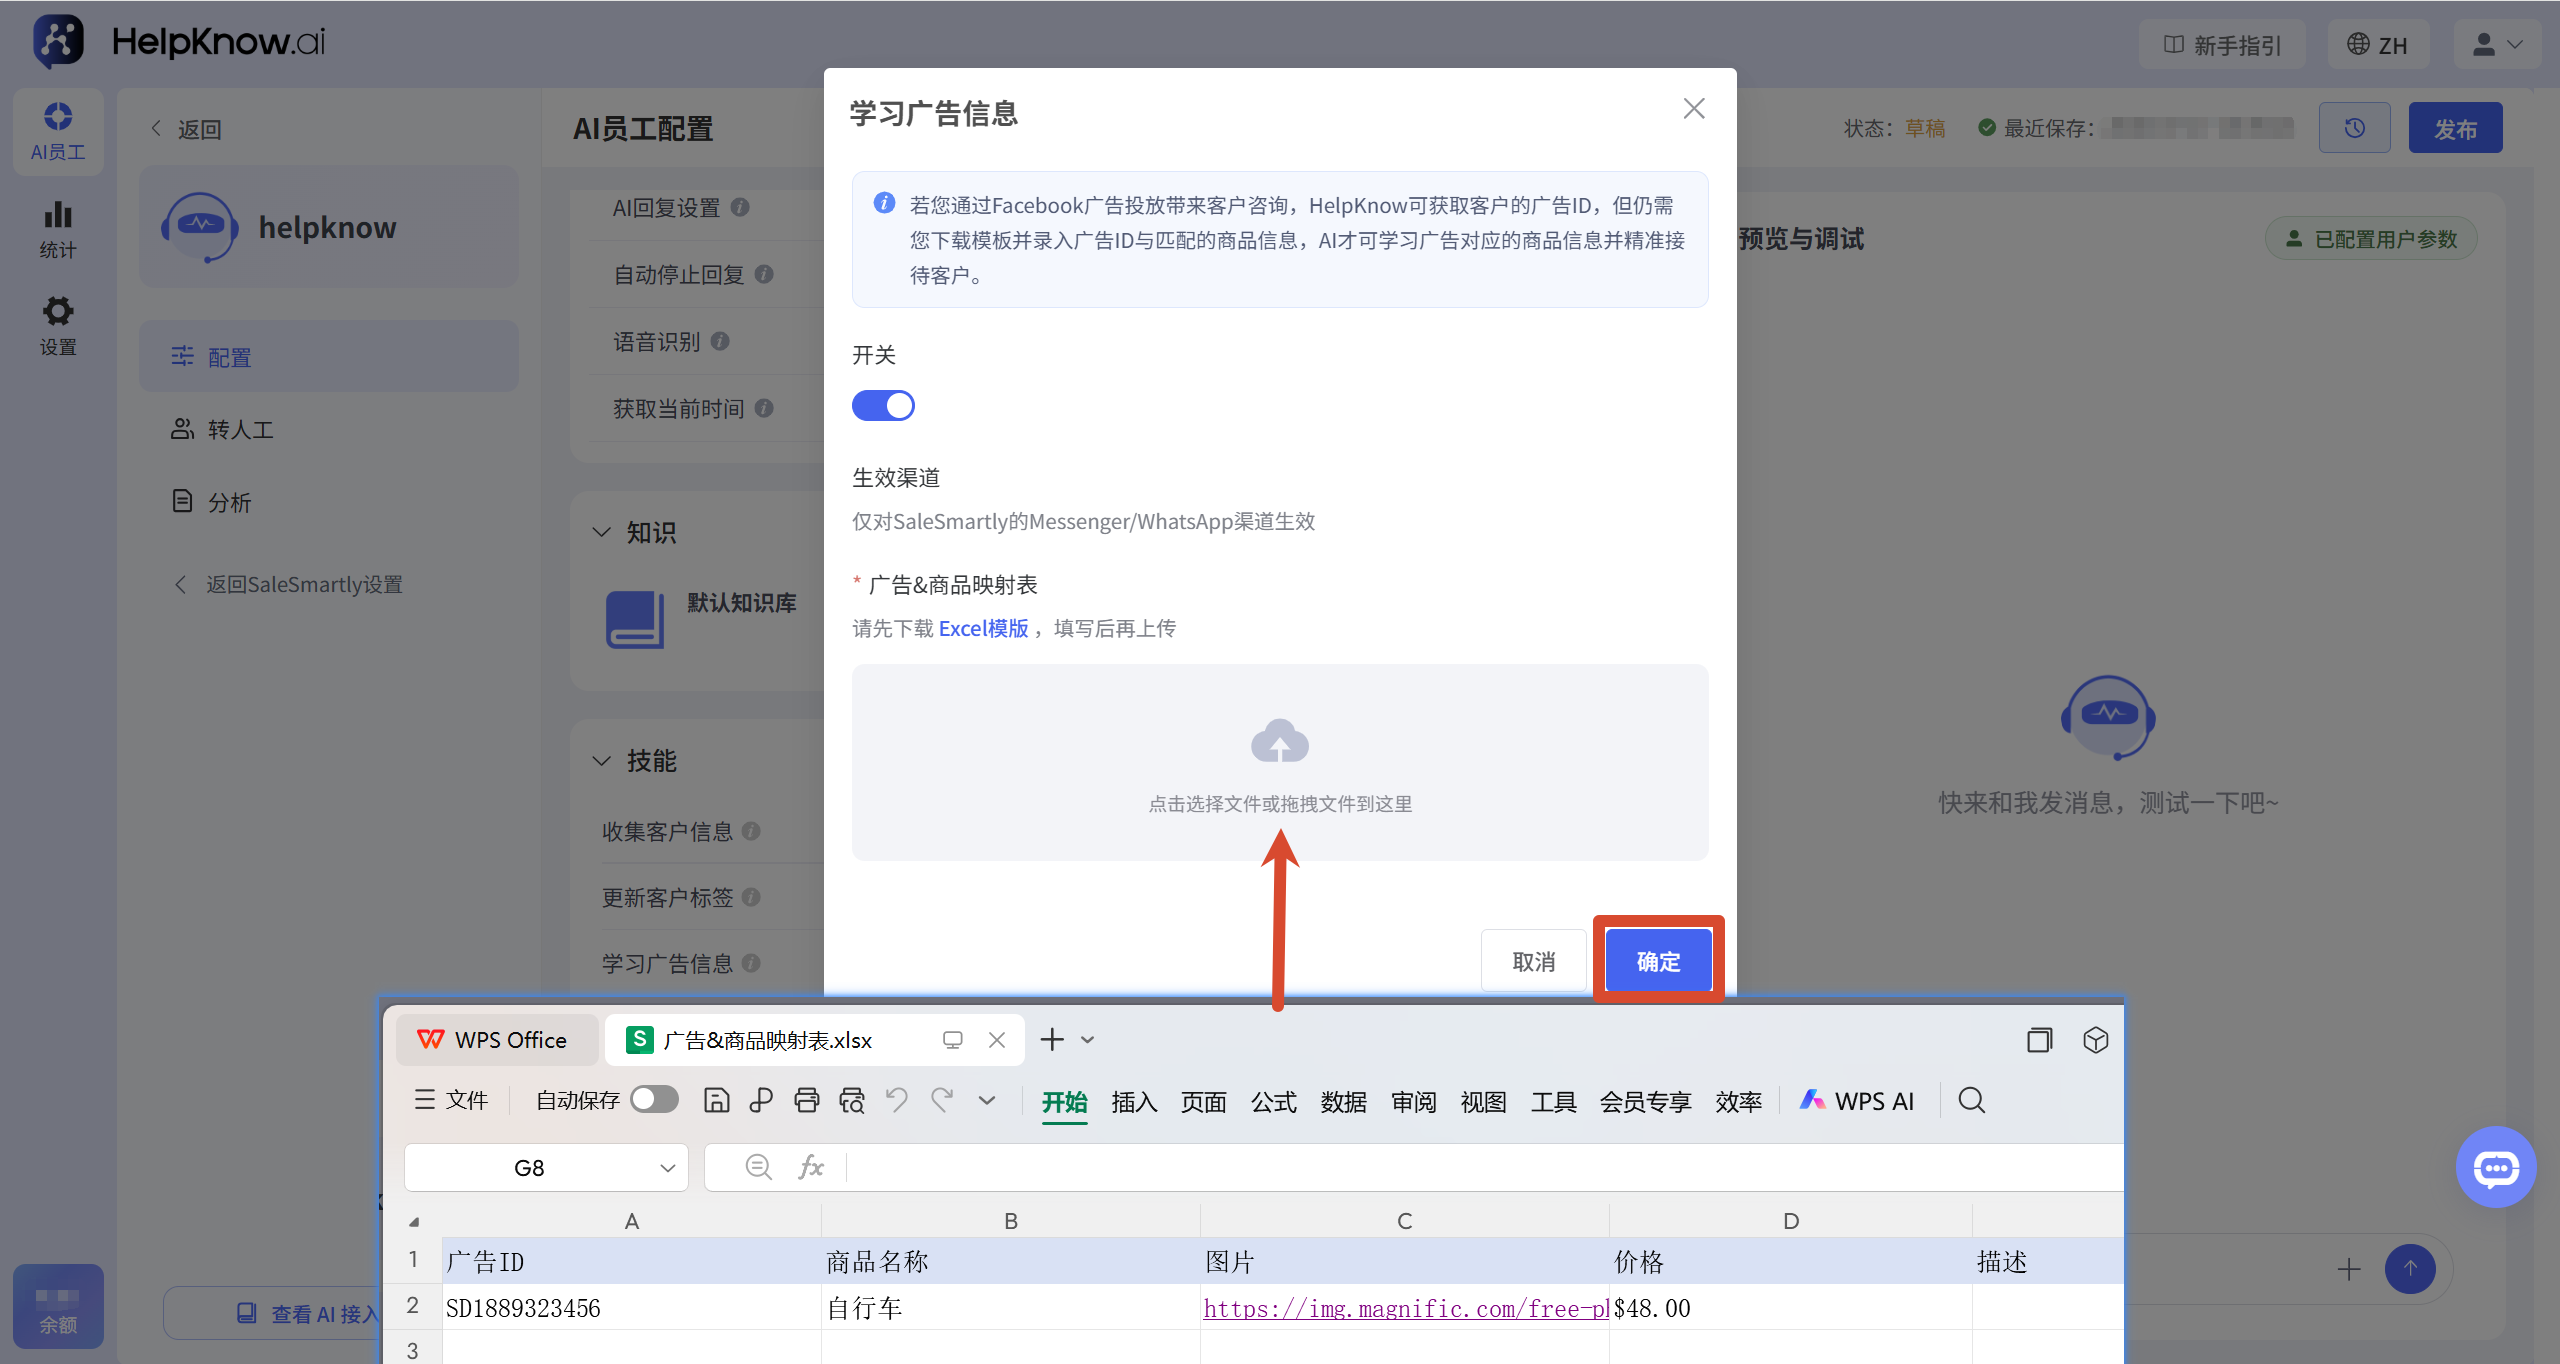
4. Supplement or modify product information
When adding new products or modifying information such as prices, images, and descriptions, the mapping table needs to be re-uploaded.
The re-uploaded file will replace the currently uploaded mapping table, so the new file must contain the original data as well as the data that has been added or modified this time.
The specific steps are as follows:
- Add or modify product information in the original mapping table.
- Delete the currently uploaded mapping table.
- Upload a complete mapping table containing all advertising and product information.
- Click "OK" to save.
IV. Testing and Release
1. Configure source ad ID
Debugging parameters can be configured through any of the following entry points:
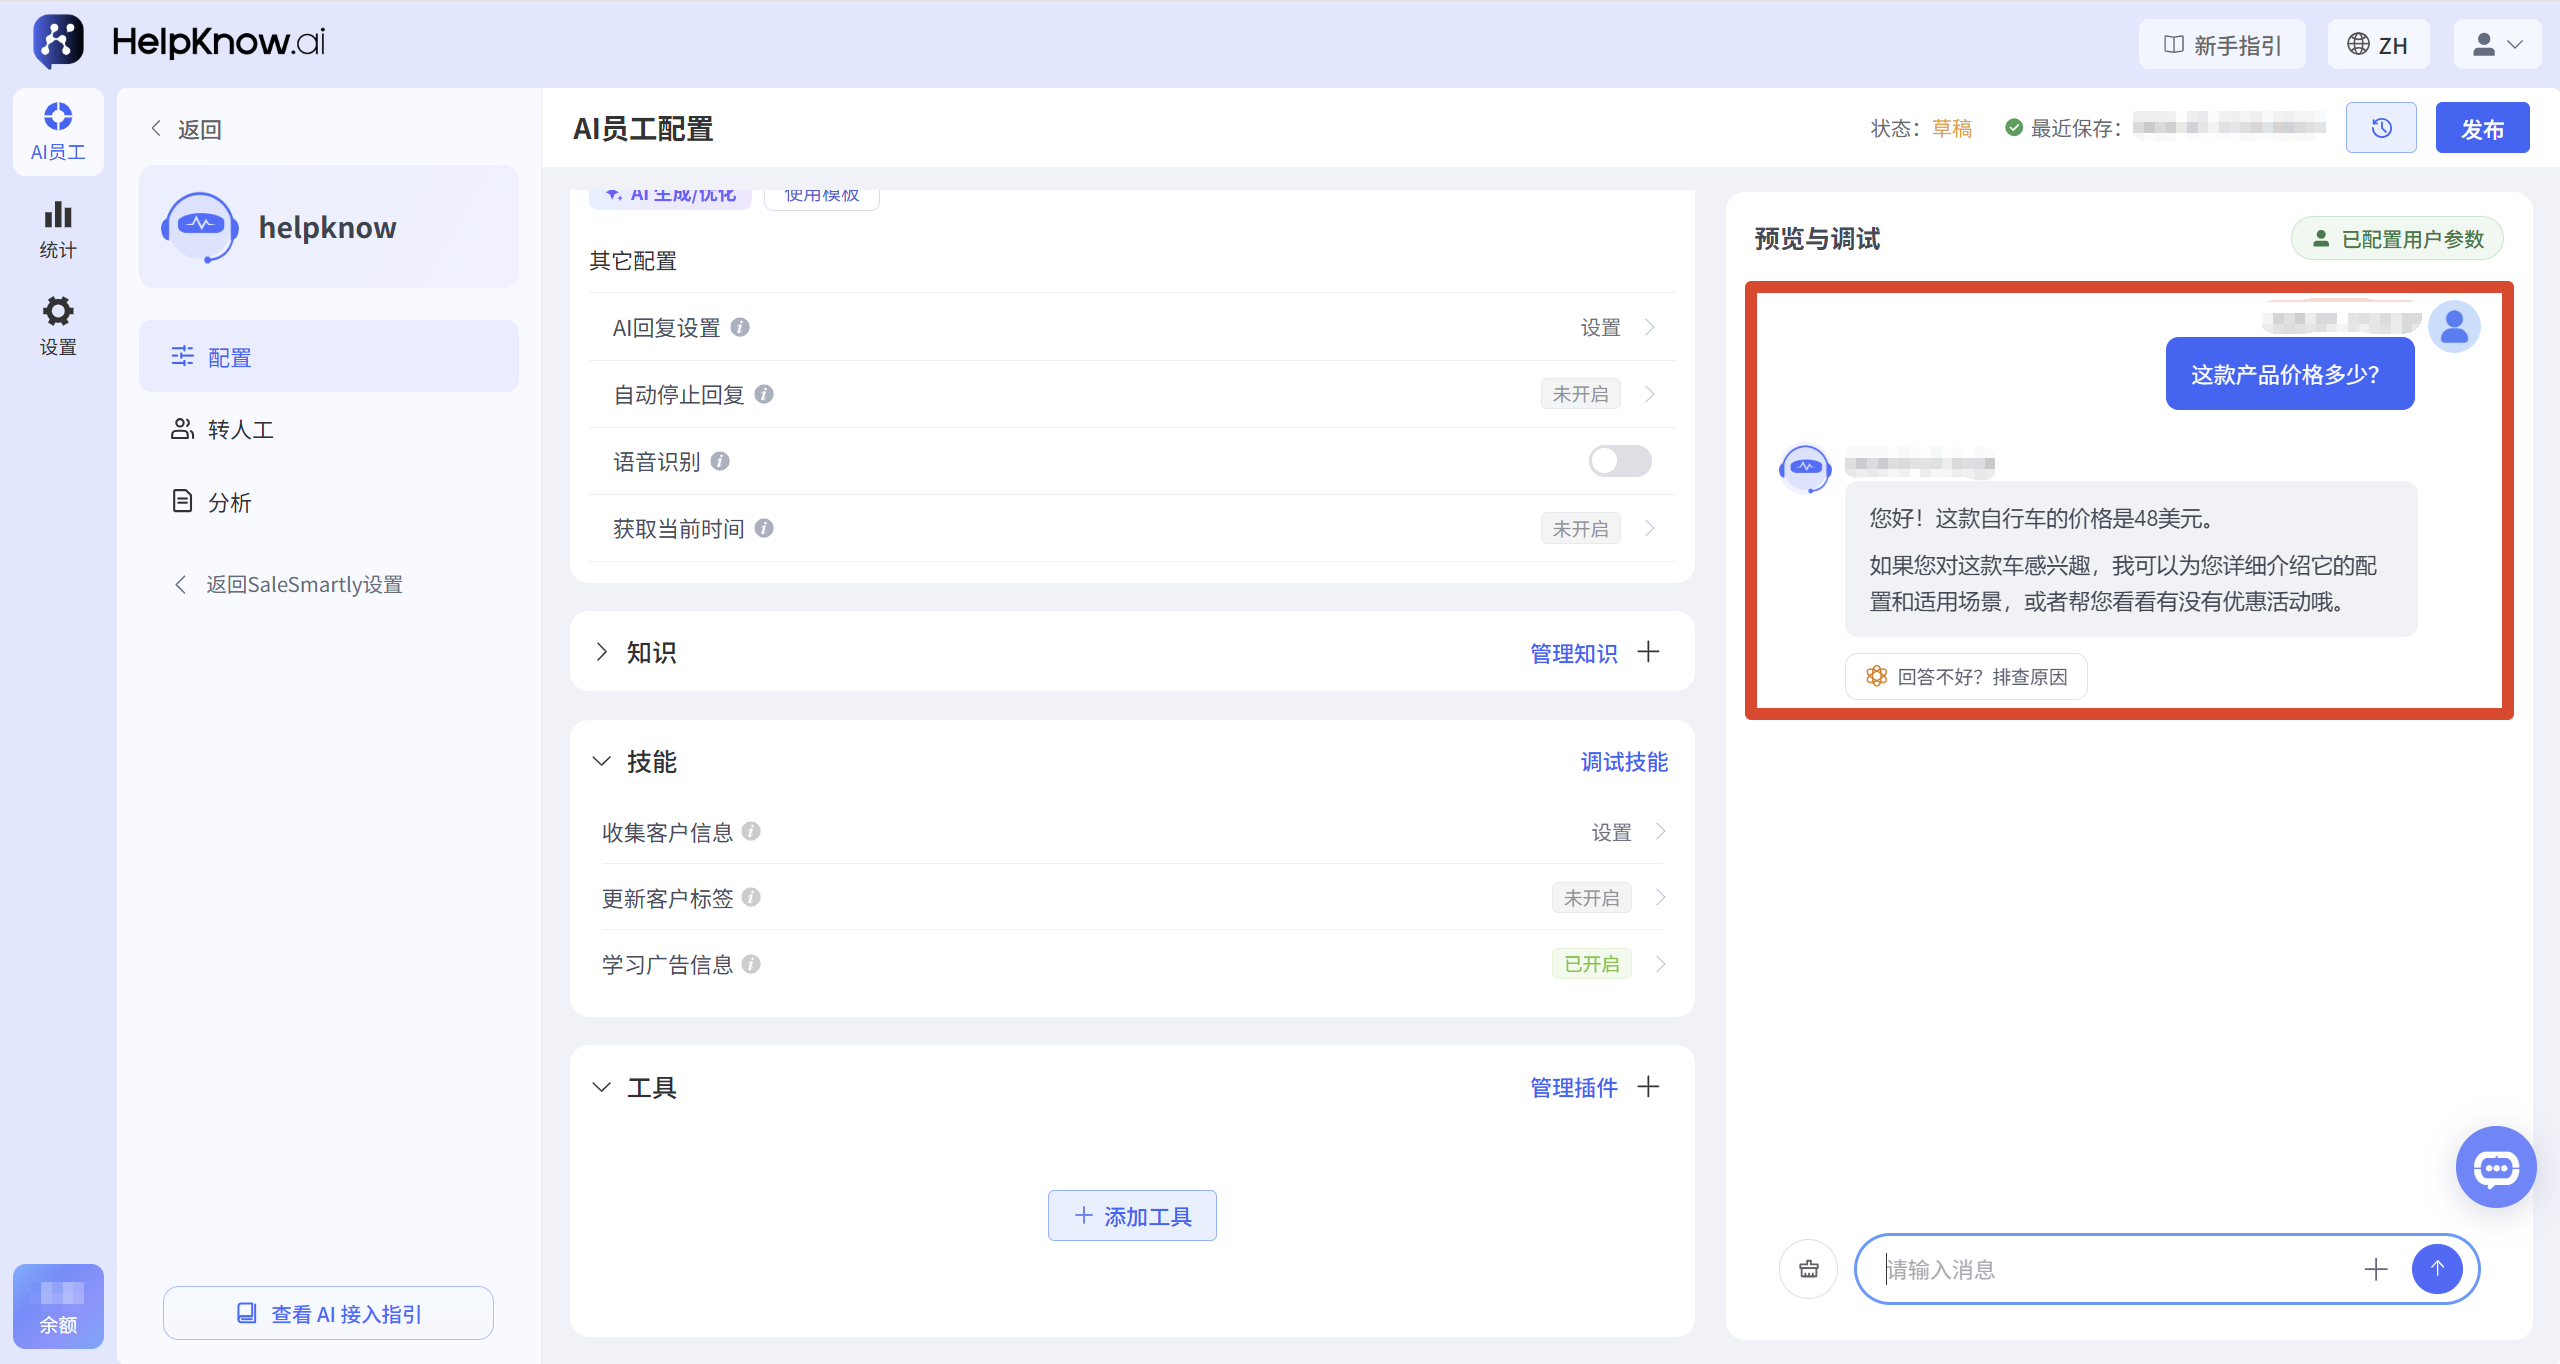
- Click "Configure User Parameters" in the upper right corner of "Preview and Debug".
- Click "Adjust Skills" in the upper right corner of the "Skills" area.
After entering the configuration page, enter an ad ID from the mapping table in "Source Ad ID", and then click "Apply to Debug".
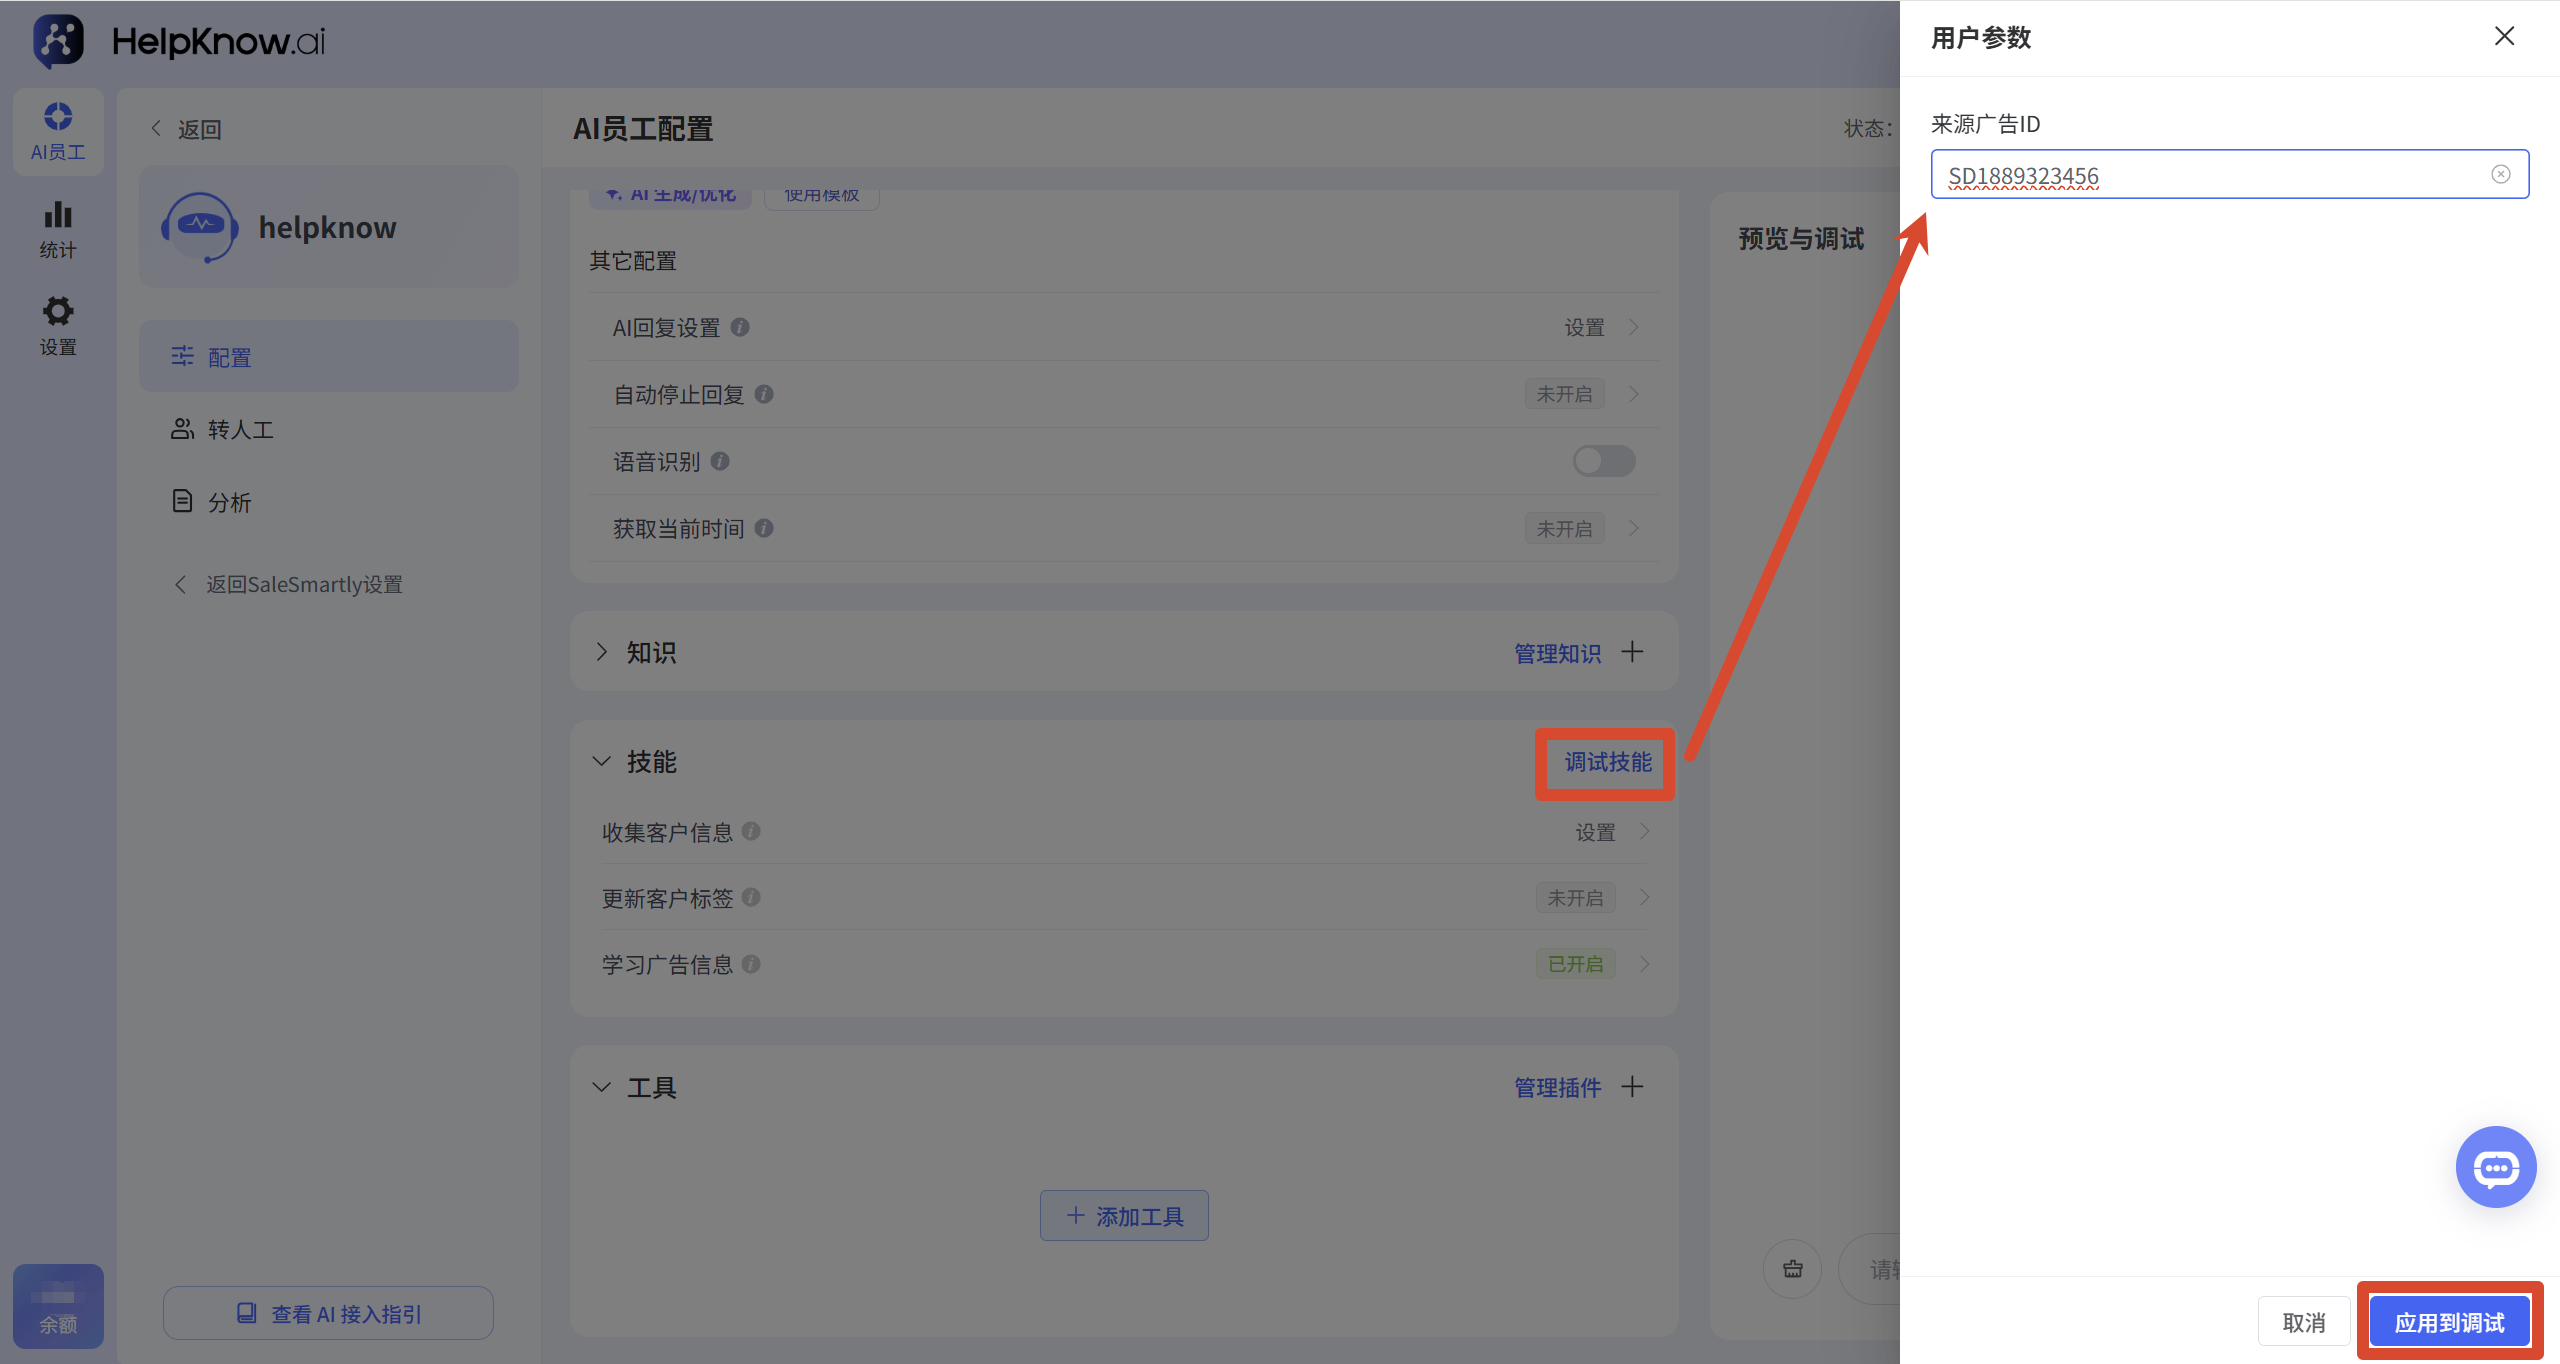
2. Check the AI's response results.
In the "Preview and Debug" area, ask for the product information corresponding to the advertisement, for example:
How much does this product cost?
Check if the AI responded with the price, image, or description of the corresponding product in the mapping table. If the response matches the information in the table, it means the ad ID and product information have been correctly matched.
3. Publish configuration
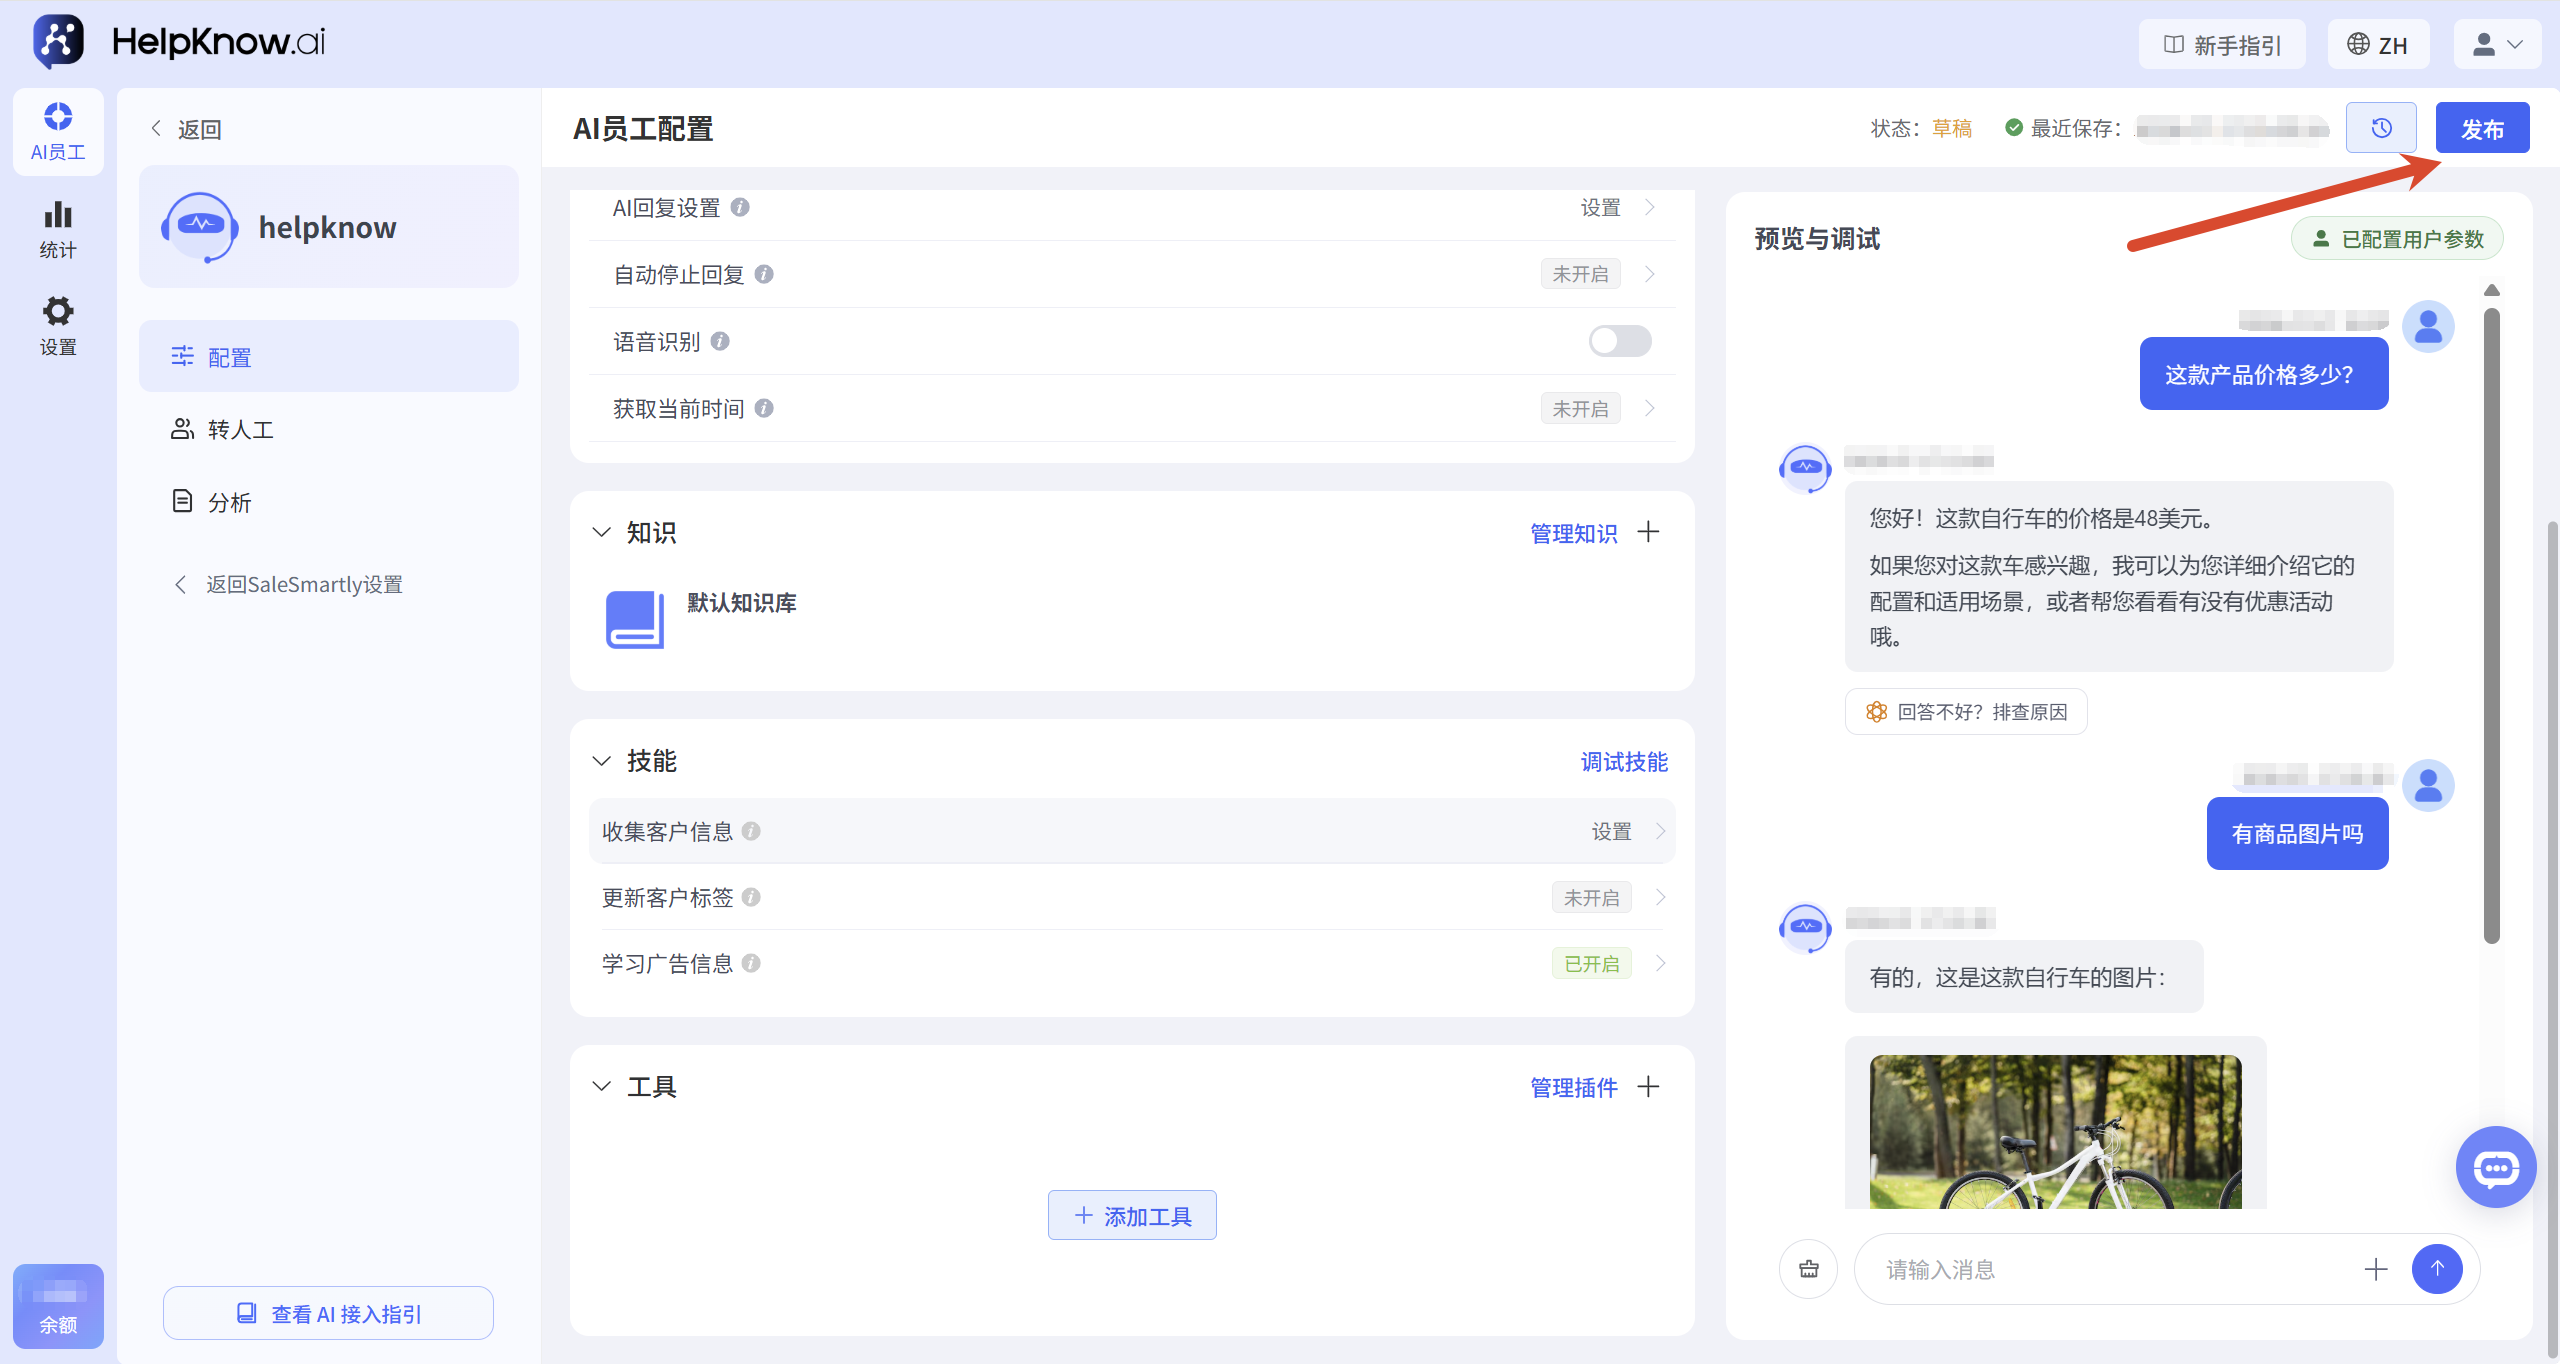
After confirming that the test is successful, click "Publish" in the upper right corner of the page to officially apply the configuration. You will also need to publish again after modifying skill switches or re-uploading the mapping table.
V. Precautions
- Only Messenger and WhatsApp channels integrated with SaleSmartly can obtain the source ad ID.
- When re-uploading the mapping table, you need to upload a complete file containing all advertising and product information.
- After modifying the skill configuration or mapping table, the AI employee needs to be re-released.
VI. Frequently Asked Questions
1. Why didn't the AI identify the product the customer was inquiring about?
Please check the following:
- Did the customer initiate the inquiry through a Facebook ad, and is the current conversation originating from a SaleSmartly-connected Messenger or WhatsApp channel?
- Is the "Learn Advertising Information" switch turned on?
- Does the customer's source ad ID exist in the mapping table?
- Has the mapping table been successfully uploaded?
- Have AI employees been deployed after the configuration was modified?
2. Why did the AI provide incorrect product information?
Please check the mapping relationship between the ad ID and the product information in the mapping table to confirm that the row containing the ad ID contains the correct product.
3. Why didn't the AI respond with the product image?
Please ensure that the image information in the mapping table is an accessible image link, not a local file path or a link that requires login to open.
VII. Related Recommendations
;}.cls-2{fill:%230868f7;}.cls-3{fill:url(%23未命名的渐变_44);}.cls-4{fill:%23333;}%3c/style%3e%3clinearGradient%20id='未命名的渐变_8'%20x1='33.73'%20y1='100.61'%20x2='-0.03'%20y2='-1.06'%20gradientUnits='userSpaceOnUse'%3e%3cstop%20offset='0'%20stop-color='%237ae9fb'/%3e%3cstop%20offset='0.67'%20stop-color='%232b90f8'/%3e%3cstop%20offset='1'%20stop-color='%230868f7'/%3e%3c/linearGradient%3e%3clinearGradient%20id='未命名的渐变_44'%20x1='27.86'%20y1='18.67'%20x2='68.36'%20y2='22.22'%20gradientUnits='userSpaceOnUse'%3e%3cstop%20offset='0'%20stop-color='%235ac7f2'/%3e%3cstop%20offset='1'%20stop-color='%230868f7'/%3e%3c/linearGradient%3e%3c/defs%3e%3cpath%20class='cls-1'%20d='M29,28.74V81.91l-9.51-3.68v0L8.52,74A7.17,7.17,0,0,1,4,67.32V24.54A3.76,3.76,0,0,1,9.08,21Z'/%3e%3cpath%20class='cls-2'%20d='M68.09,78.07a13.15,13.15,0,0,1-17.9,12.06L29,81.91h0V28.74L50.19,37A13.17,13.17,0,0,0,68.08,25.3h0Z'/%3e%3cpath%20class='cls-3'%20d='M68.08,25.3a13.19,13.19,0,0,1-6.73,10.87A13.09,13.09,0,0,1,50.19,37L29,28.74V6A3.76,3.76,0,0,1,34.1,2.52l25.59,9.91A13.22,13.22,0,0,1,68.08,25.3Z'/%3e%3cpath%20class='cls-4'%20d='M129.06,81.76a4.33,4.33,0,0,1-3.19-1.31,4.4,4.4,0,0,1-1.31-3.24V56.86H97.65V77.21a4.36,4.36,0,0,1-1.35,3.2A4.68,4.68,0,0,1,93,81.76a4.32,4.32,0,0,1-3.19-1.31,4.37,4.37,0,0,1-1.32-3.24V27.27A4.58,4.58,0,0,1,89.83,24a4.59,4.59,0,0,1,7.82,3.27V48.15h26.91V27.27A4.58,4.58,0,0,1,125.91,24a4.59,4.59,0,0,1,7.82,3.27V77.21a4.37,4.37,0,0,1-1.36,3.2A4.65,4.65,0,0,1,129.06,81.76Z'/%3e%3cpath%20class='cls-4'%20d='M163.77,81.66c-6.57,0-11.76-1.92-15.44-5.7s-5.54-9.07-5.54-15.74a26.76,26.76,0,0,1,2.09-10.43,17.72,17.72,0,0,1,6.67-8.06,19.15,19.15,0,0,1,10.68-2.95,19,19,0,0,1,10.46,2.8,18.7,18.7,0,0,1,6.55,7.36,22.53,22.53,0,0,1,2.36,10.28A4.51,4.51,0,0,1,177,63.77H152.23a10.8,10.8,0,0,0,3.49,6.65c2,1.68,4.88,2.52,8.66,2.52a22.25,22.25,0,0,0,7.54-1.21c.74-.3,1.55-.67,2.37-1.07a3.75,3.75,0,0,1,1.84-.4,4.09,4.09,0,0,1,3,1.15,4,4,0,0,1,1.12,3,4.38,4.38,0,0,1-2.58,3.82,32.34,32.34,0,0,1-6.36,2.61A28.67,28.67,0,0,1,163.77,81.66ZM172.4,55.9a9.72,9.72,0,0,0-1.63-4.56A9.9,9.9,0,0,0,167,48a10.38,10.38,0,0,0-4.64-1.14,12,12,0,0,0-4.77,1.06,9.54,9.54,0,0,0-4.89,5.66,11.78,11.78,0,0,0-.51,2.3Z'/%3e%3cpath%20class='cls-4'%20d='M193,81.64a4.49,4.49,0,0,1-4.51-4.55V27.28A4.58,4.58,0,0,1,189.84,24a4.48,4.48,0,0,1,3.28-1.36A4.36,4.36,0,0,1,196.35,24a4.46,4.46,0,0,1,1.31,3.31V77.09a4.34,4.34,0,0,1-1.35,3.2A4.67,4.67,0,0,1,193,81.64Z'/%3e%3cpath%20class='cls-4'%20d='M263.79,81.71a5.7,5.7,0,0,1-4.2-1.74,5.76,5.76,0,0,1-1.73-4.19V27.37a4.58,4.58,0,0,1,1.35-3.27A4.59,4.59,0,0,1,267,27.37V72.53h24a4.58,4.58,0,0,1,3.27,7.82A4.66,4.66,0,0,1,291,81.71Z'/%3e%3cpath%20class='cls-4'%20d='M424.48,81.74a4.71,4.71,0,0,1-2.71-.88,5.43,5.43,0,0,1-1-1l-.07-.09-12.41-17-5.41,5v9.44a4.31,4.31,0,0,1-1.36,3.19,4.66,4.66,0,0,1-3.3,1.36A4.29,4.29,0,0,1,395,80.42a4.36,4.36,0,0,1-1.32-3.23V27.37A4.58,4.58,0,0,1,395,24.1a4.52,4.52,0,0,1,6.58.12,4.54,4.54,0,0,1,1.24,3.15V56.31l17.72-16.38.05,0a4.8,4.8,0,0,1,2.94-1.11,4.4,4.4,0,0,1,3.27,1.2,4.57,4.57,0,0,1,1.2,3.27,4.44,4.44,0,0,1-.77,2.33,7.45,7.45,0,0,1-1.43,1.65l-11,9.64,13.34,17.68a5,5,0,0,1,1,2.71,4.12,4.12,0,0,1-1.36,3.24A4.64,4.64,0,0,1,424.48,81.74Z'/%3e%3cpath%20class='cls-4'%20d='M317.93,81.76a21.5,21.5,0,1,1,21.17-21.5A21.37,21.37,0,0,1,317.93,81.76Zm0-34.1a12.61,12.61,0,1,0,12.42,12.6A12.52,12.52,0,0,0,317.93,47.66Z'/%3e%3cpath%20class='cls-4'%20d='M212.18,101.22a4.12,4.12,0,0,1-3.05-1.26,4.17,4.17,0,0,1-1.26-3.1V43.34a4.37,4.37,0,0,1,1.3-3.14,4.26,4.26,0,0,1,3.13-1.3,4.19,4.19,0,0,1,3.1,1.26,4.32,4.32,0,0,1,1.26,3.16,20.77,20.77,0,0,1,13-4.54,21.51,21.51,0,0,1,0,43,20.51,20.51,0,0,1-13-4.57V96.86a4.15,4.15,0,0,1-1.3,3.06A4.5,4.5,0,0,1,212.18,101.22Zm17.43-53.63c-6.23,0-12.93,4.11-12.93,12.72a12.73,12.73,0,0,0,25.46,0A12.71,12.71,0,0,0,229.61,47.59Z'/%3e%3cpath%20class='cls-4'%20d='M365.76,81.76a21.5,21.5,0,1,1,21.18-21.5A21.37,21.37,0,0,1,365.76,81.76Zm0-34.1a12.61,12.61,0,1,0,12.42,12.6A12.52,12.52,0,0,0,365.76,47.66Z'/%3e%3c/svg%3e)