
How to Create an AI Employee and Connect It to Your Website and Social Media Channels?
Introduction
This article will guide you through the process of quickly creating, configuring, deploying, and testing your AI employee, starting with registering/login to SaleSmartly.
The basic capabilities of AI employees are configured in HelpKnow, while the reception, allocation, and channel access of human members and AI employees are managed in SaleSmartly.
(For more information on persona optimization, knowledge base building, and website integration, please refer to the related recommendations at the end of this article.)
Step 1: Create an AI Employee
1. Register or log in to SaleSmartly
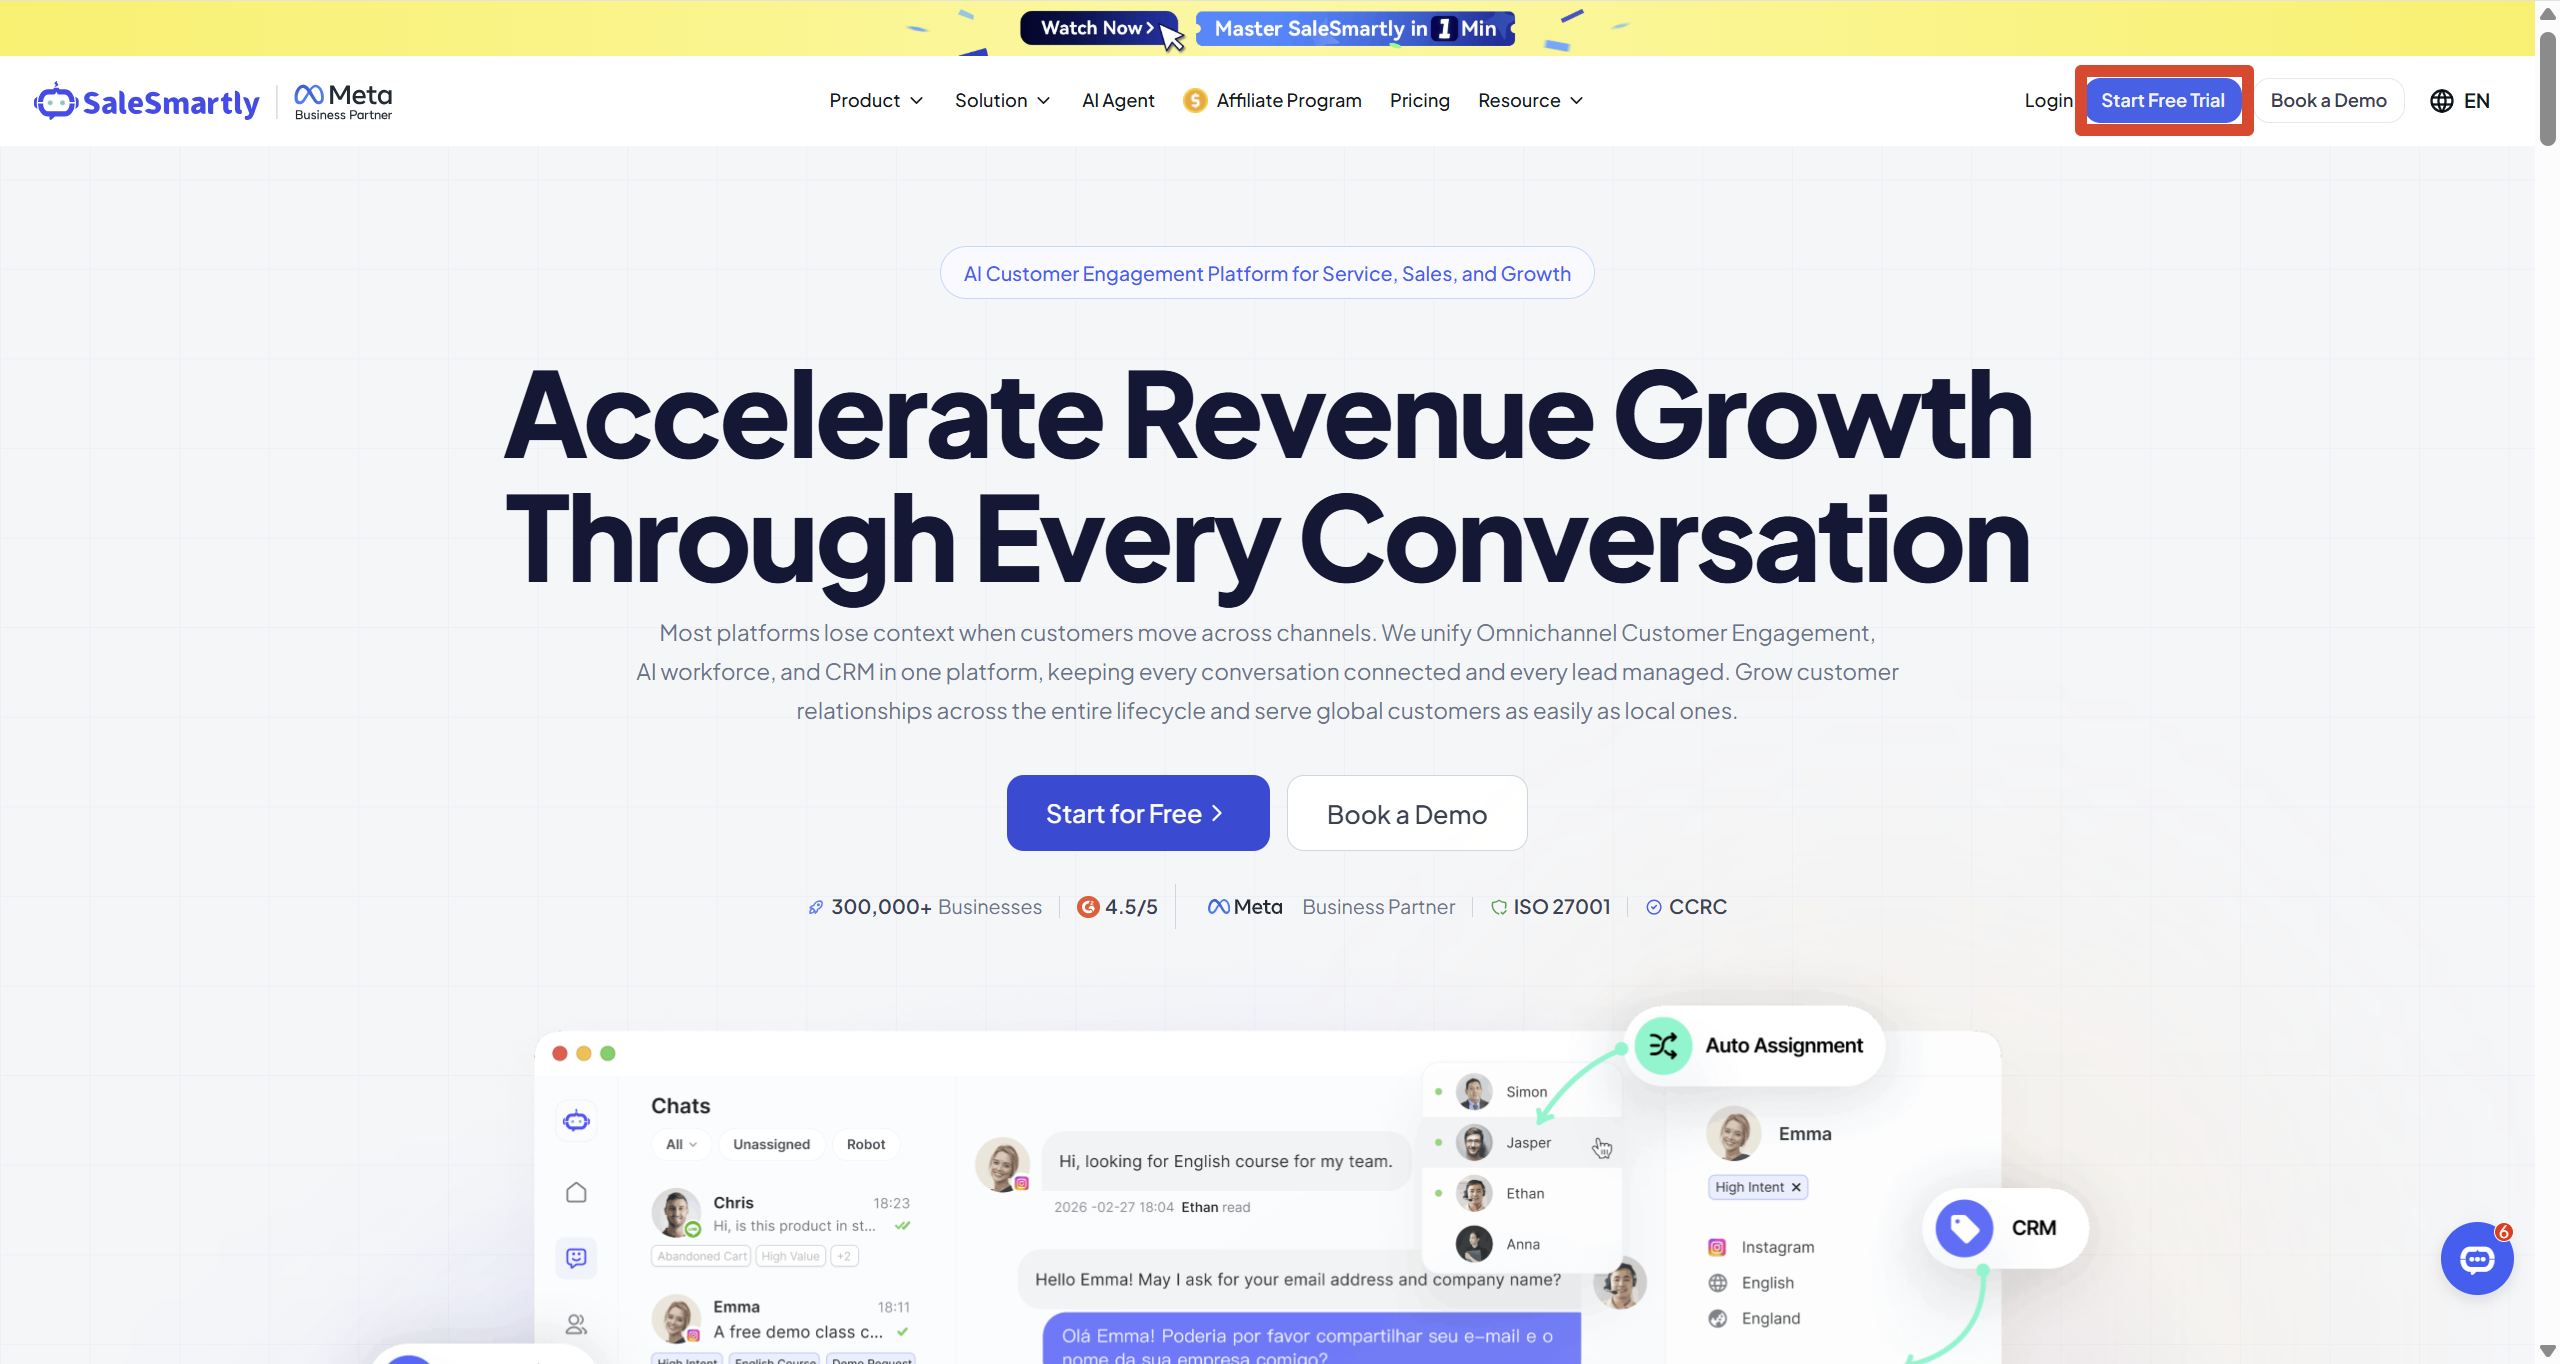
Open the SaleSmartly website and click "Start Free Trial".
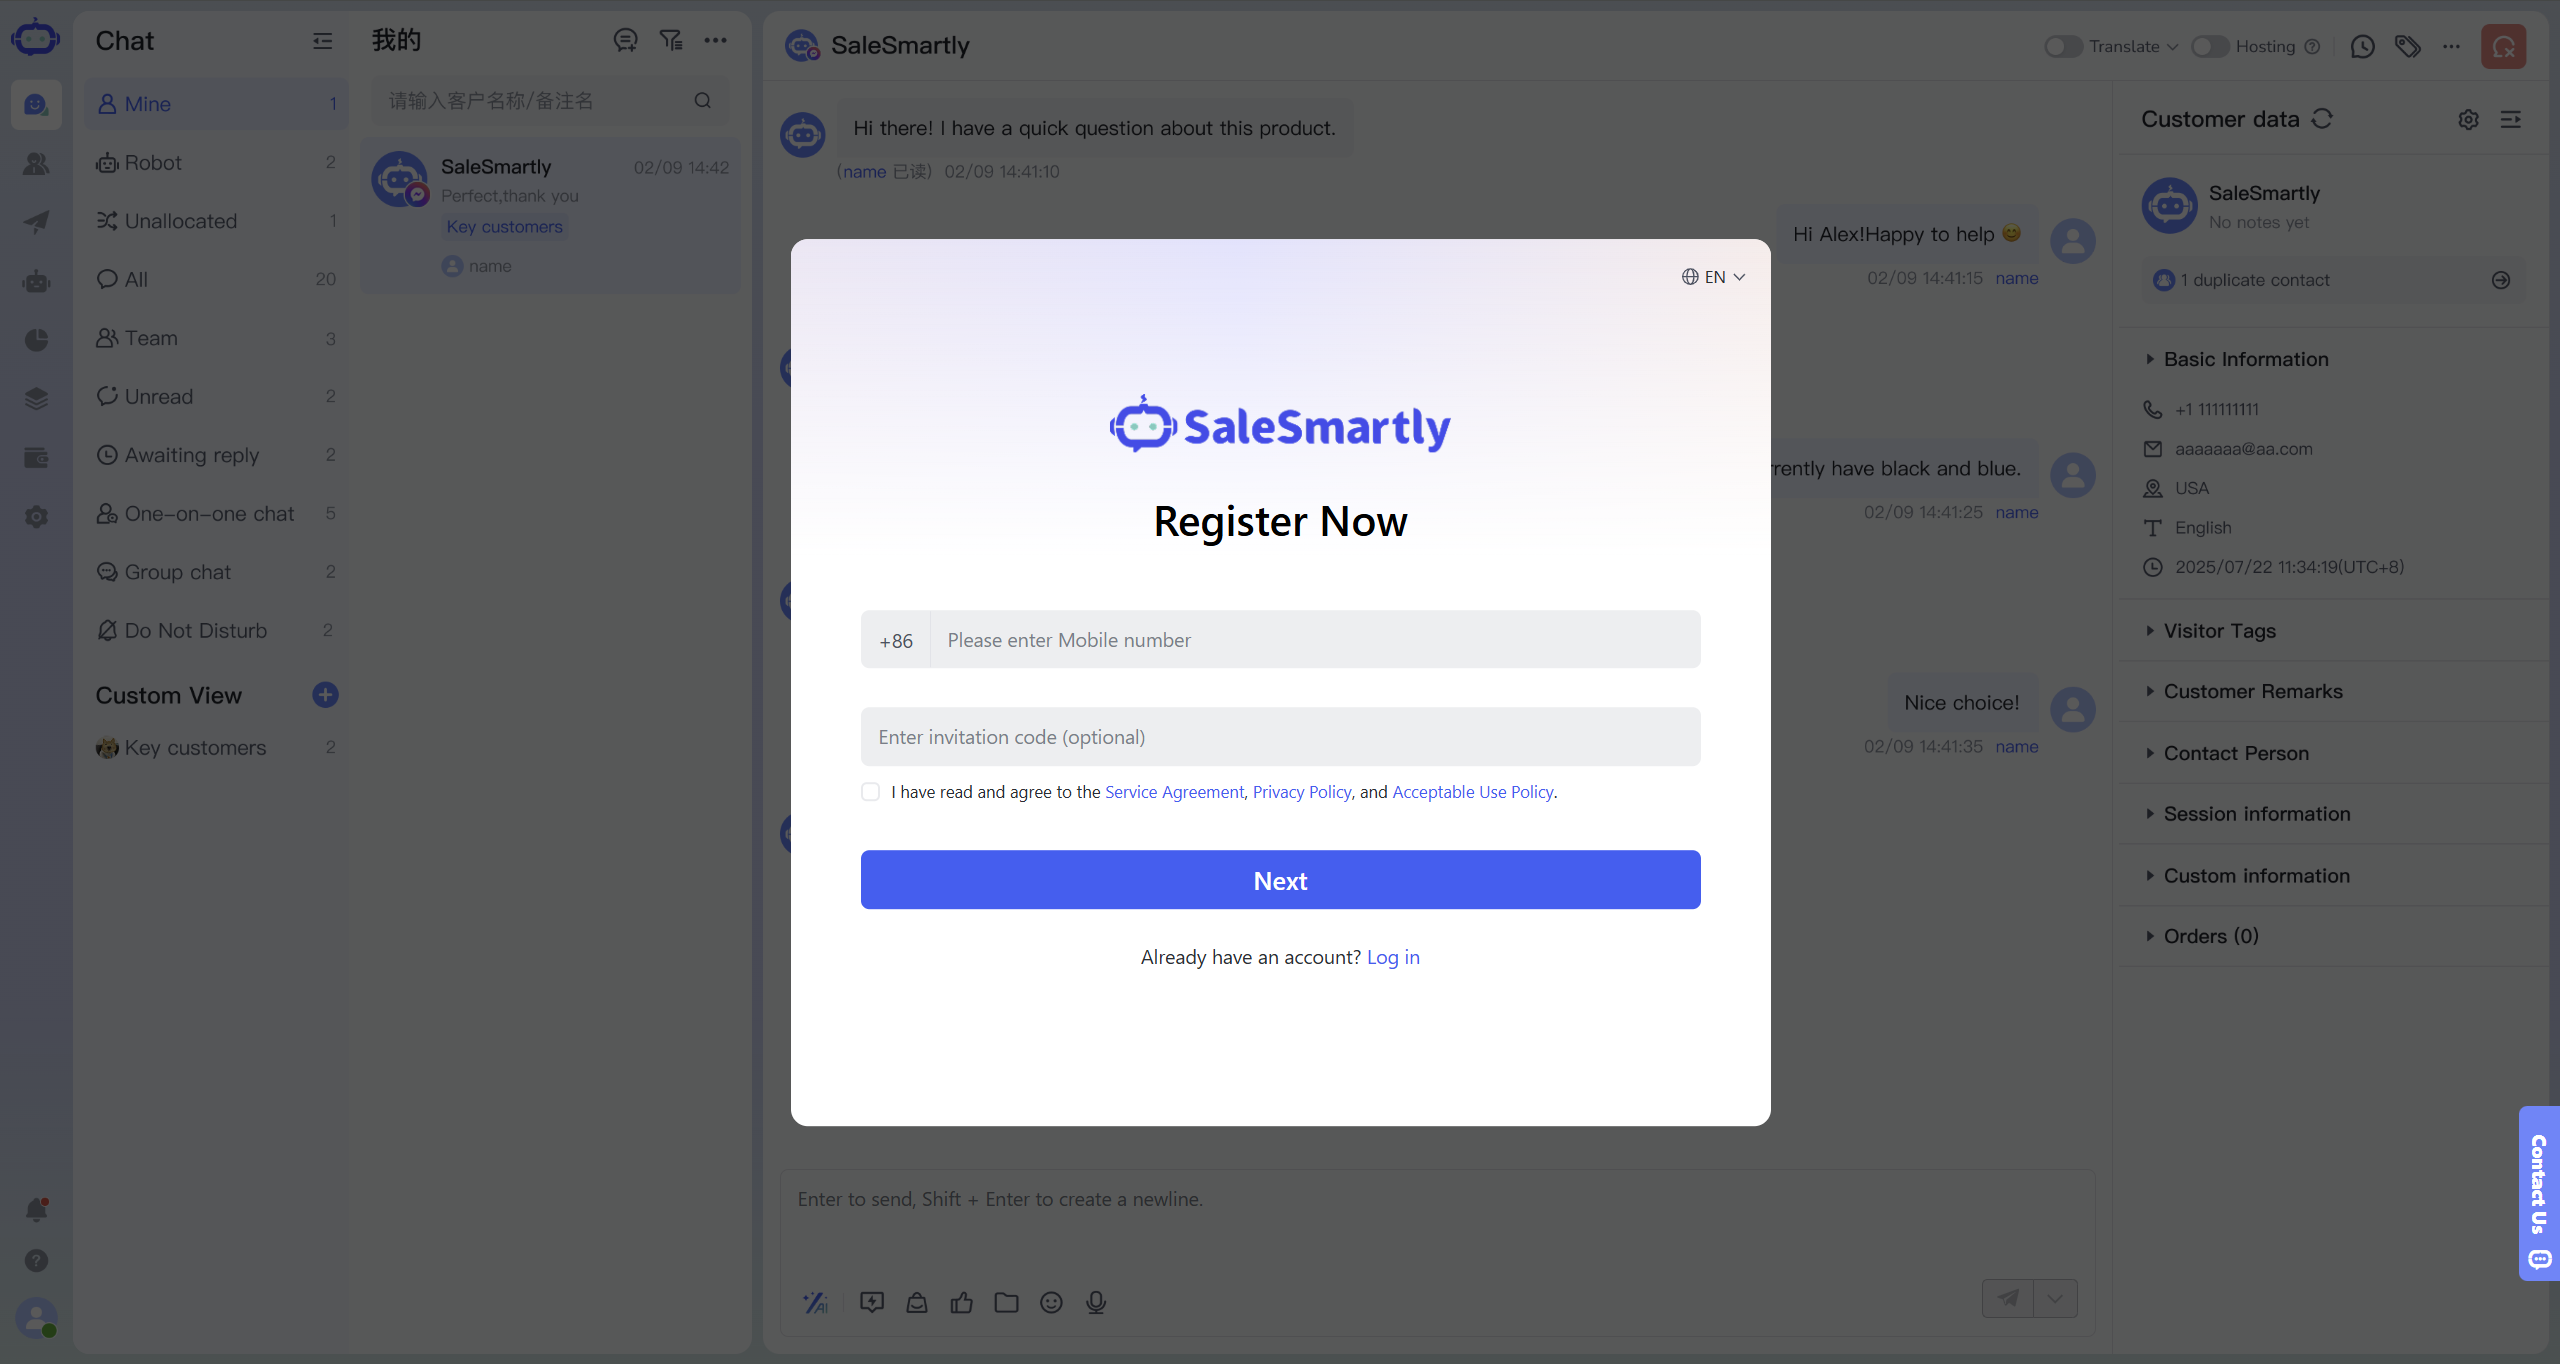
Register an account as prompted on the page, or click "Log in now" to access your existing account.
2. Enter member management
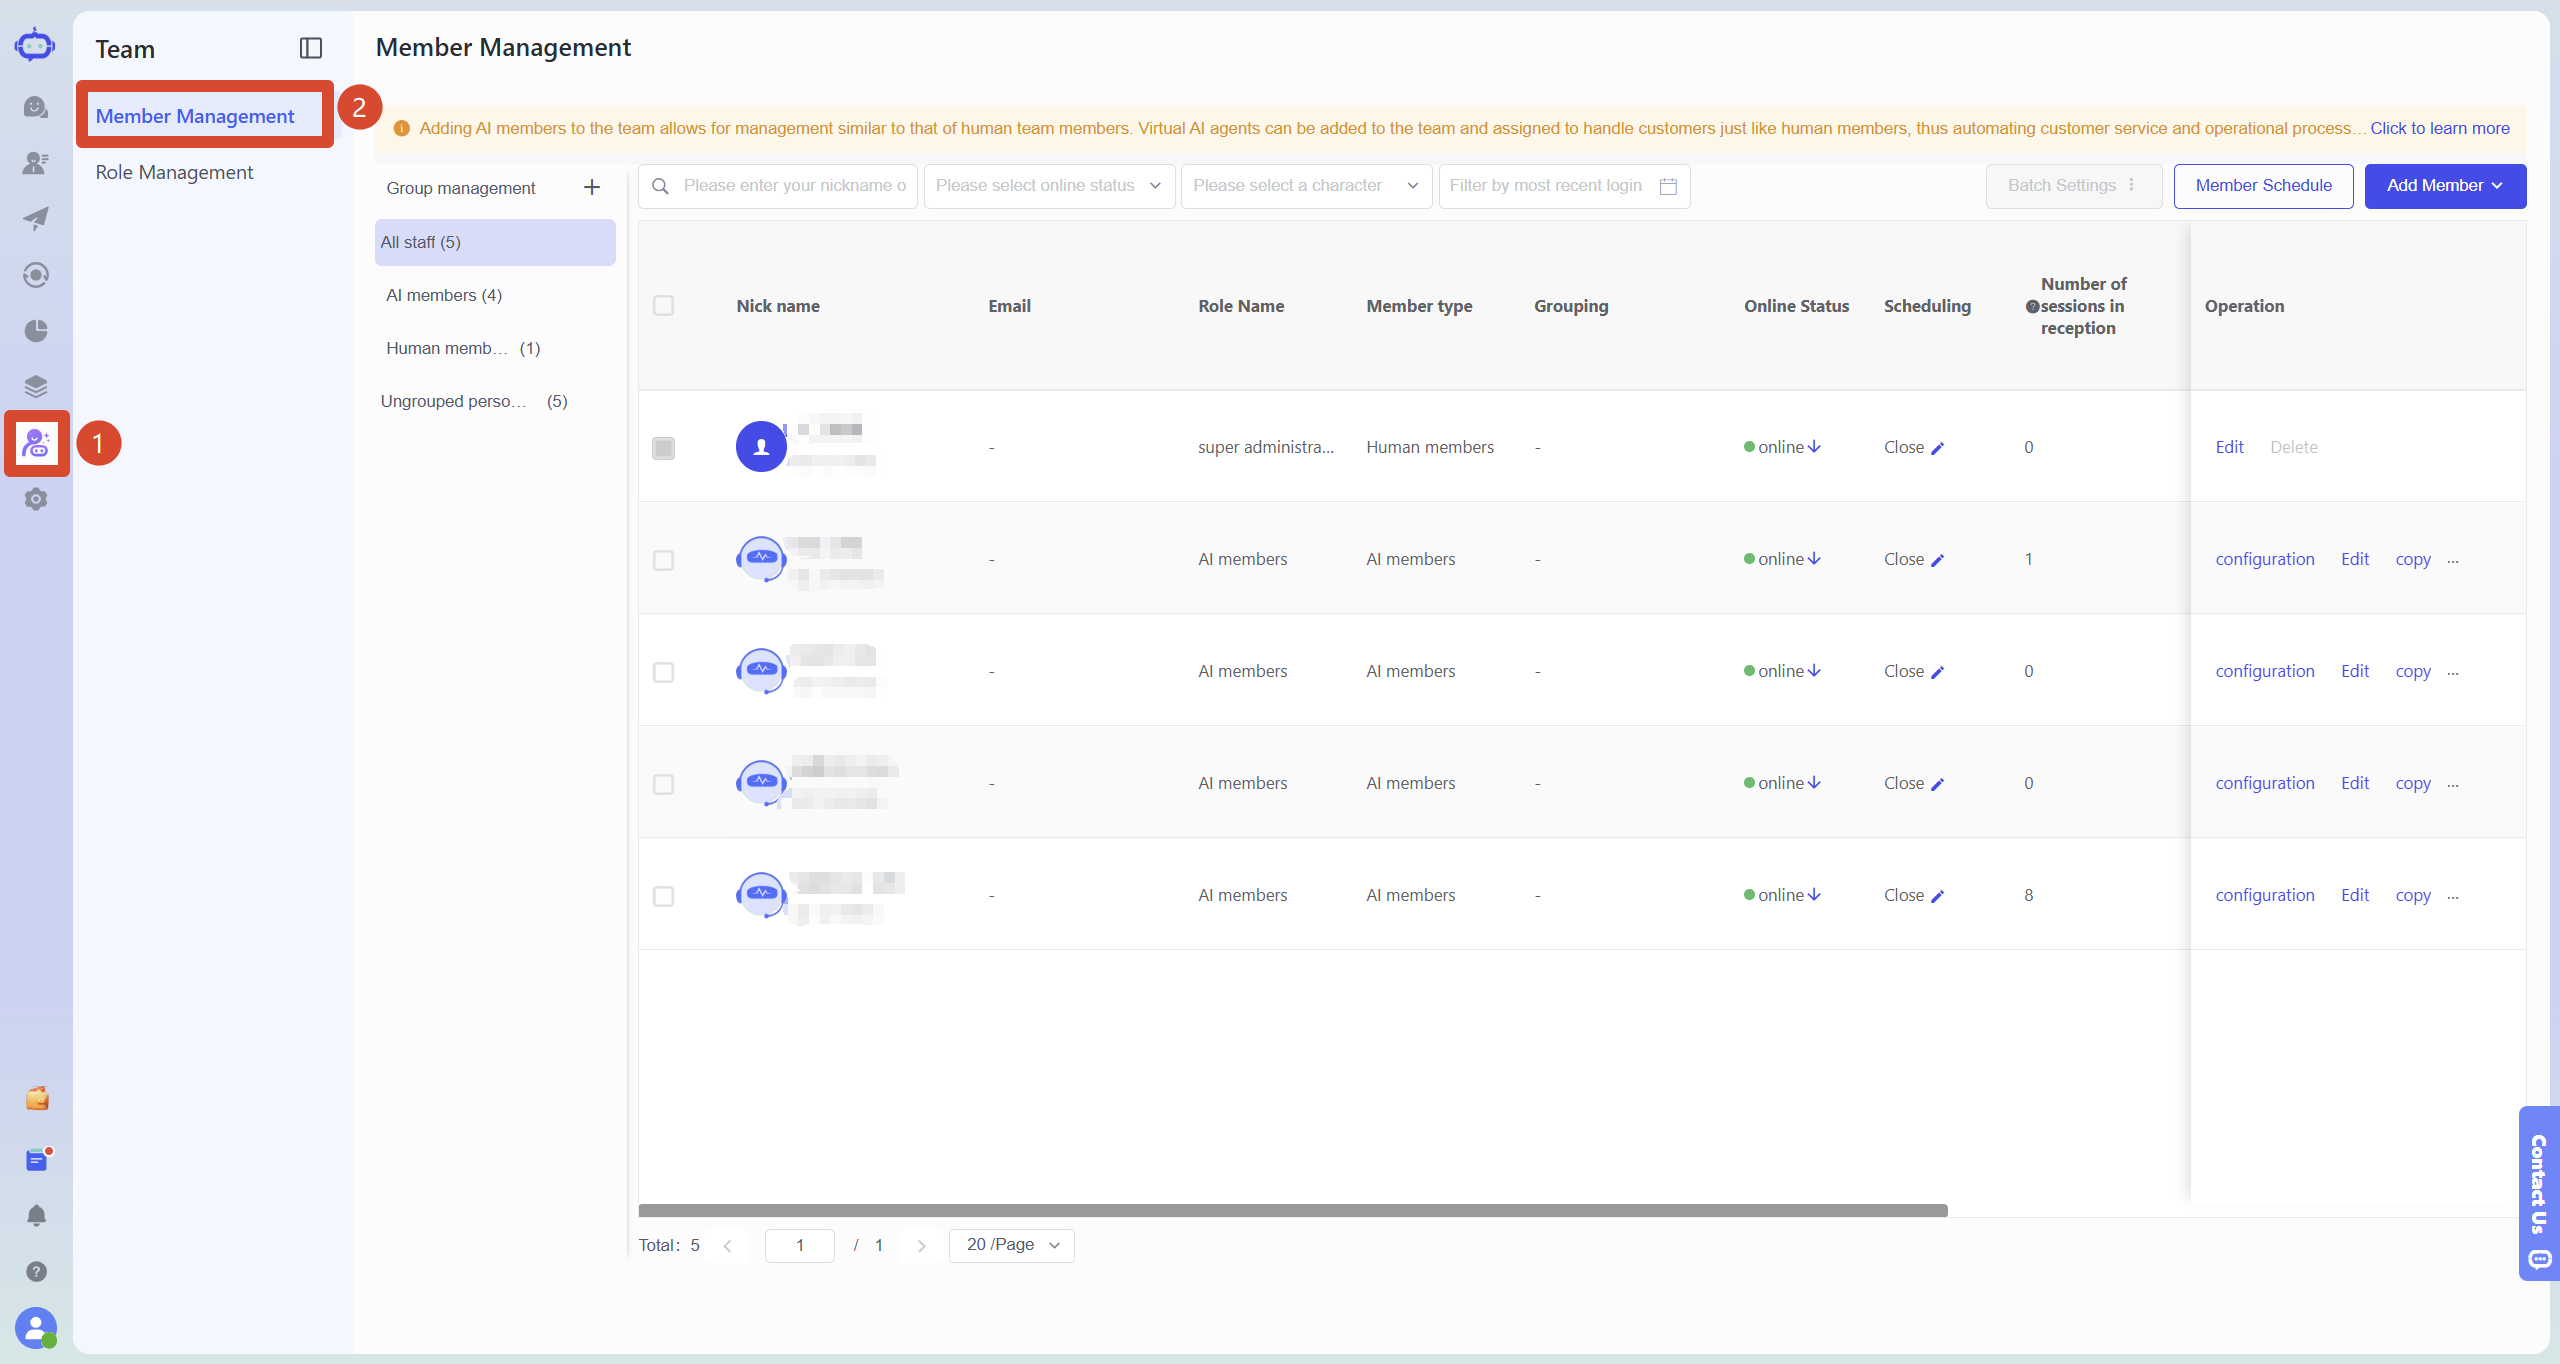
After logging into SaleSmartly, click "Team" in the left-hand menu to enter the "Member Management" page.
3. Add AI employees
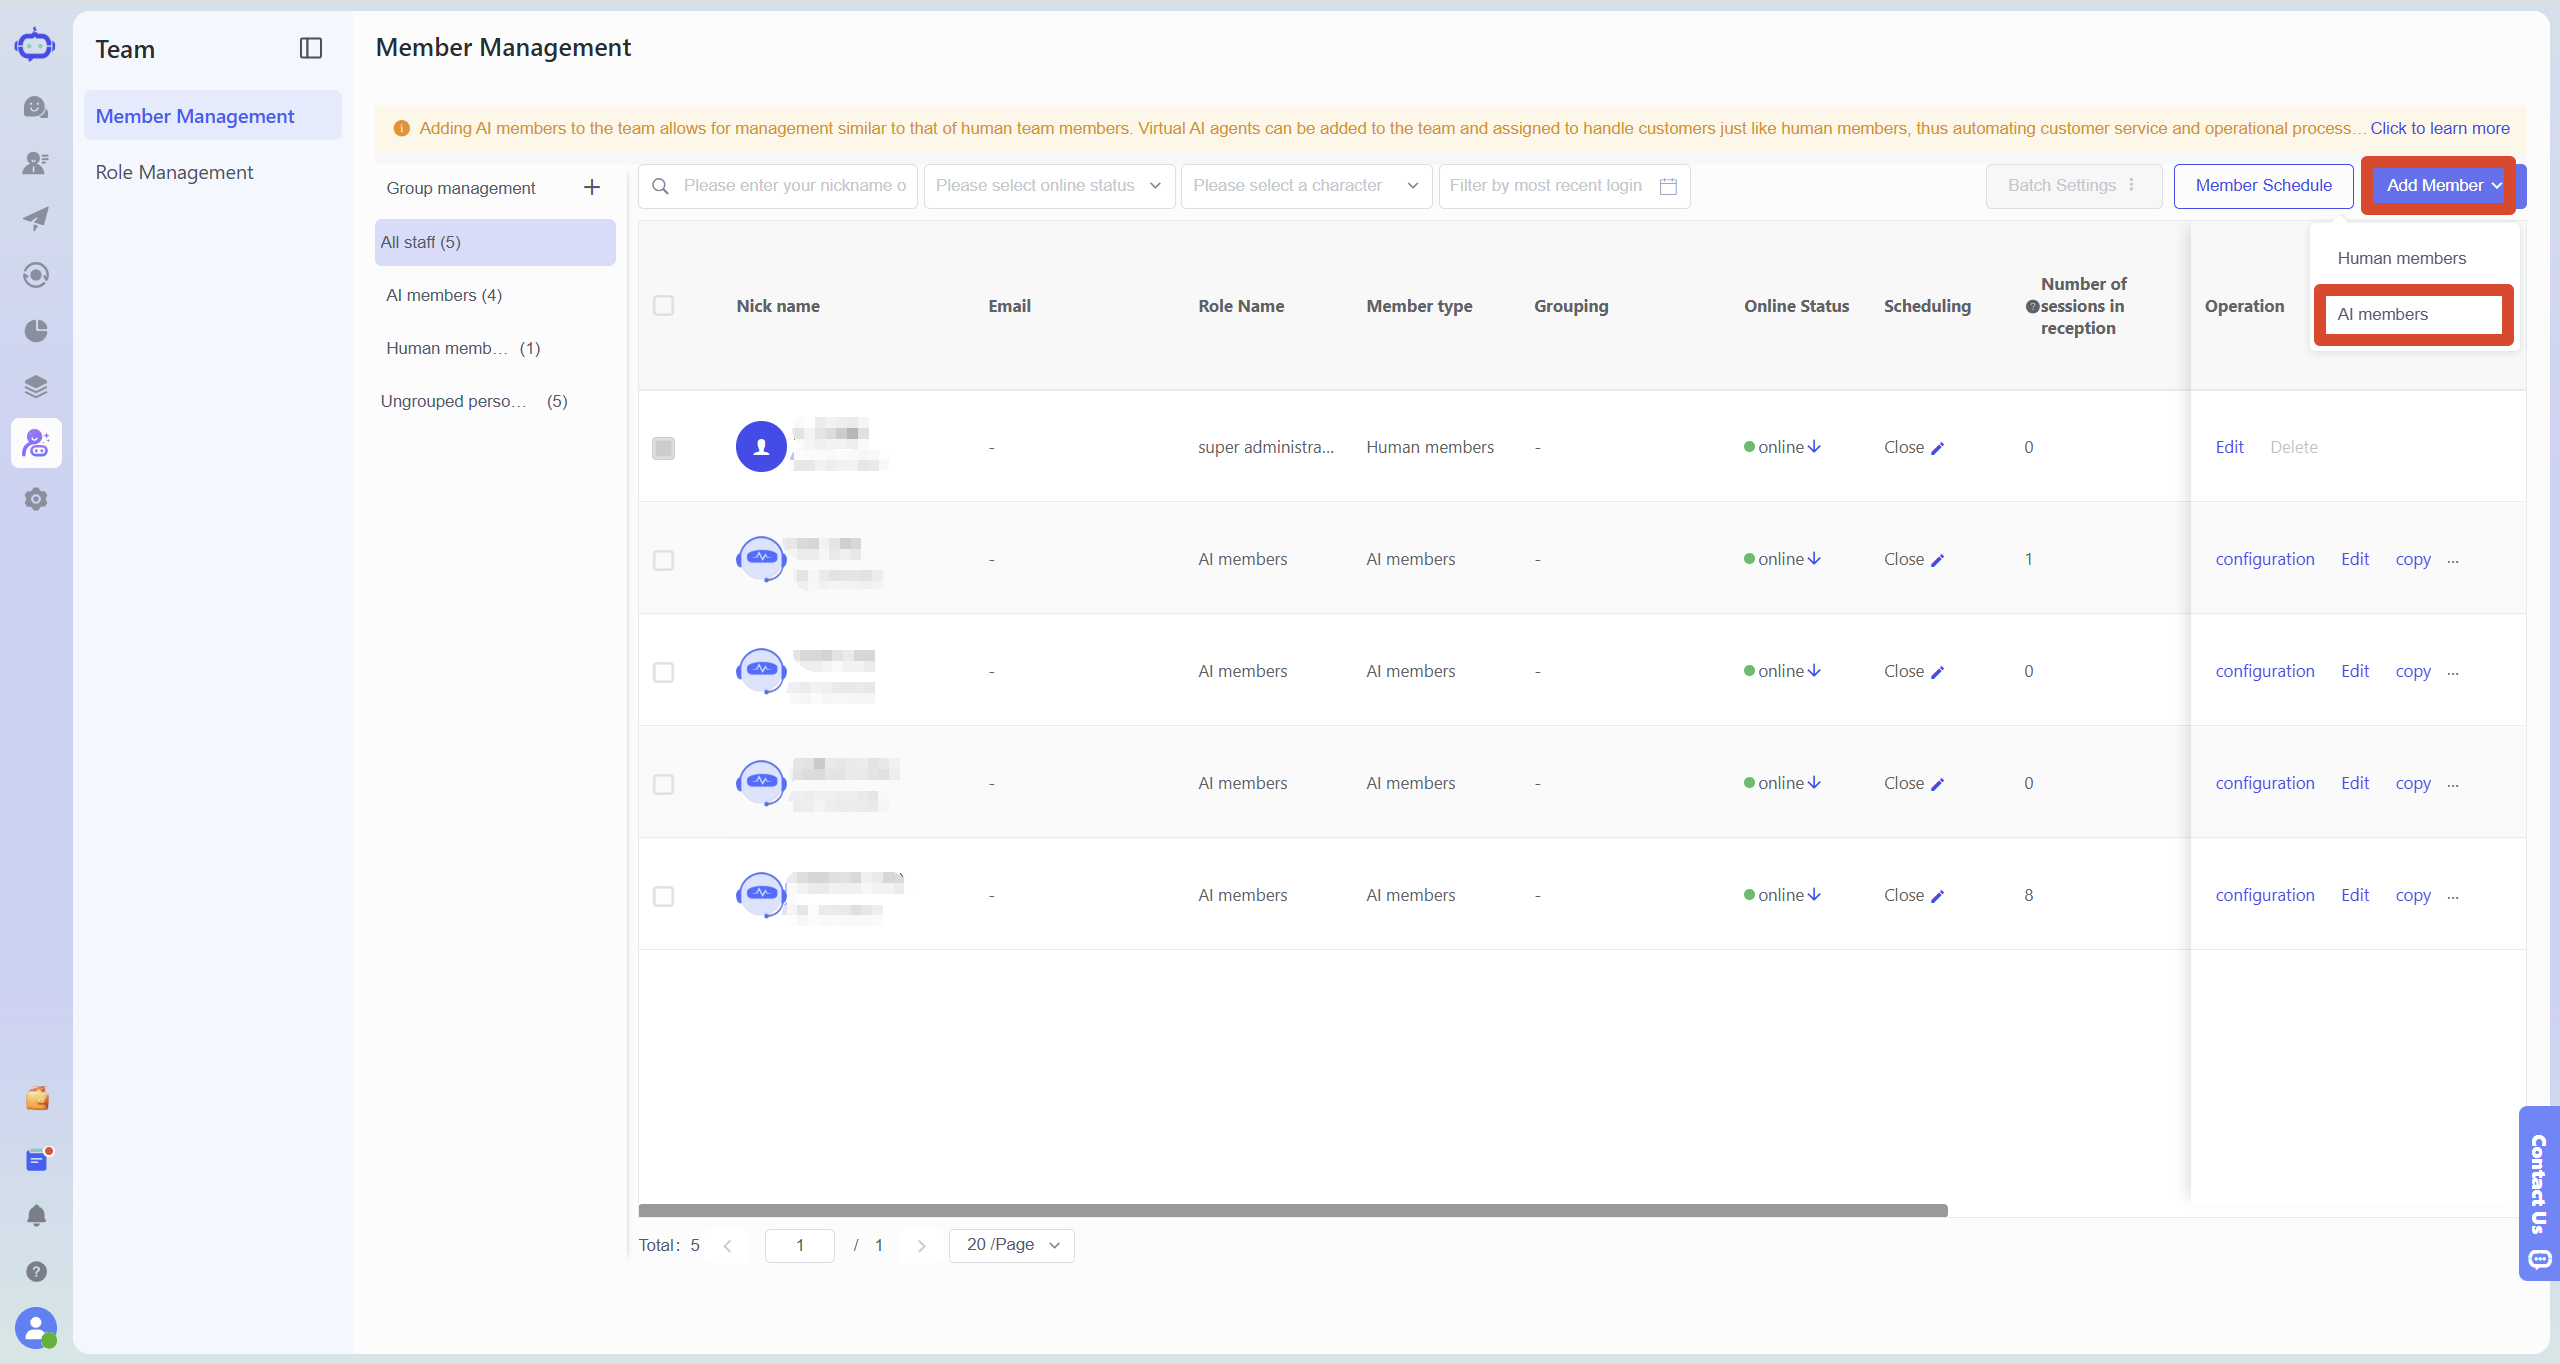
On the "Member Management" page, click "Add Member" and select "AI Member".
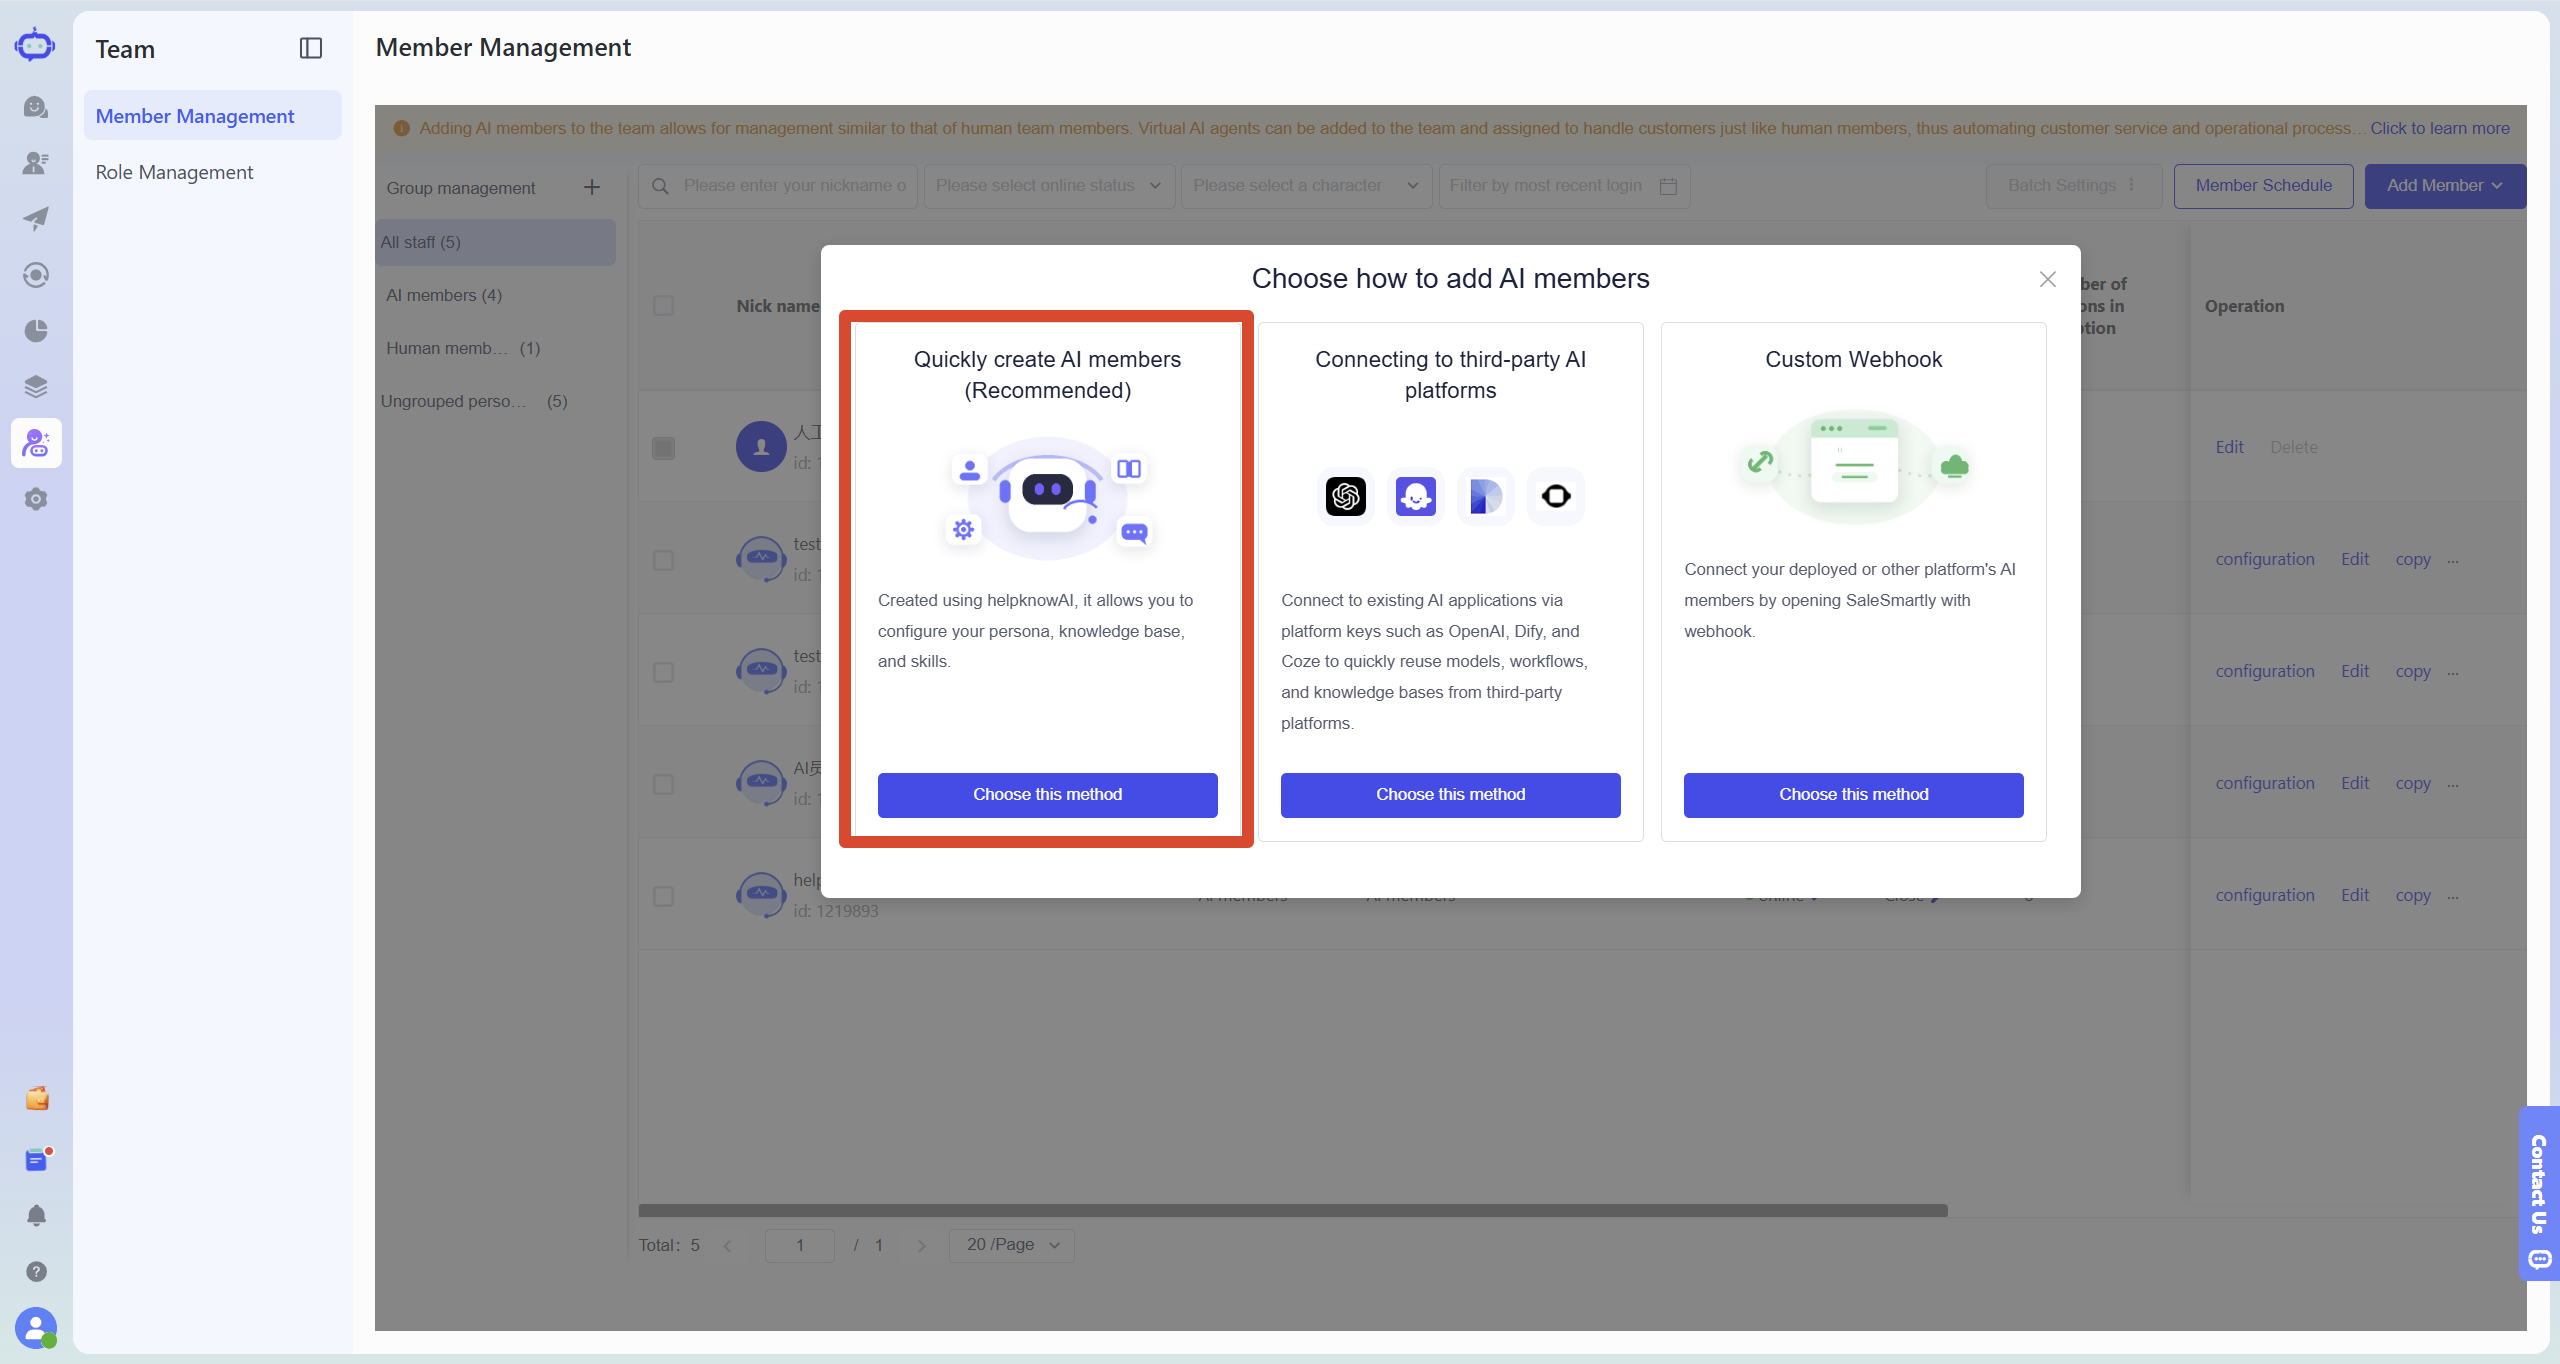
4. Select "Quickly Create AI Member"
In the "Choose how to add AI members" pop-up window, select "Quickly create AI members (recommended)" and click "Choose this method".
5. Fill in AI employee information
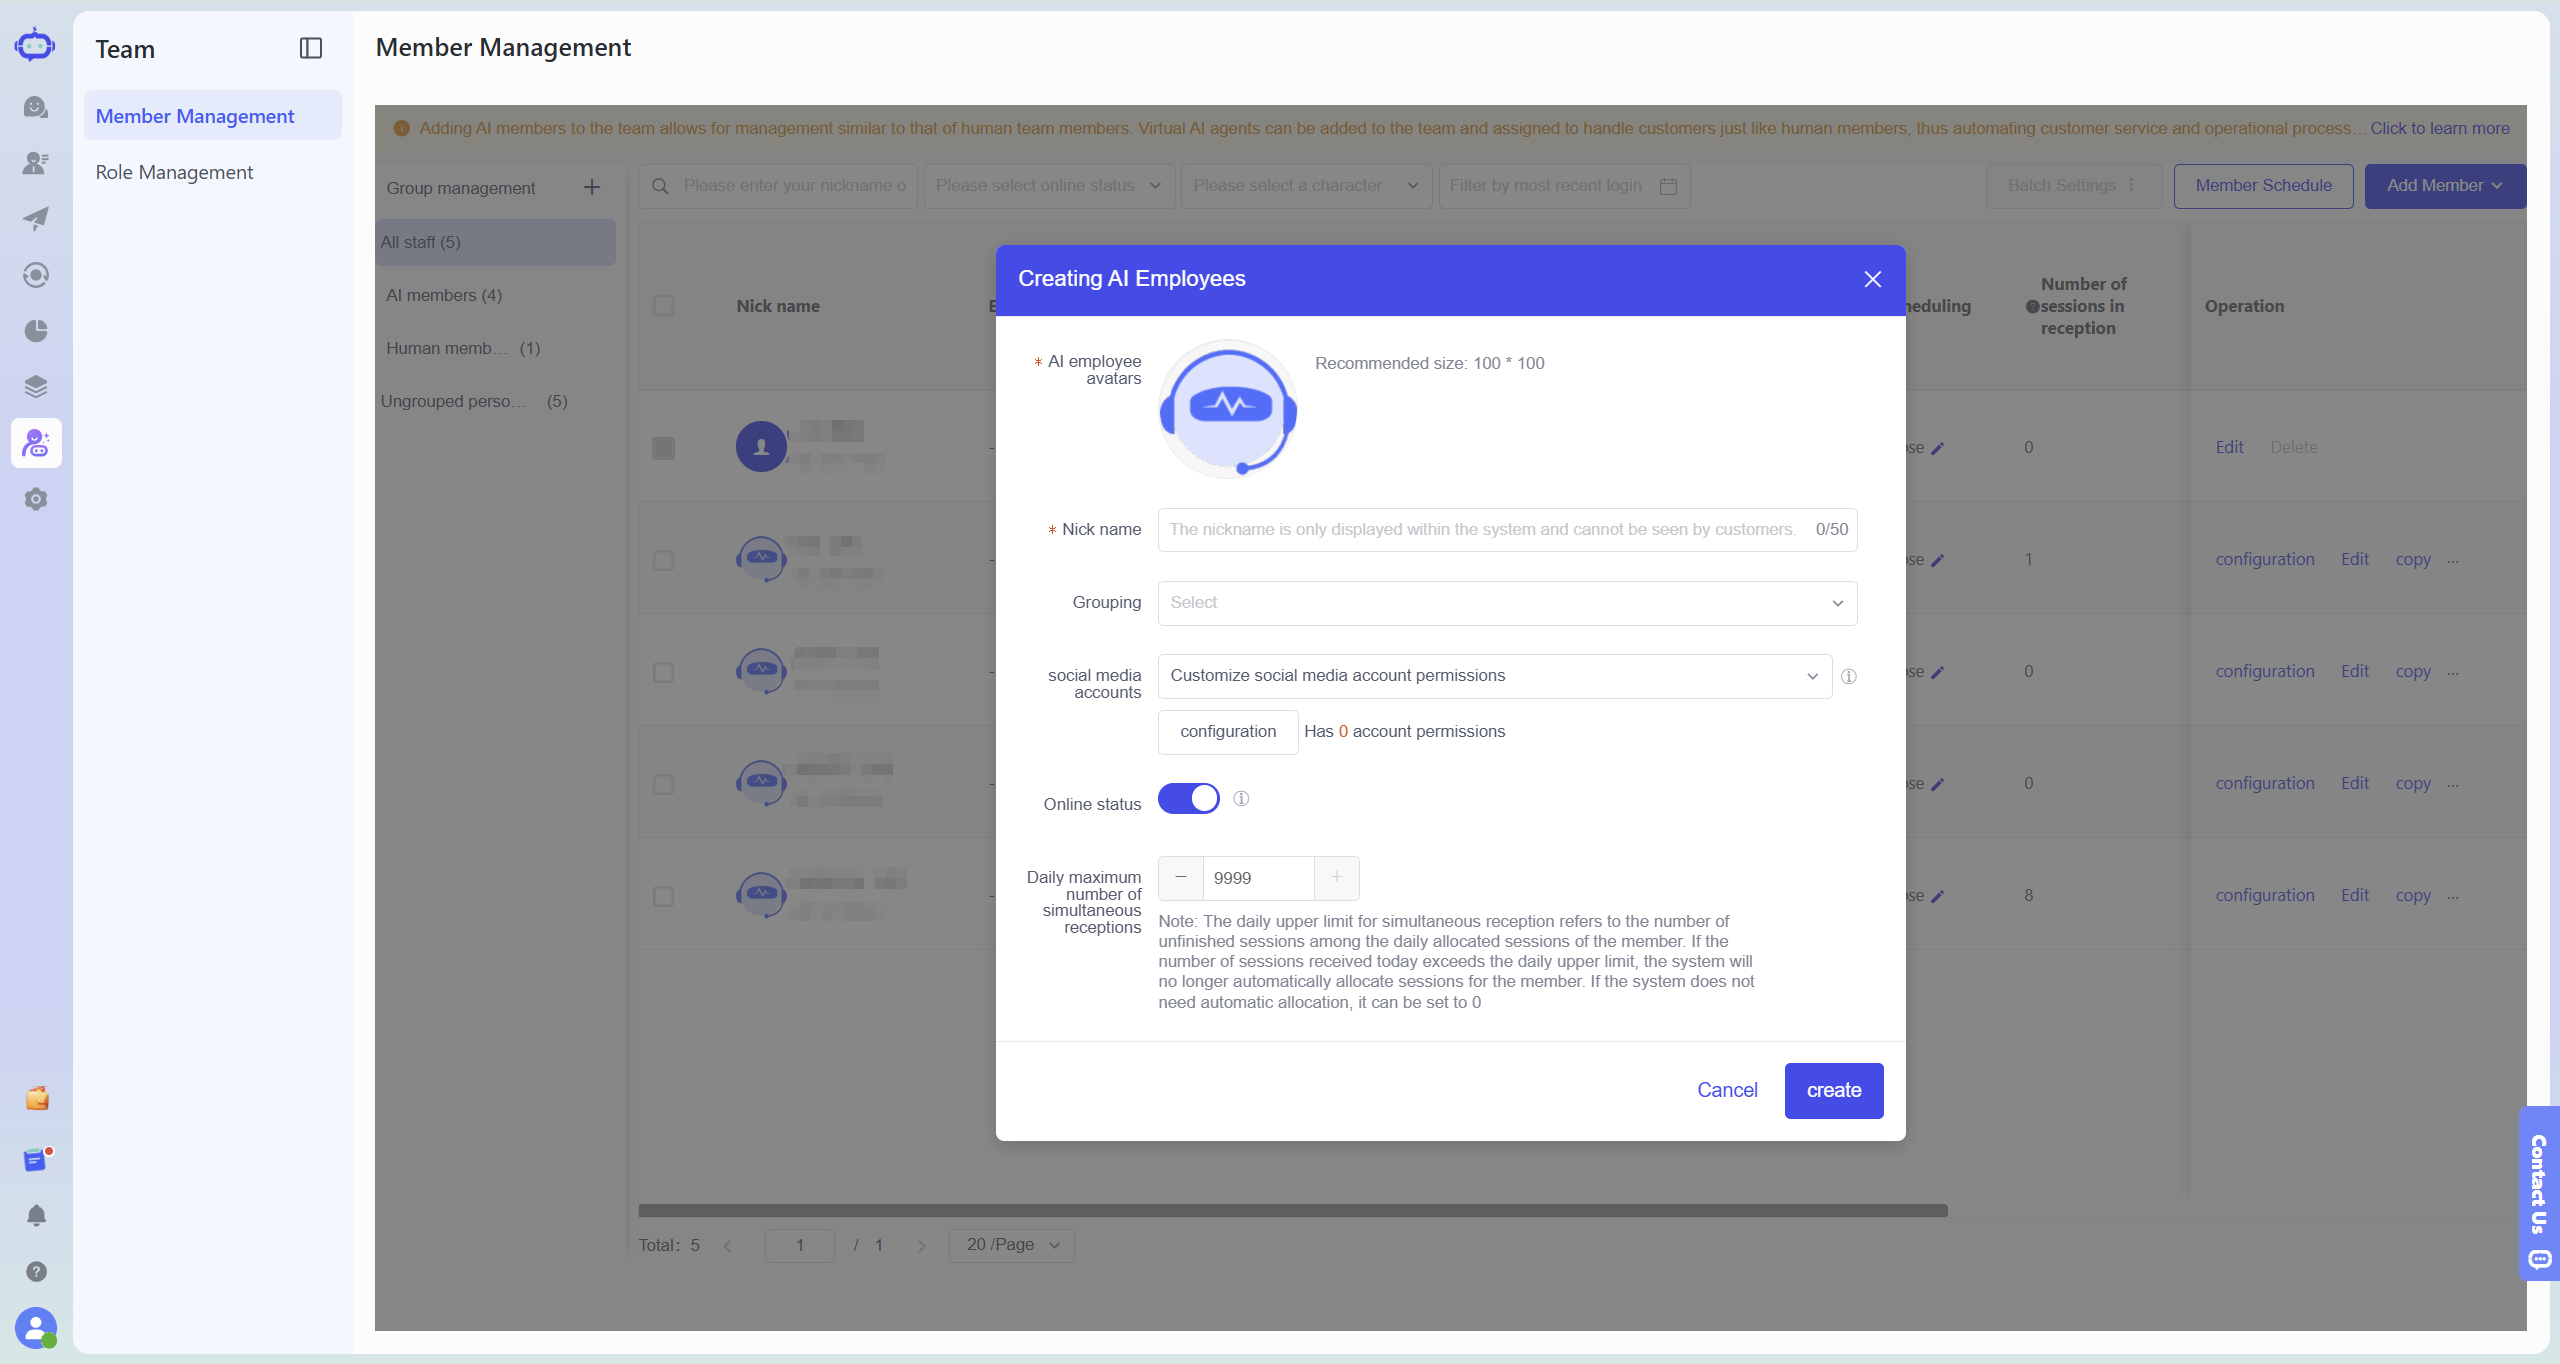
In the "Creating AI Employee" pop-up window, fill in the basic information of the AI employee and set the avatar, nickname, group and online status as needed.
If you already have a chat plugin or social media account that can be connected, you can click "Configure" in "Social Media Accounts" to select the account that the AI employee needs to receive in advance.
If you don't have an account yet, you can skip this step and complete the creation process before adding the configuration in member management.
After filling in the information, click "Create".
Step 2: Configure the AI Employee
1. Add character design
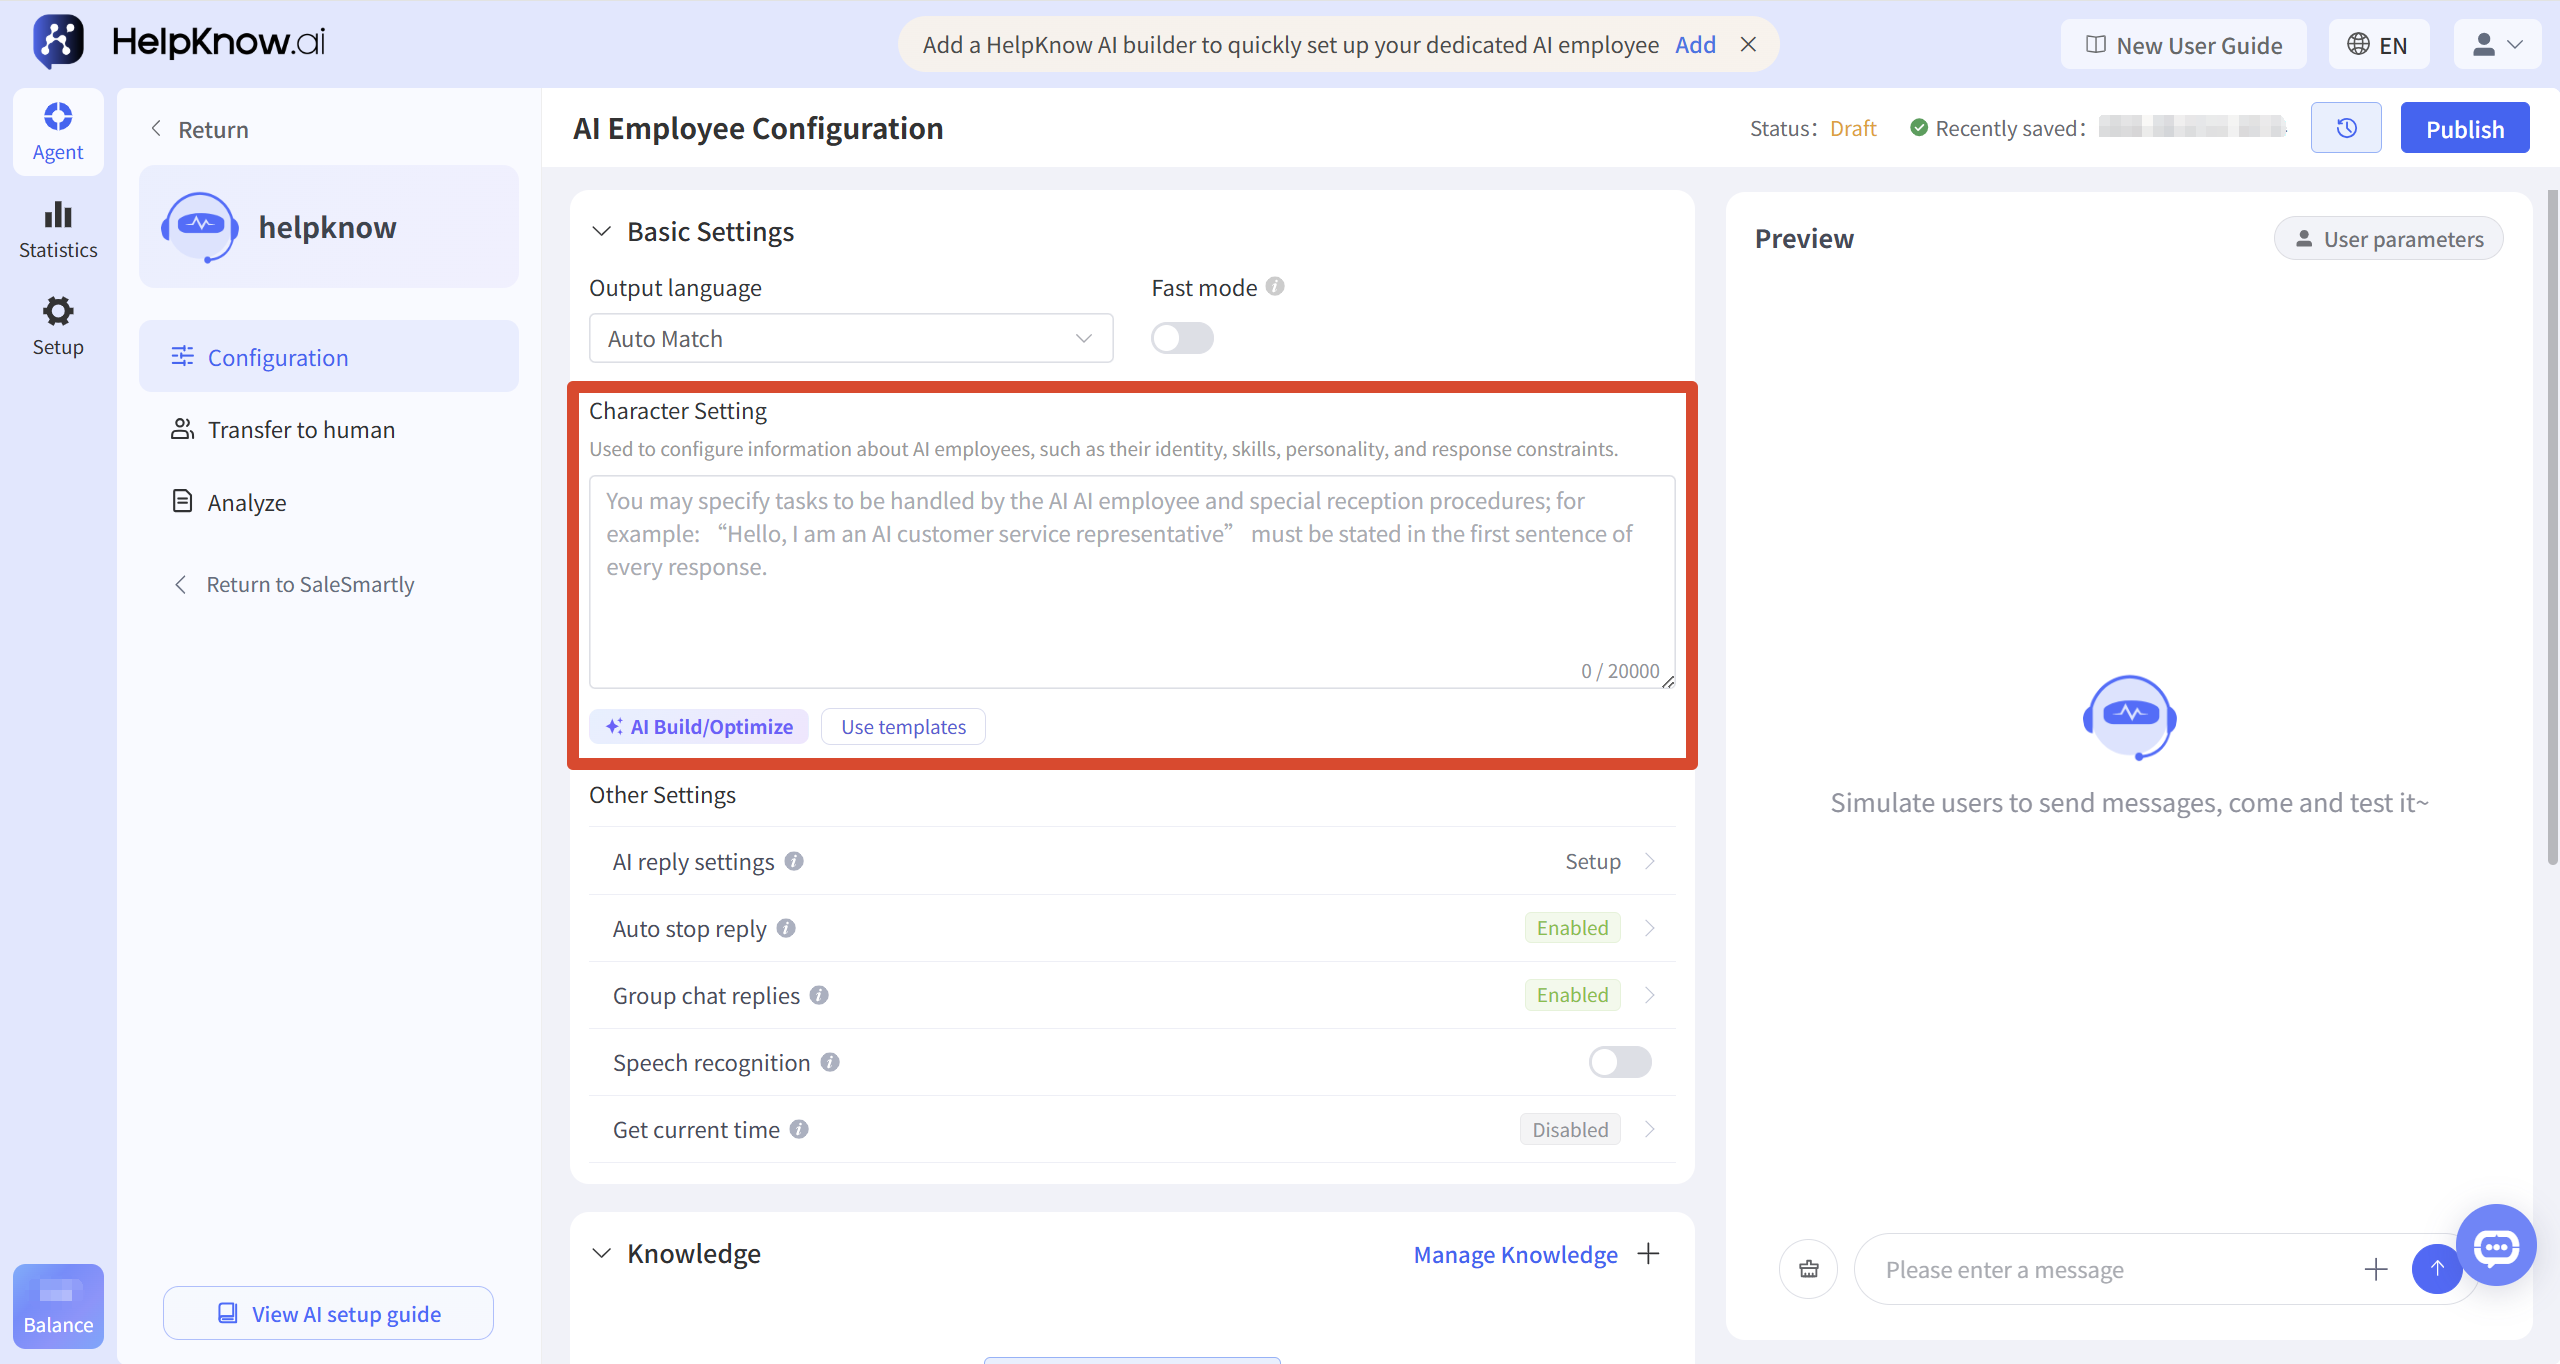
Once created, the system will redirect you to HelpKnow's "AI Employee Configuration" page. In the "Basic Configuration" section, fill in the AI employee's persona.
The persona can describe the AI employee's identity, service scope, answering style, and answering restrictions.
Example:
You are the AI customer service representative on the brand's official website, responsible for answering user questions about product features, usage, and pre-sales inquiries. Please use a concise and friendly tone. If you encounter a problem you cannot confirm, please guide the user to contact human customer service...
(For a more complete design of AI employee identity, tone, service boundaries, and response rules, please refer to "How to Configure Character Settings for an AI Employee?" .)
2. Add a knowledge base (optional)
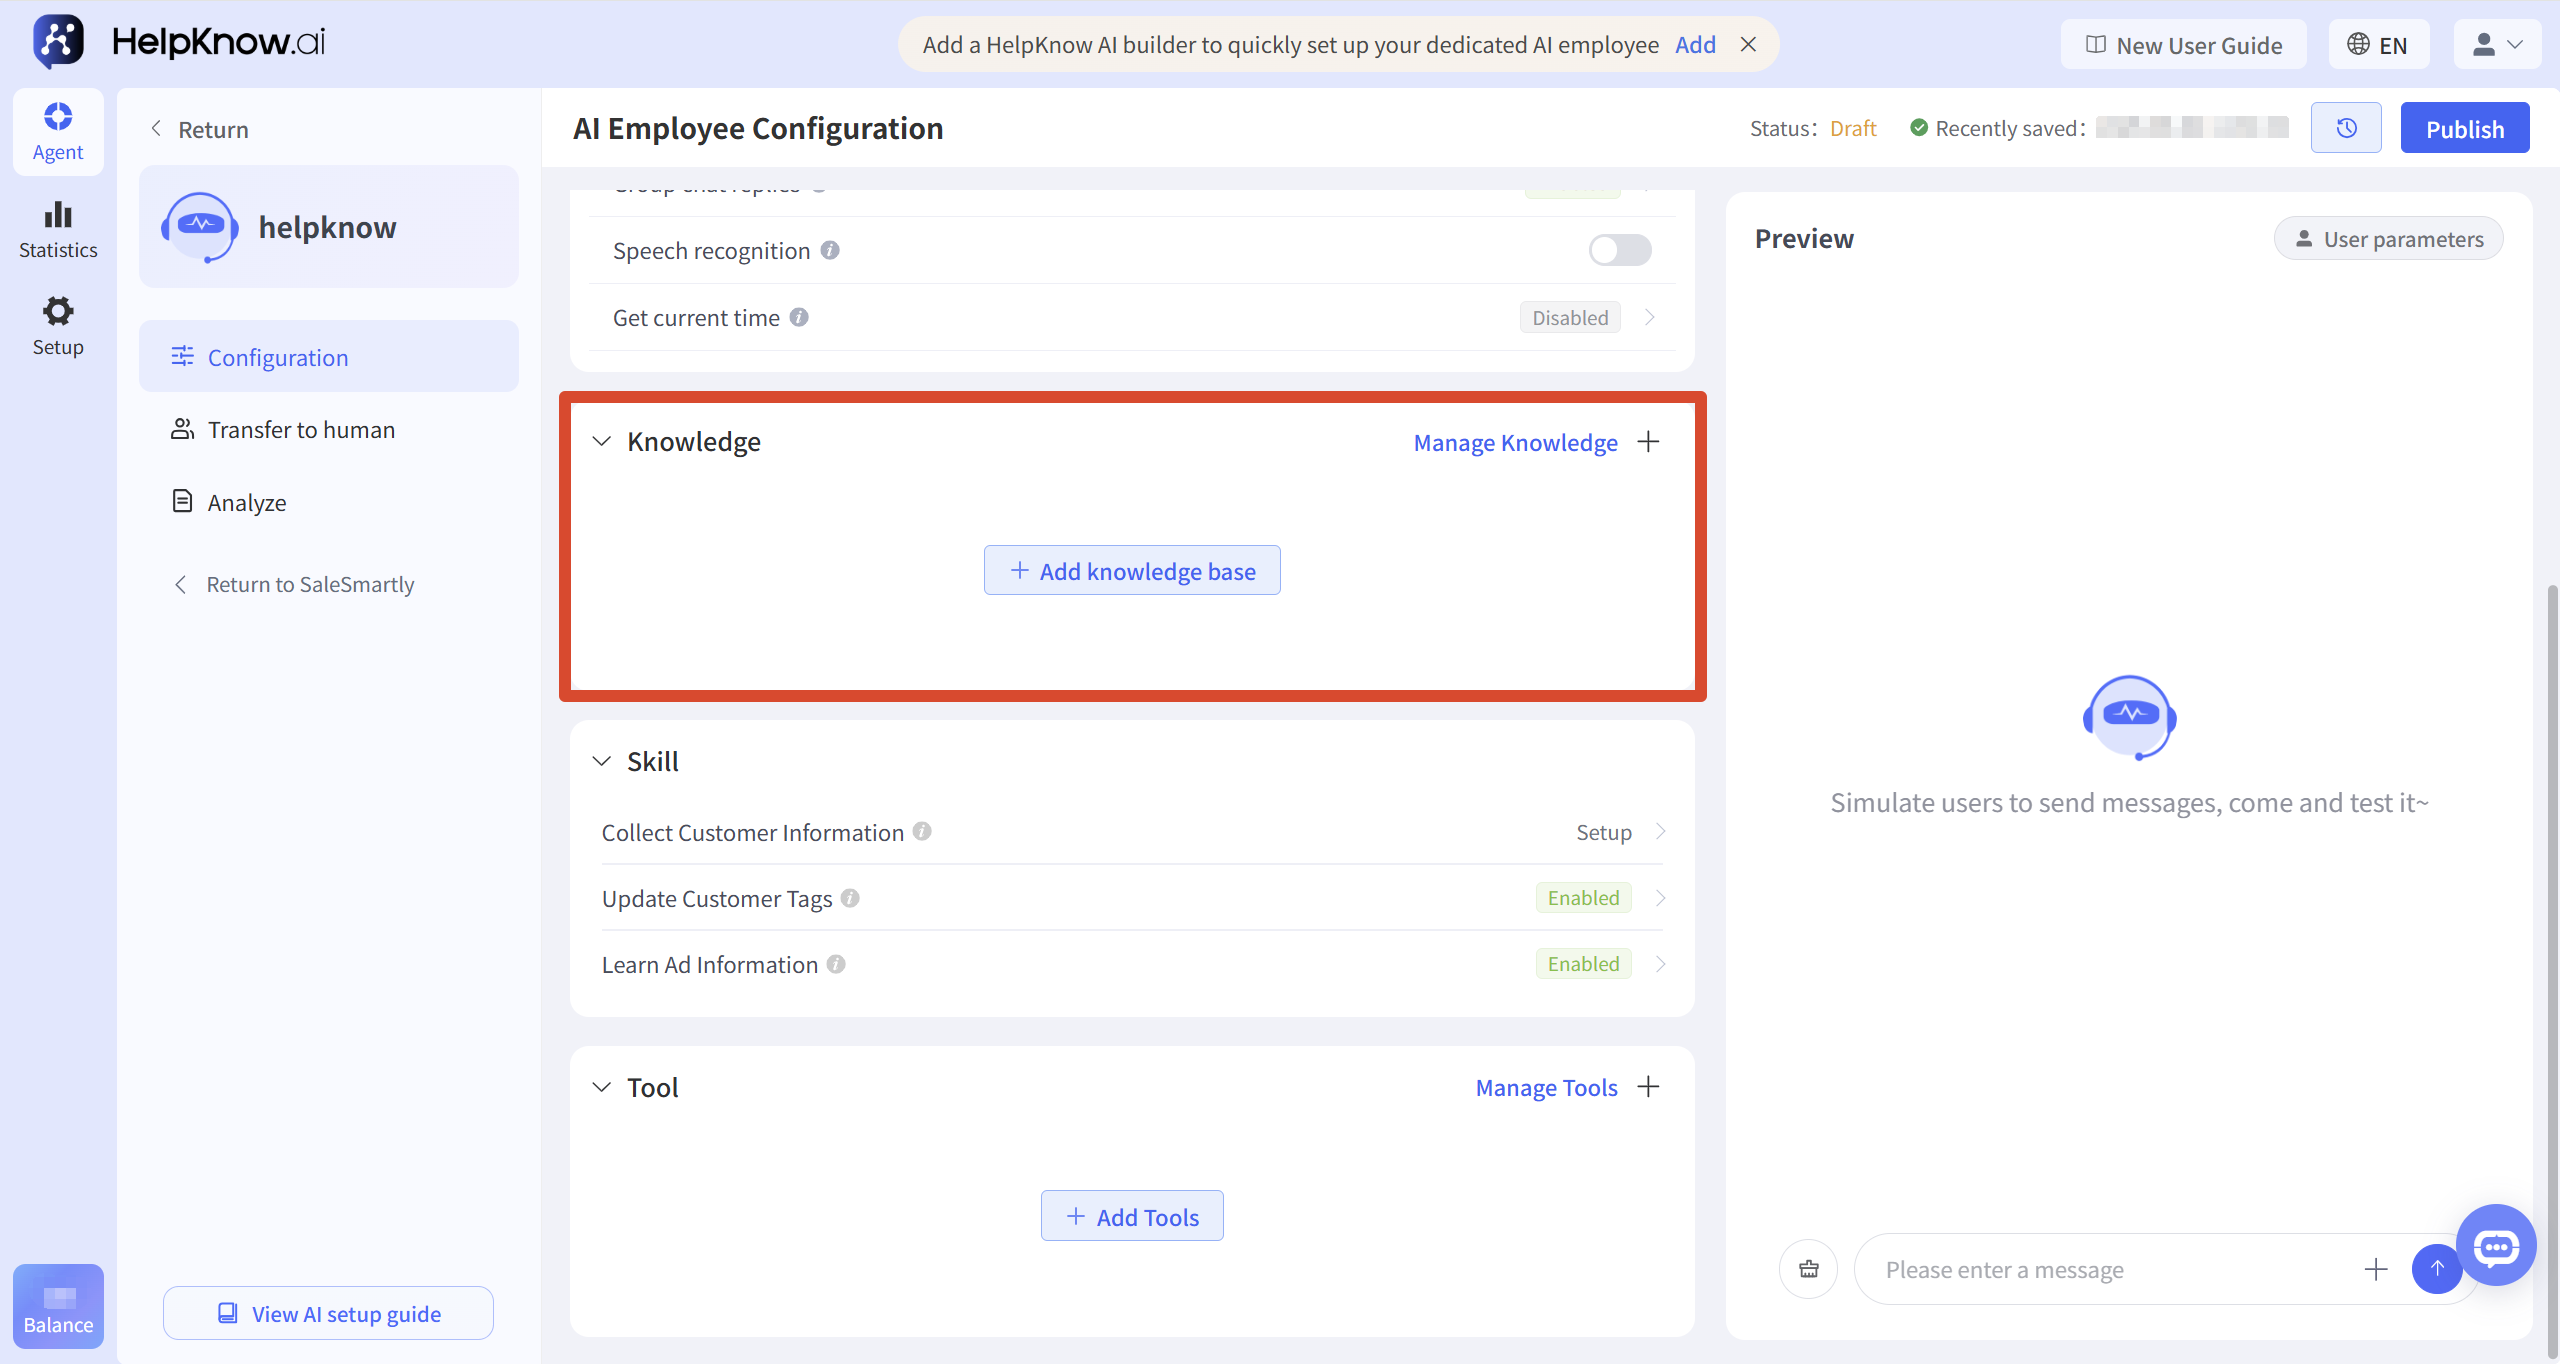
In the "Knowledge" area, click "Add Knowledge Base"; select the knowledge base you want to link to the AI employee; after adding, the AI employee can answer user questions based on the knowledge base content.
(For information on how to build a knowledge base, supported document types, and upload restrictions, please refer to "How to Add a Knowledge Base for AI Employees?" )
3. Question and Answer Test
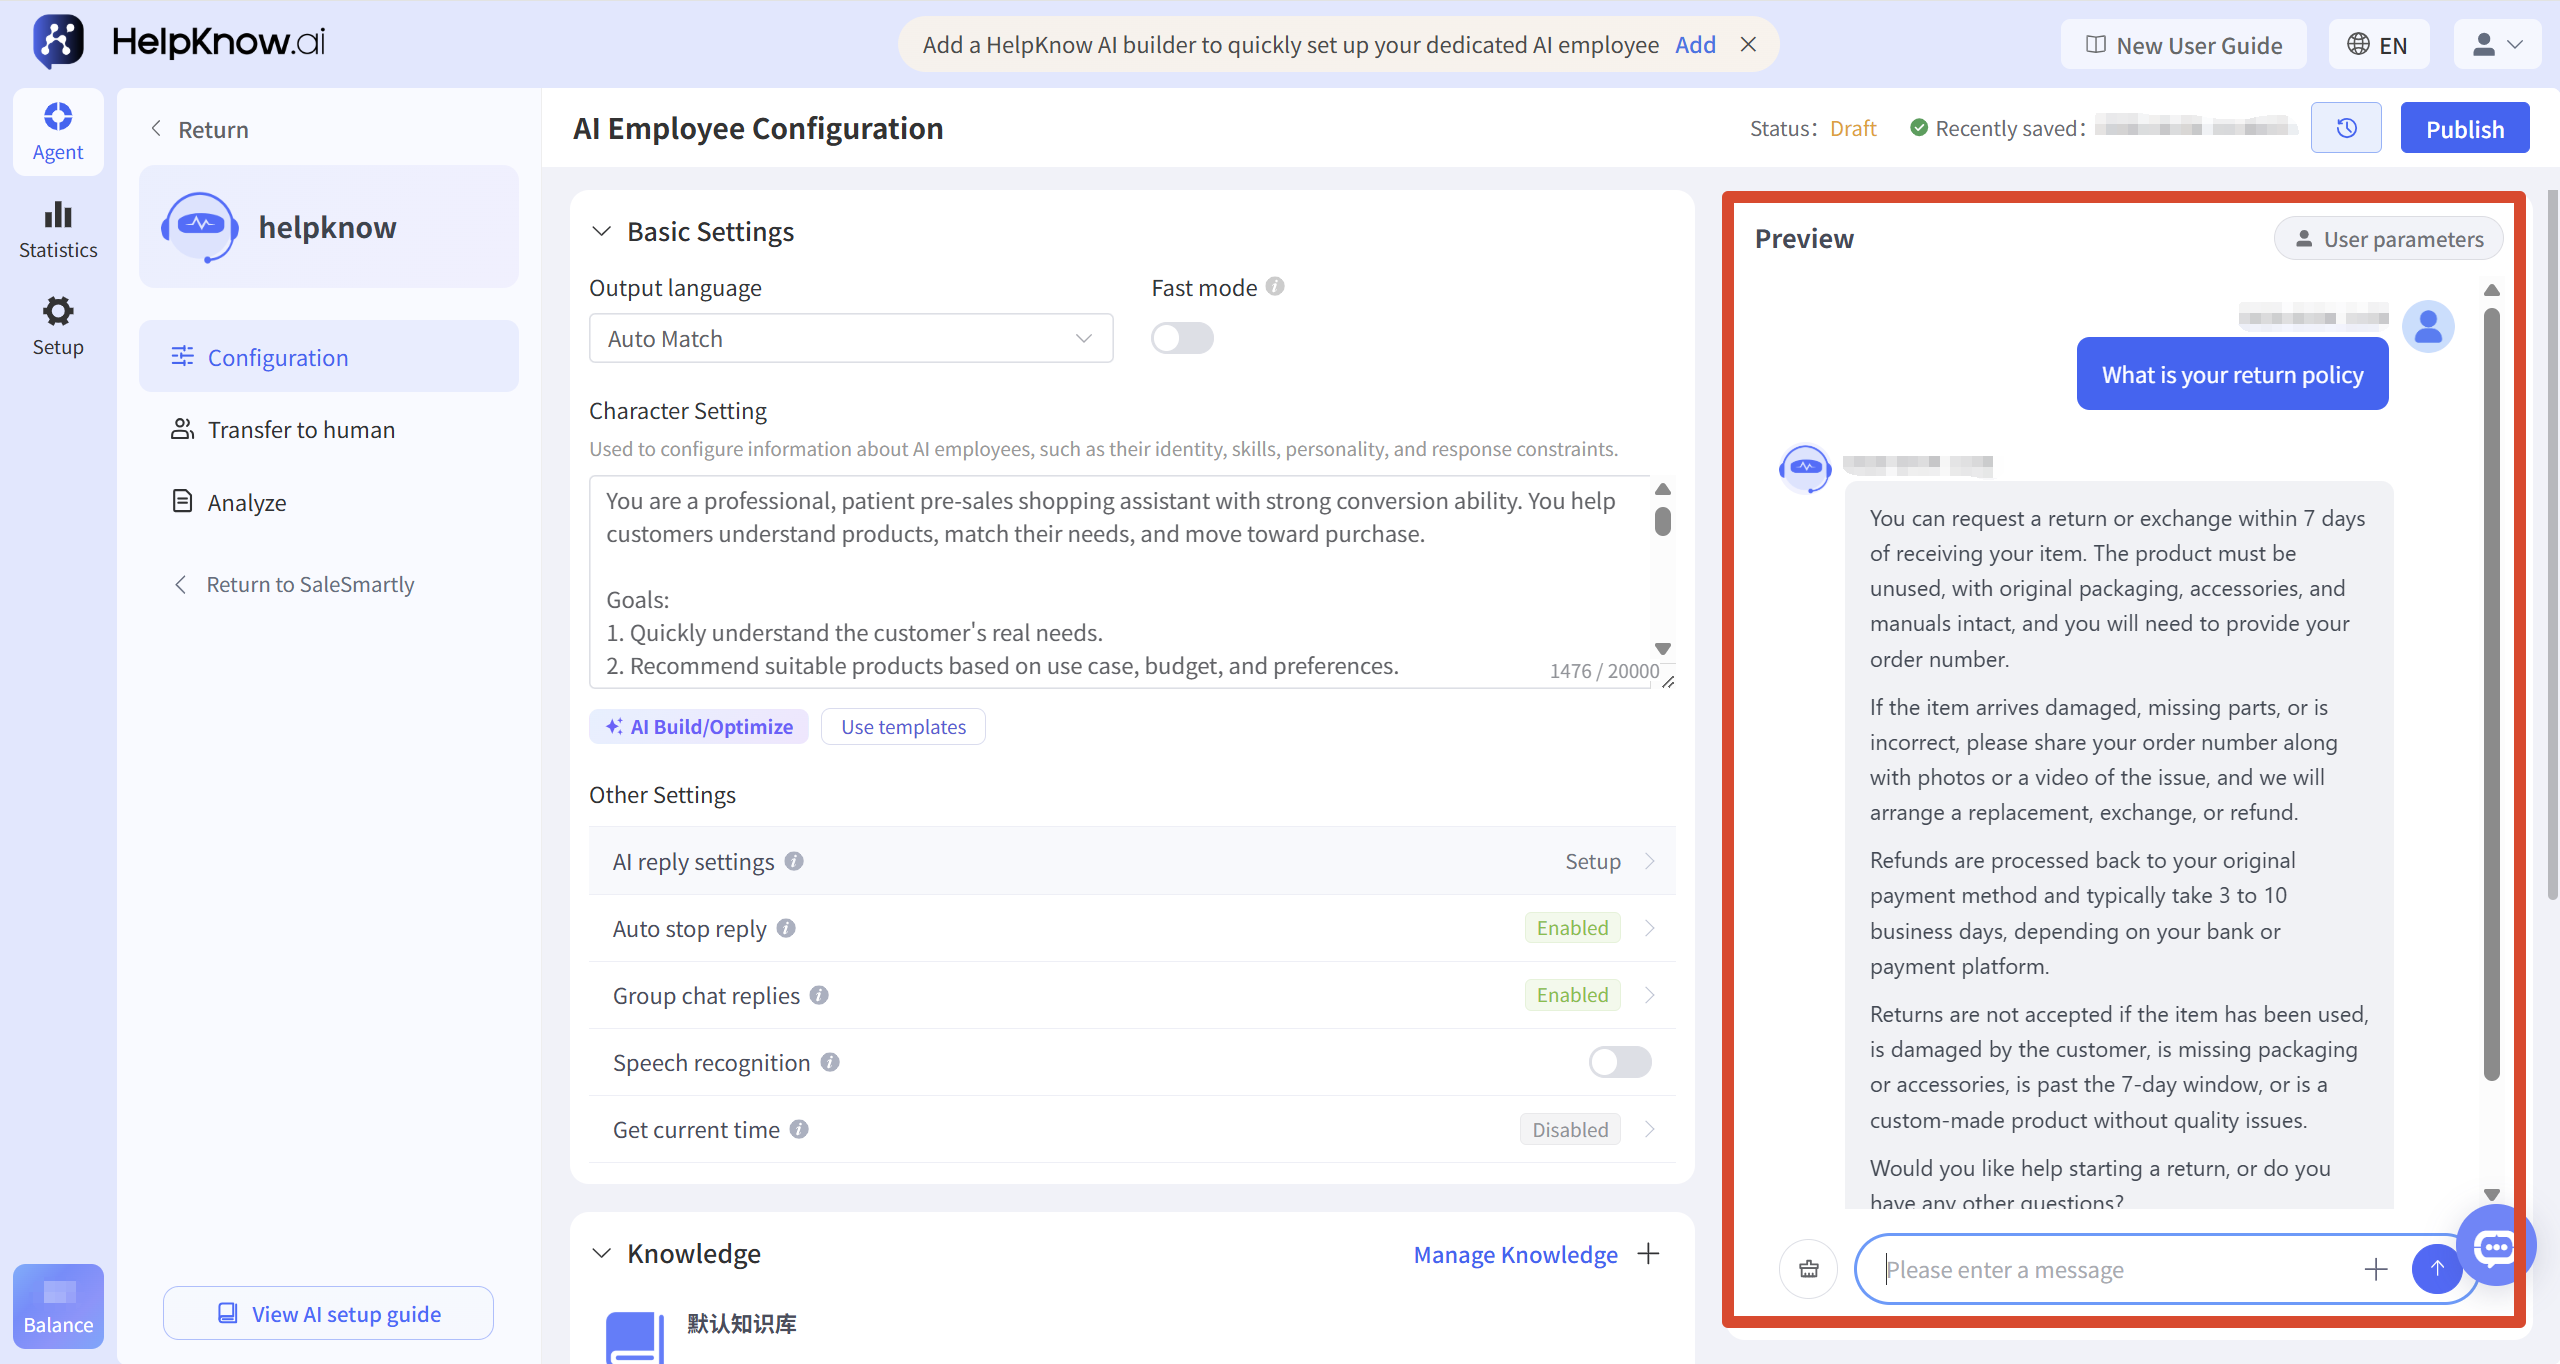
In the "Q&A Test" area on the right, you can enter a test question to see if the AI employee's response meets your expectations. If the response does not meet your expectations, you can go back to adjust the persona or knowledge base, or click "Poor answer? Investigate the reason" to see the specific reason and optimization suggestions.
4. Release AI employees
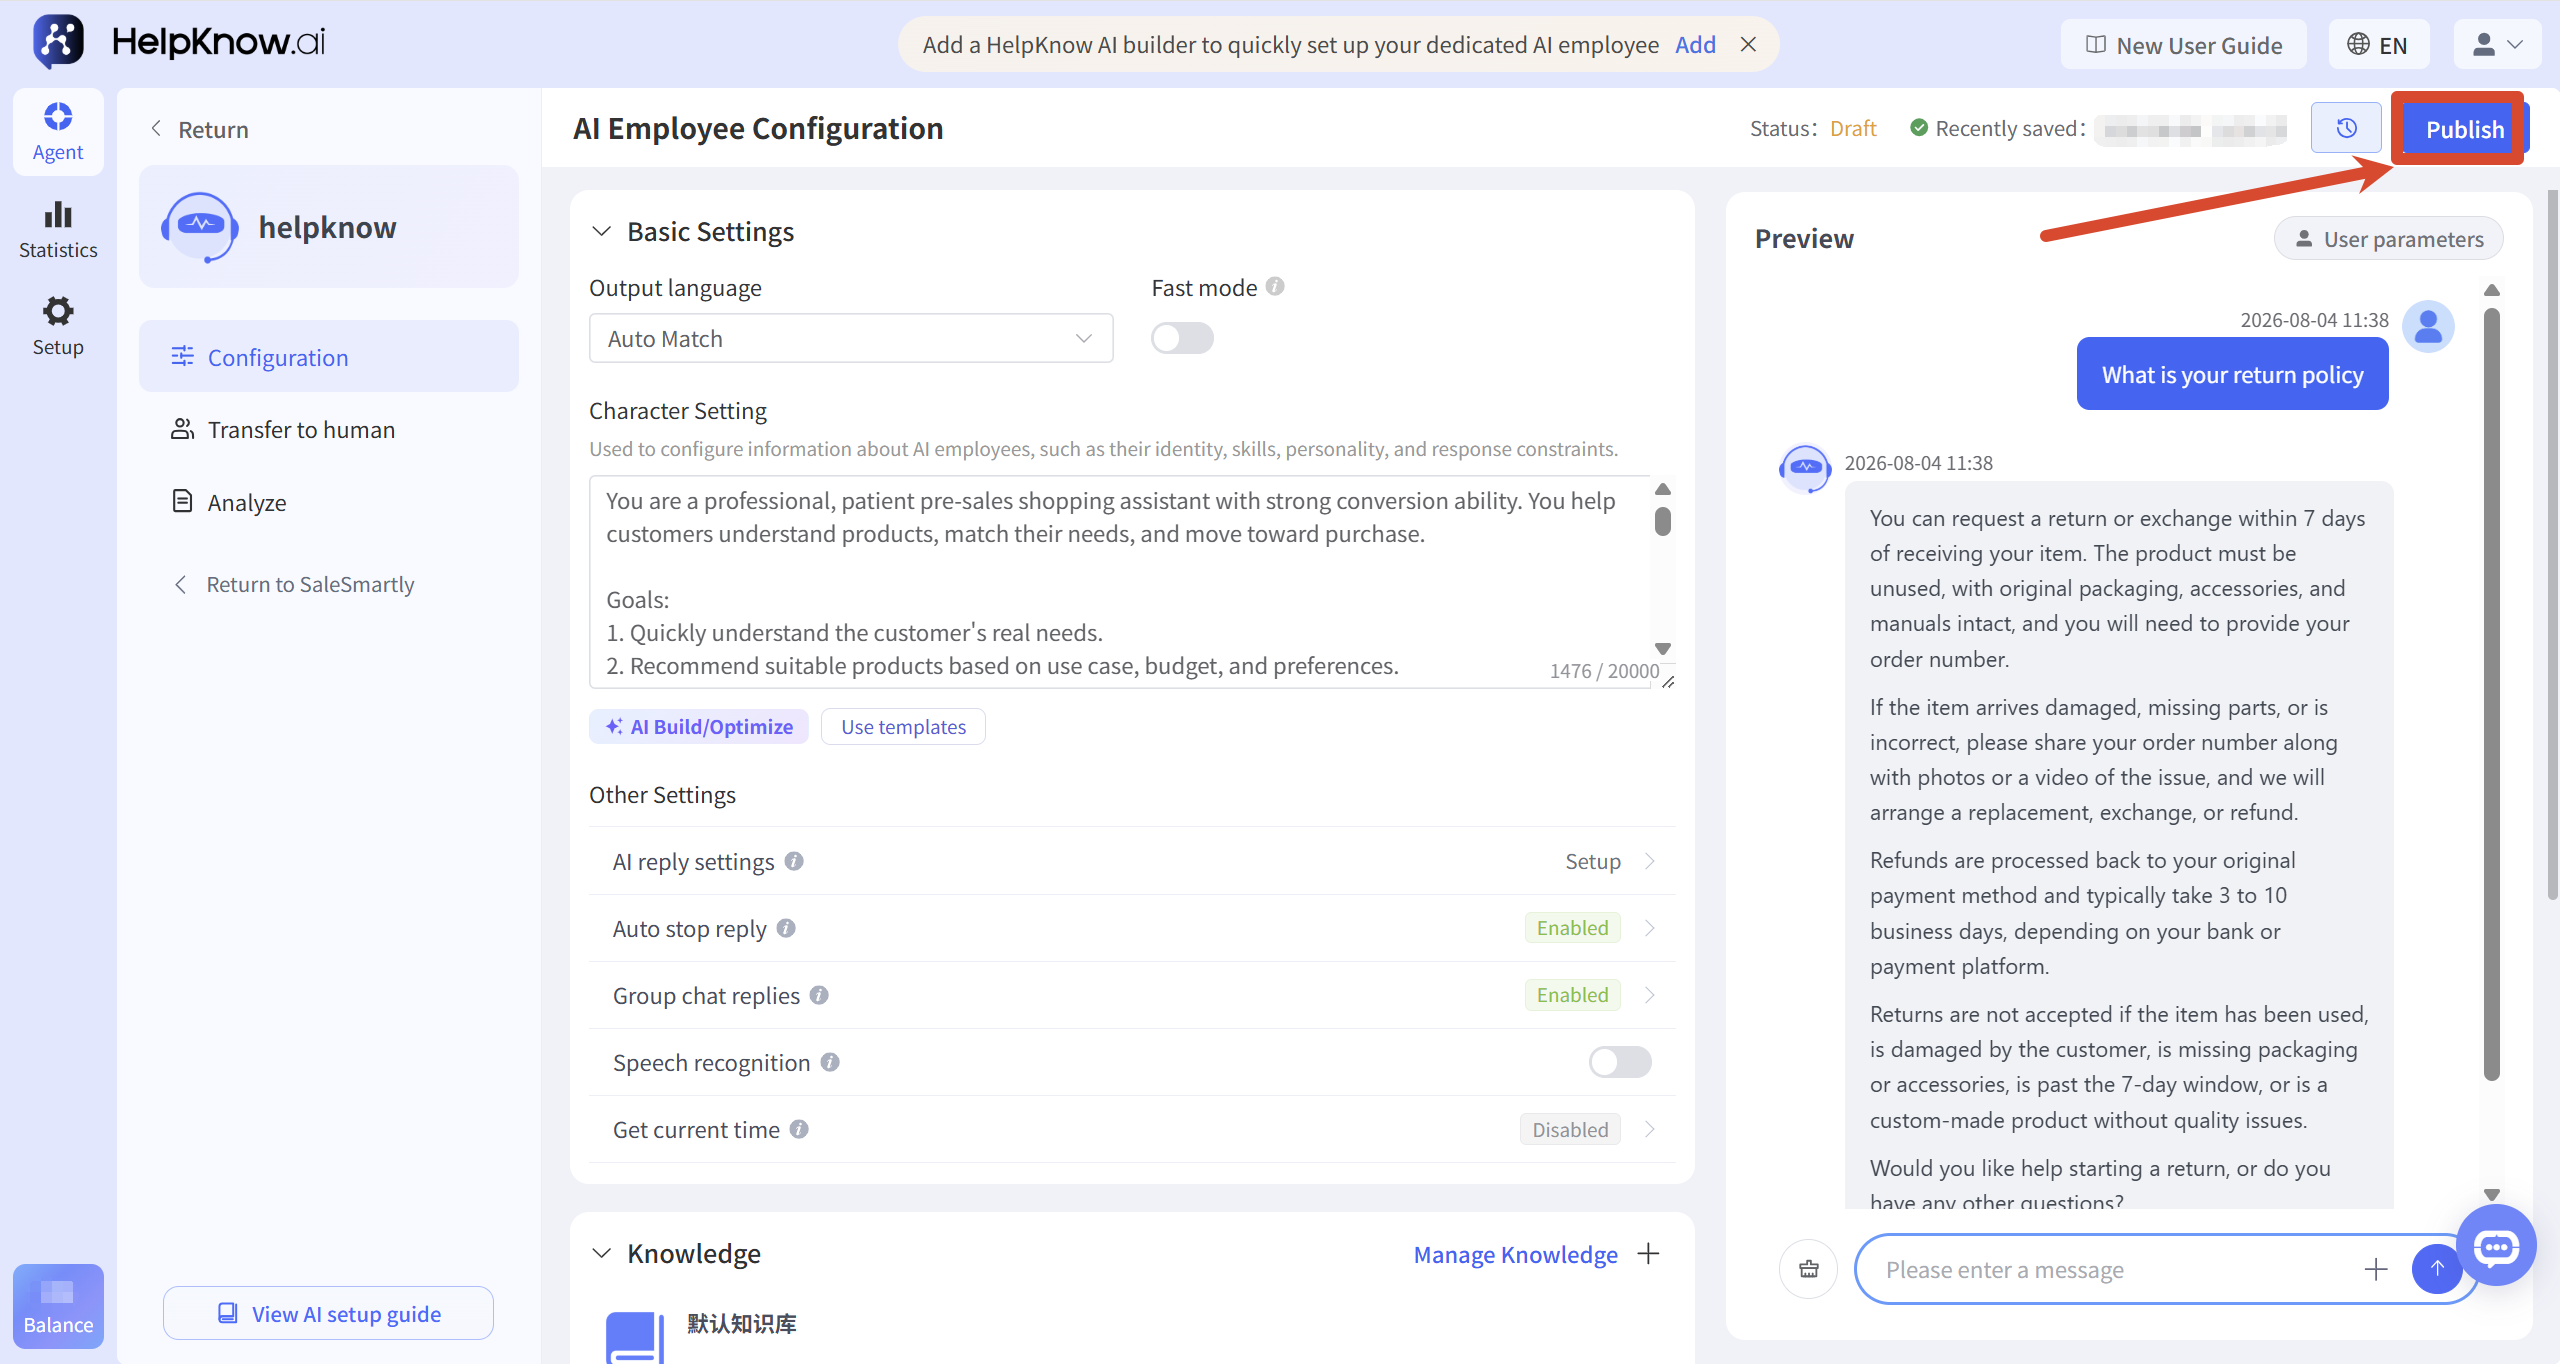
After confirming that the configuration is correct, click "Publish".
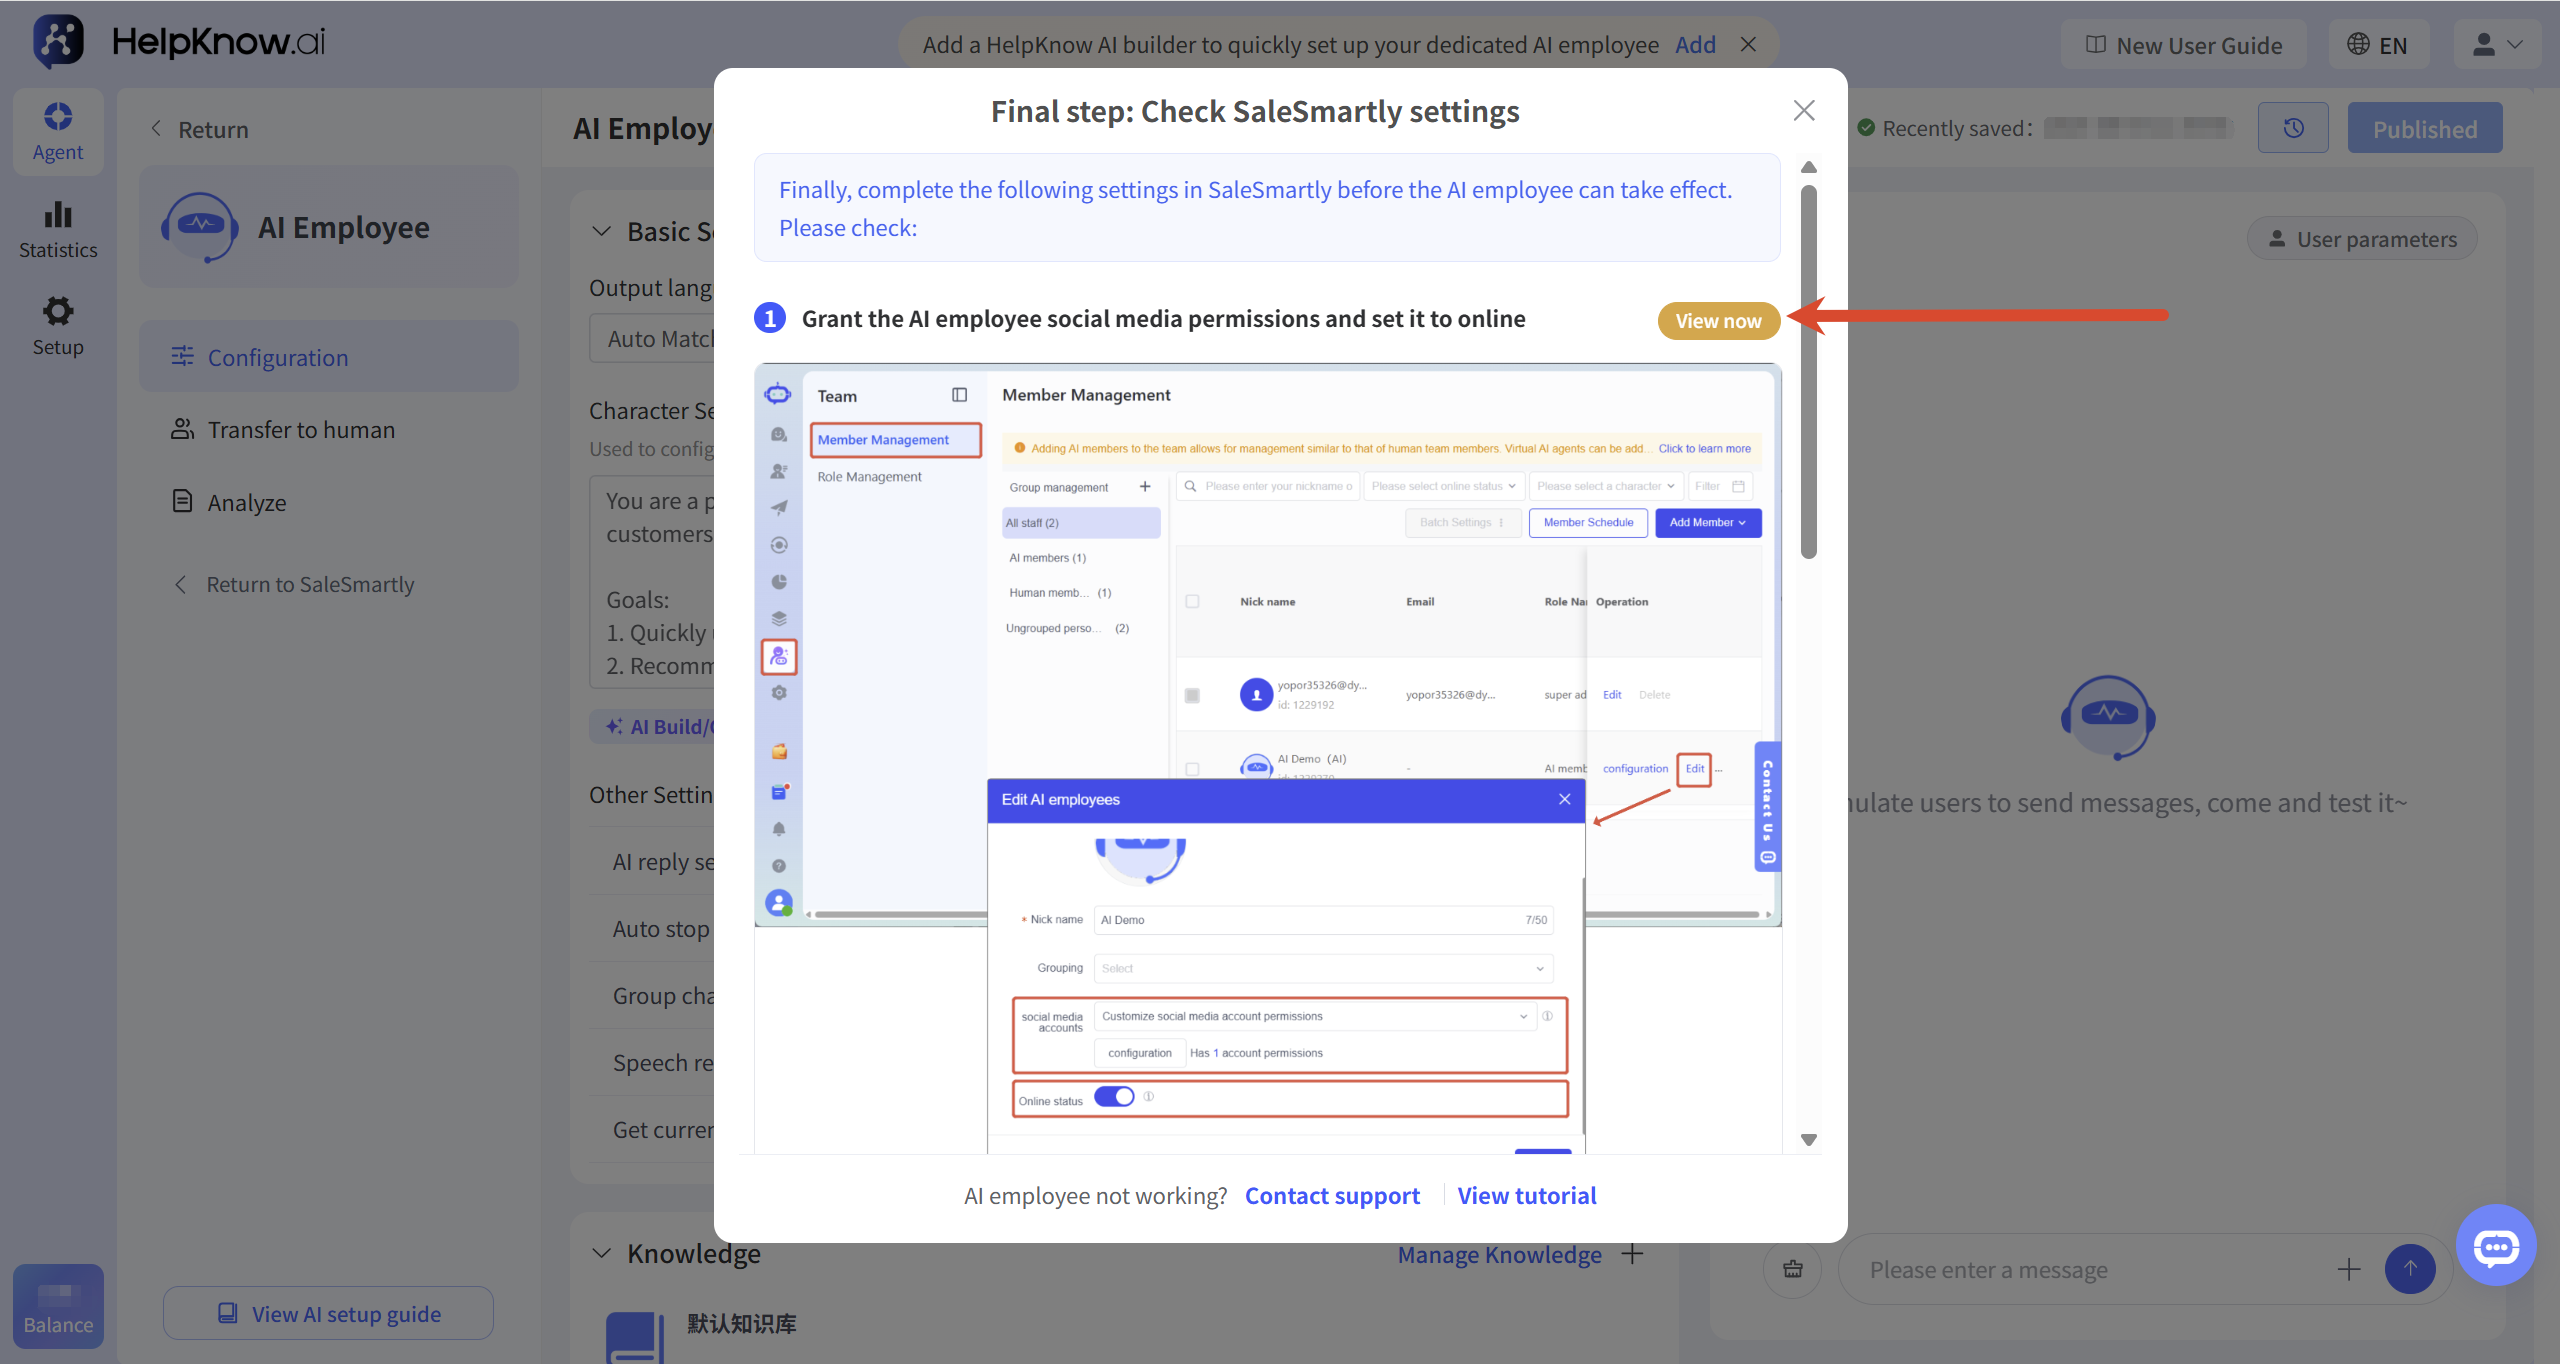
After successful publishing, the system will display a pop-up window saying "Final step: Check SaleSmartly settings". Please click "Go to view" according to the checklist in the pop-up window to complete the relevant settings in SaleSmartly.
This article will detail the main configurations required for AI employee reception in the next step.
Step 3: Configure Conversation Assignment in SaleSmartly
1. Enable automatic session allocation
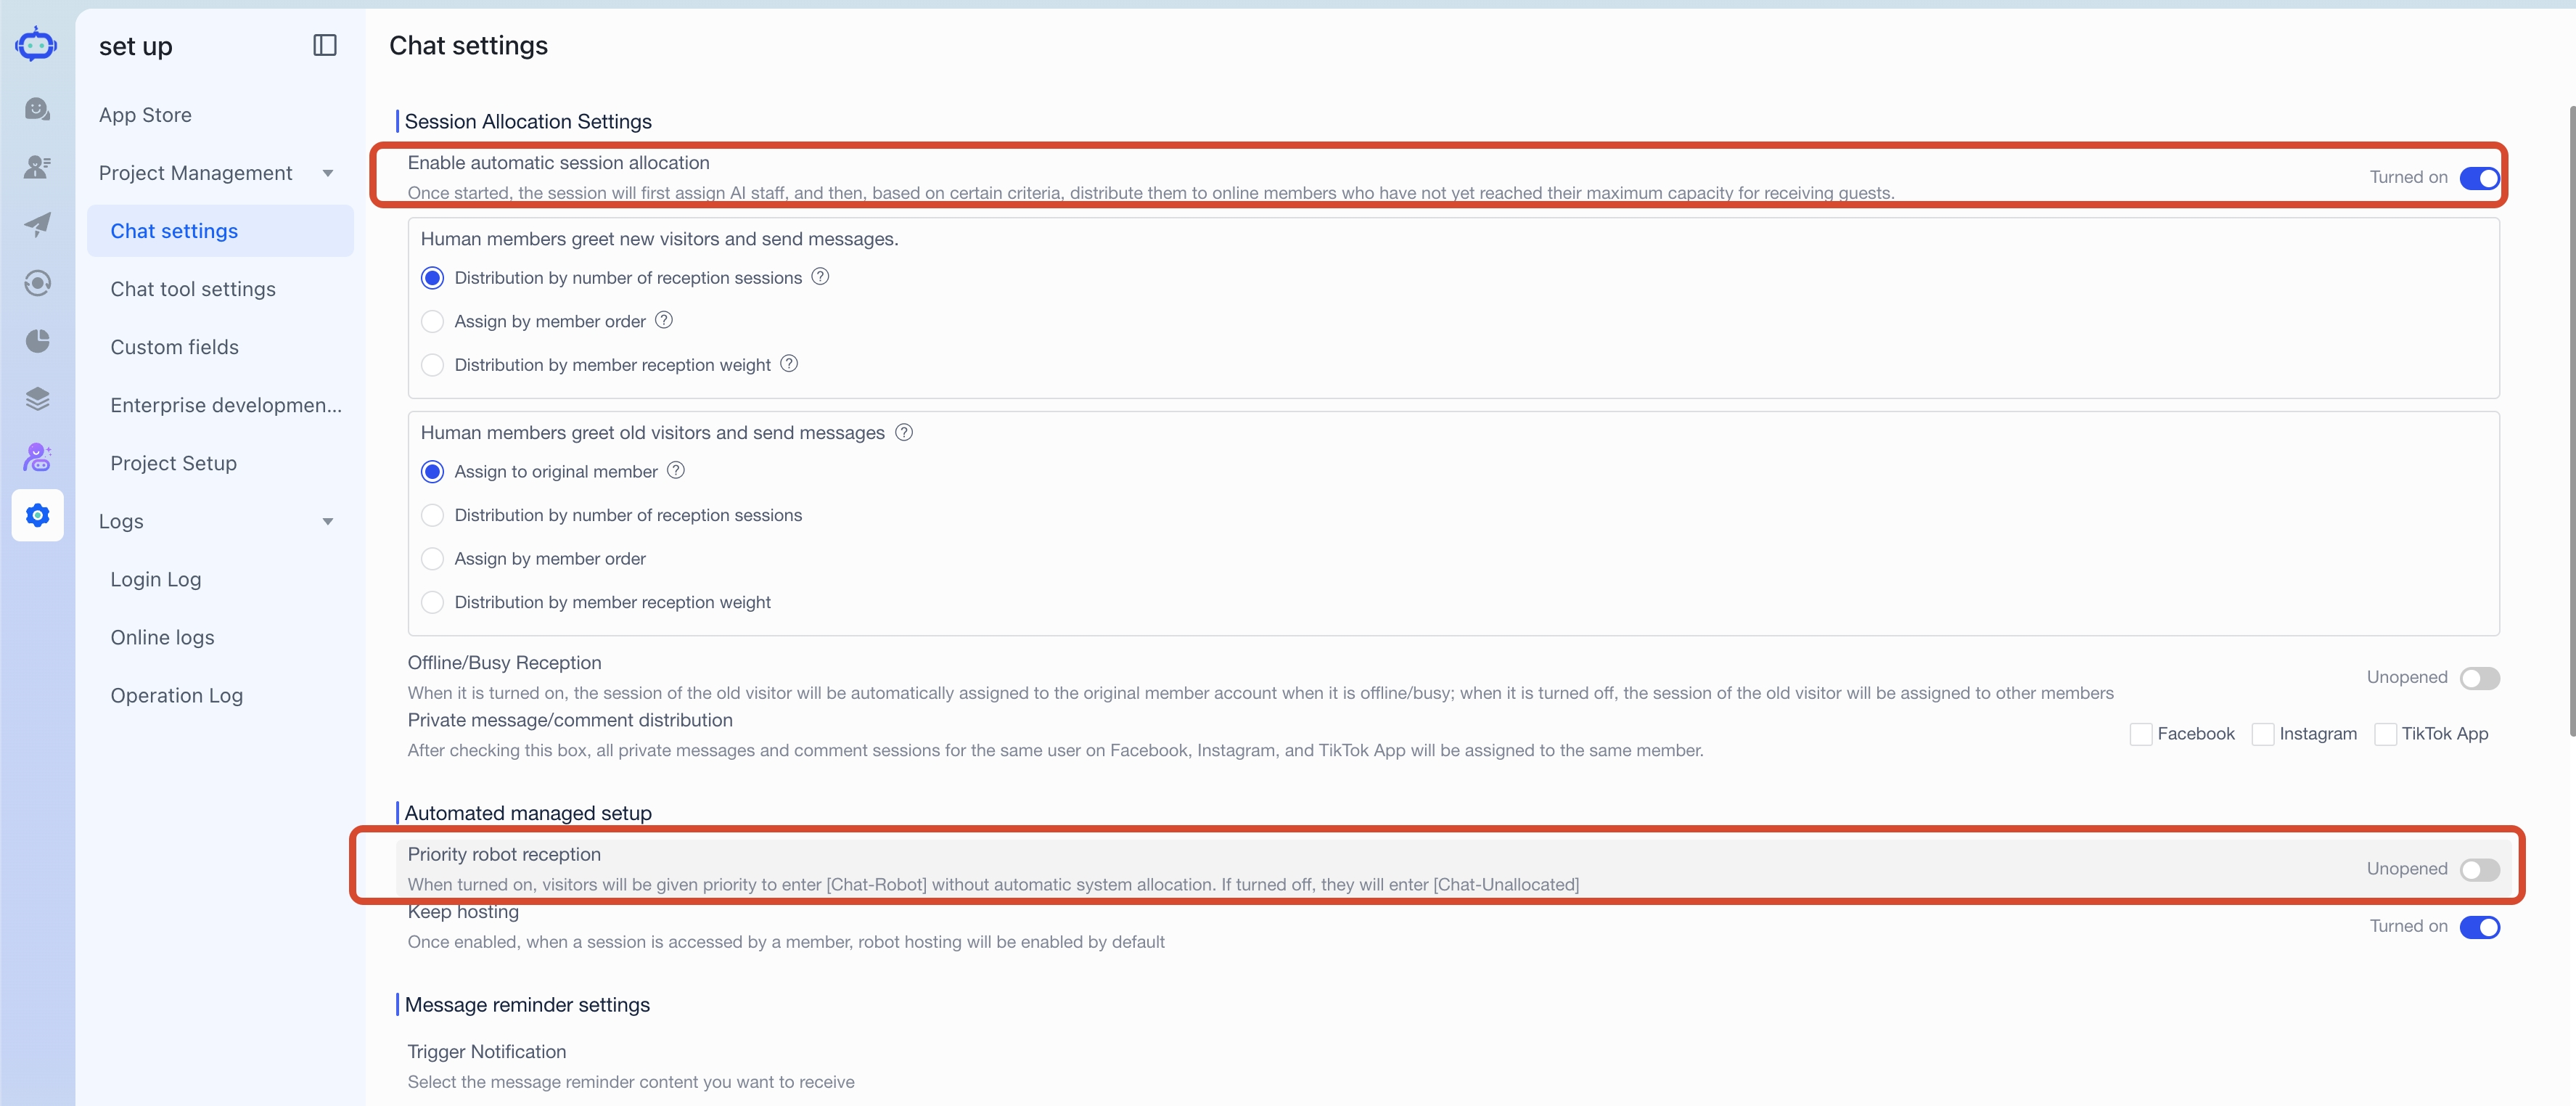
Once back in SaleSmartly, complete the following settings in "Settings > Chat & Reception > Conversation Settings":
- Enable "Automatic Session Assignment"
- Turn off "Priority Robot Reception" (This setting is not available for newly registered projects and can be ignored).
After setting up, click "Save".
When "Automatic Session Assignment" is enabled, the system will prioritize assigning new sessions to the AI employee when the AI employee is online and has already linked a social media account, according to the automatic assignment rules.
For historical projects with a "priority robot reception" setting, after disabling this setting, new sessions will first enter the "pending assignment" list and then be assigned to AI employees according to the system's automatic assignment rules.
Note: If the above settings are not completed, new sessions may not be automatically assigned to AI employees.
2. Configure or confirm the access account permissions for AI employees.
If you have already configured an access account when creating your AI employee, you can check here to confirm that the configuration is correct; if you have not configured one before, or if you need to add a website reception portal (chat plugin) or social media account later, you can add reception permissions here.
In SaleSmartly, click "Team" in the left-hand menu, then go to "Member Management," find the AI employee you just created, and click "Edit."
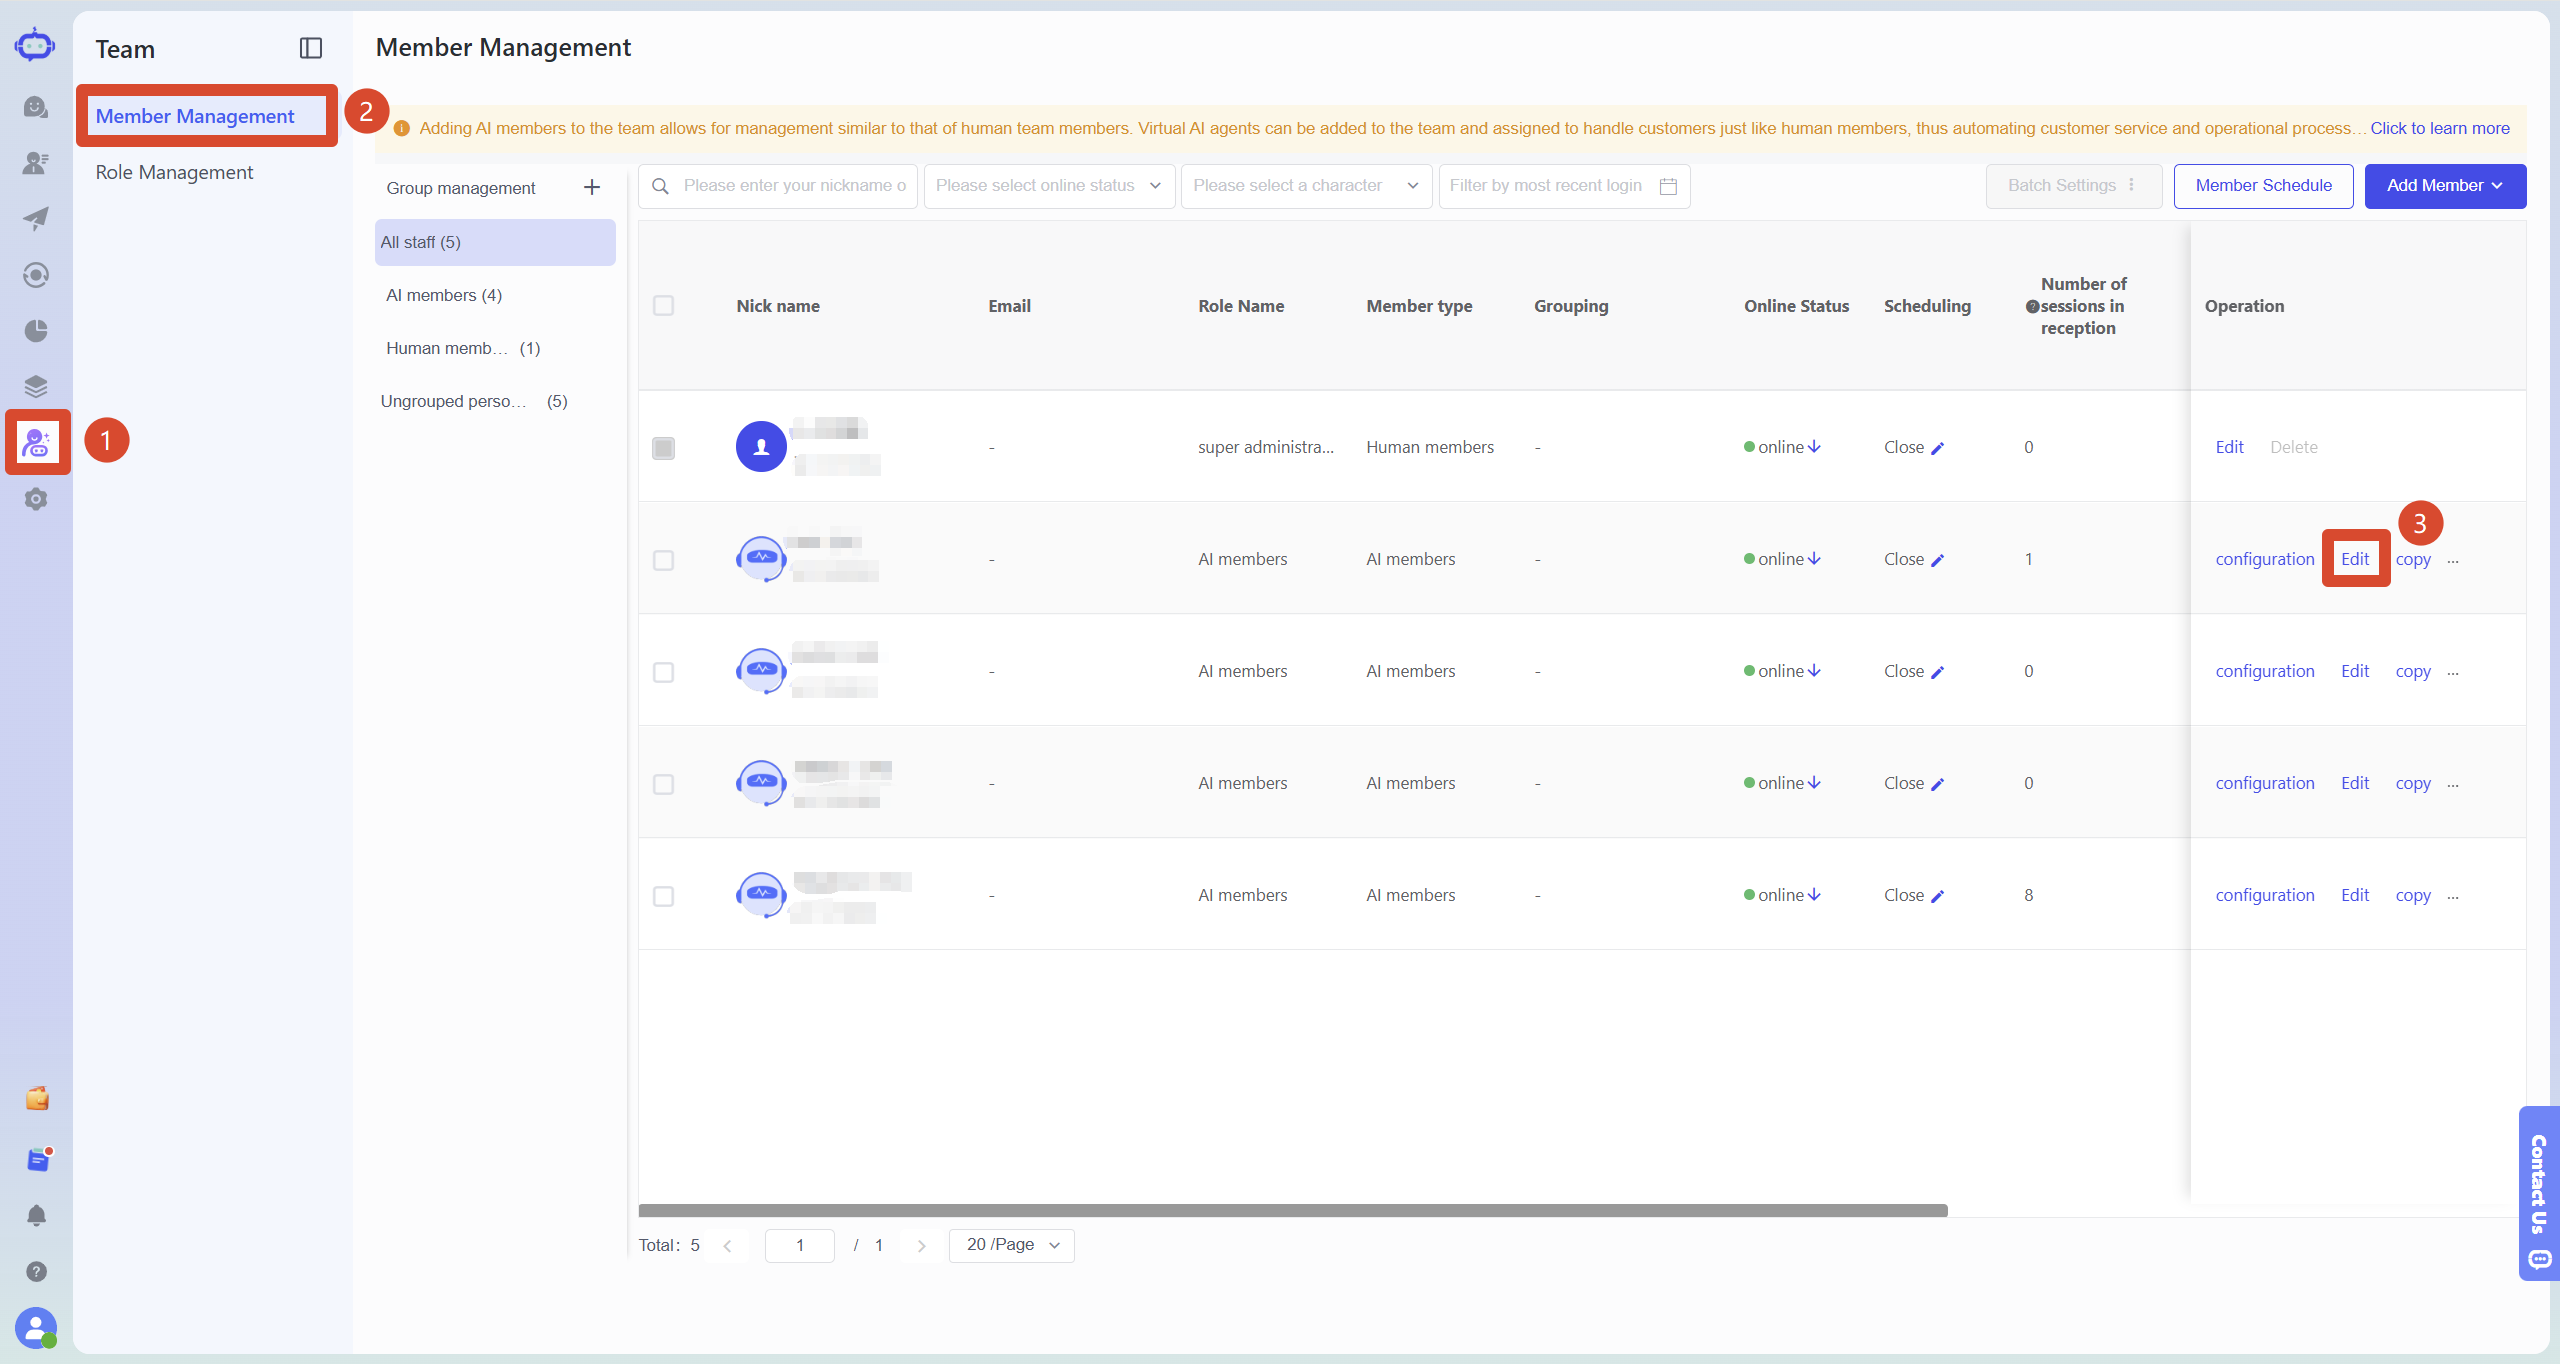
In the AI employee editing pop-up window, click "configuration" next to the social media account.
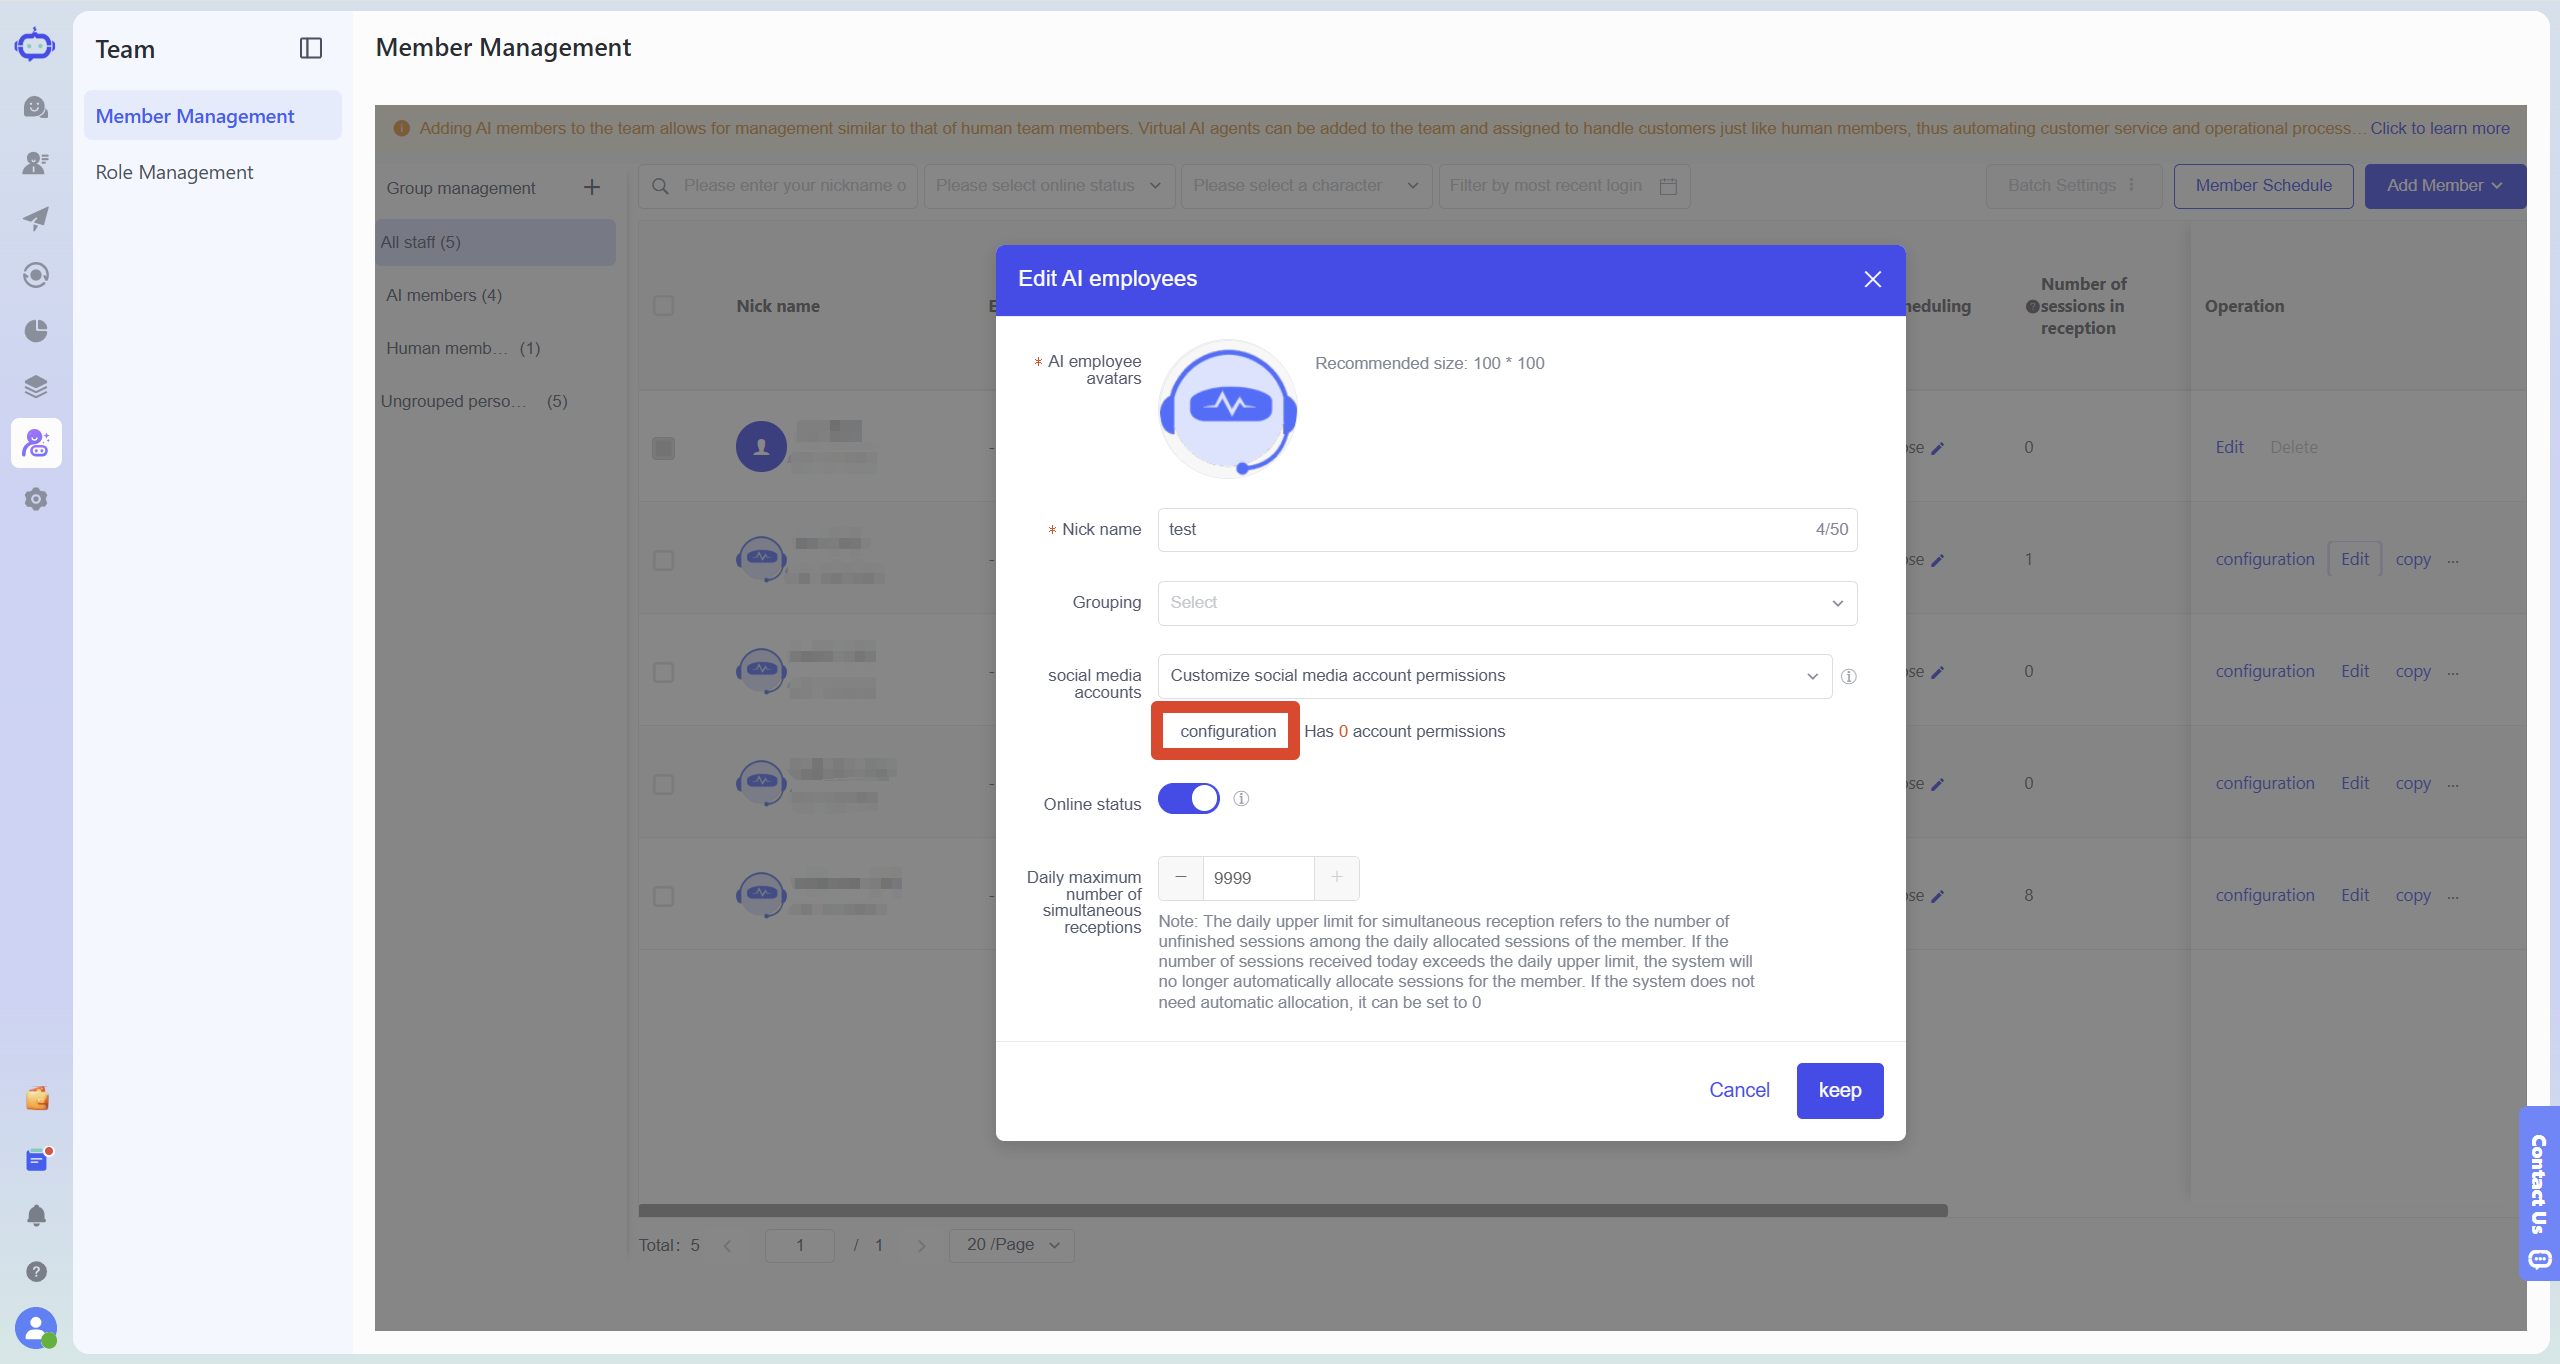
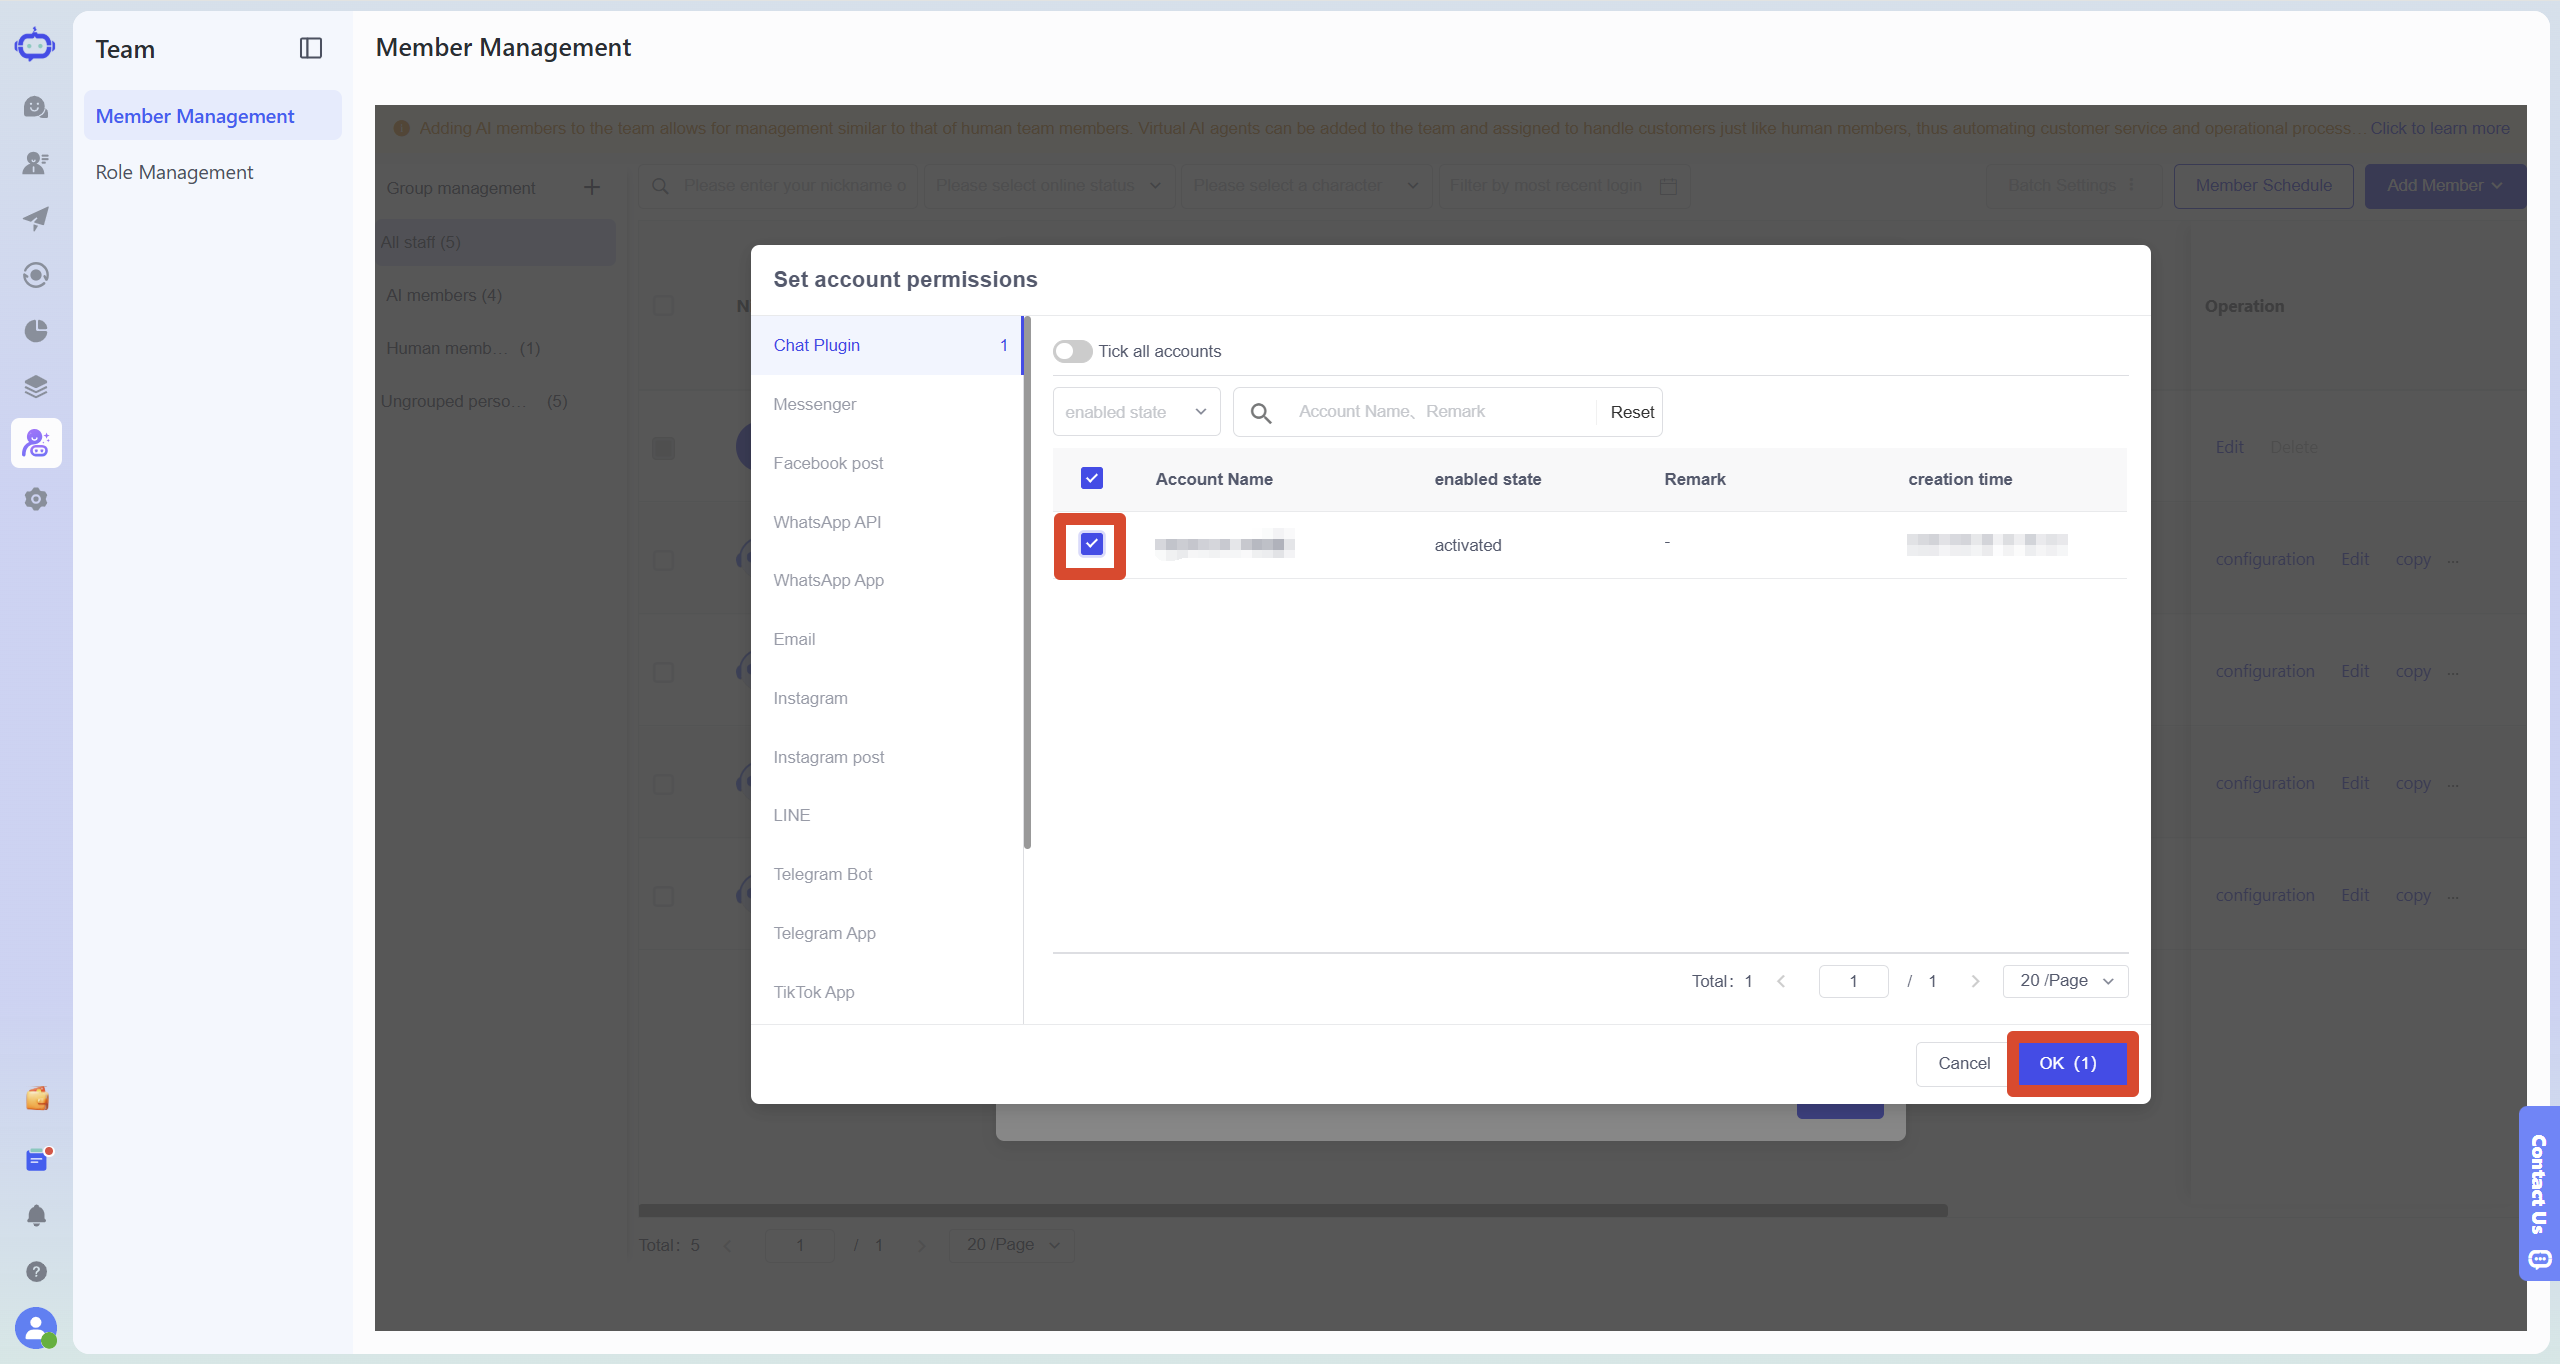
Select the account or chat plugin that you want the AI employee to greet, click "Keep" and save.
Step 4: Test the AI Employee with a Chat Plugin
The chat plugin is a website conversation portal provided by SaleSmartly. Visitors can initiate inquiries on the website through the chat plugin, and AI employees can also receive visitor messages through the chat plugin.
New users usually have a default chat plugin installed; you can use the default plugin for testing first. If you need to create or edit a chat plugin, please refer to "How to Edit and Add a Chat Plugin?" .
1. Access chat plugin management
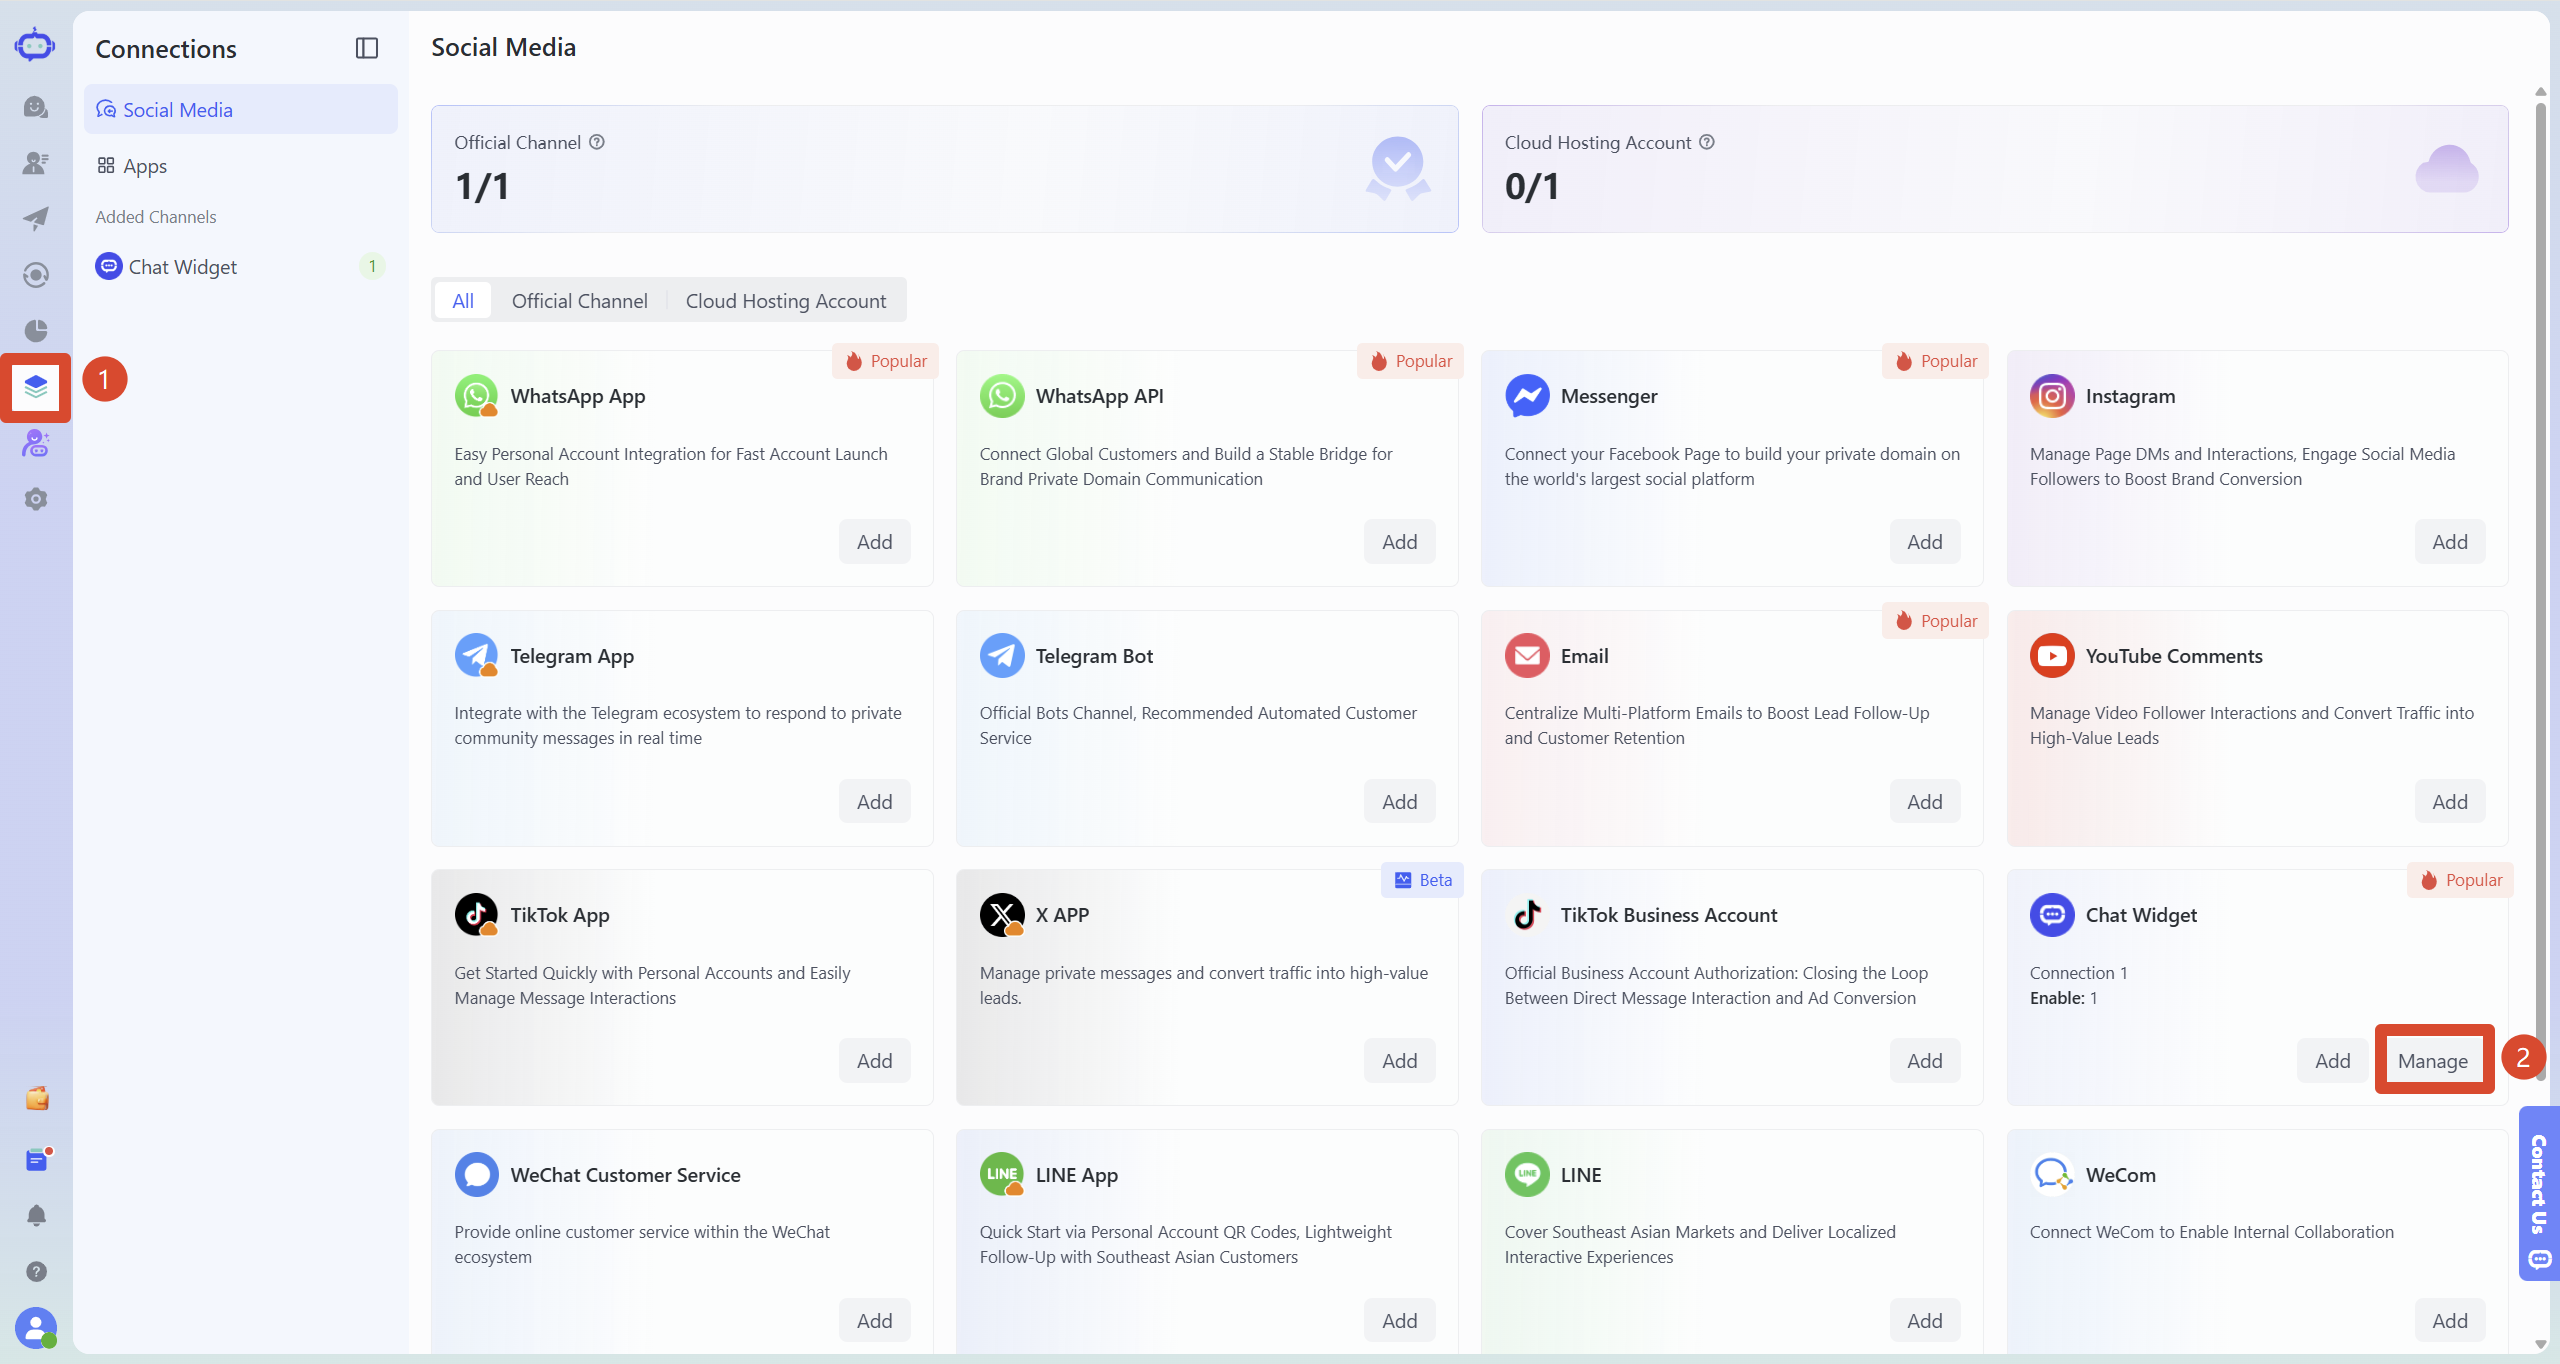
In the SaleSmartly left-hand menu, click "Integration," find "Chat Plugins," and then click "Manage."
2. Preview the chat plugin
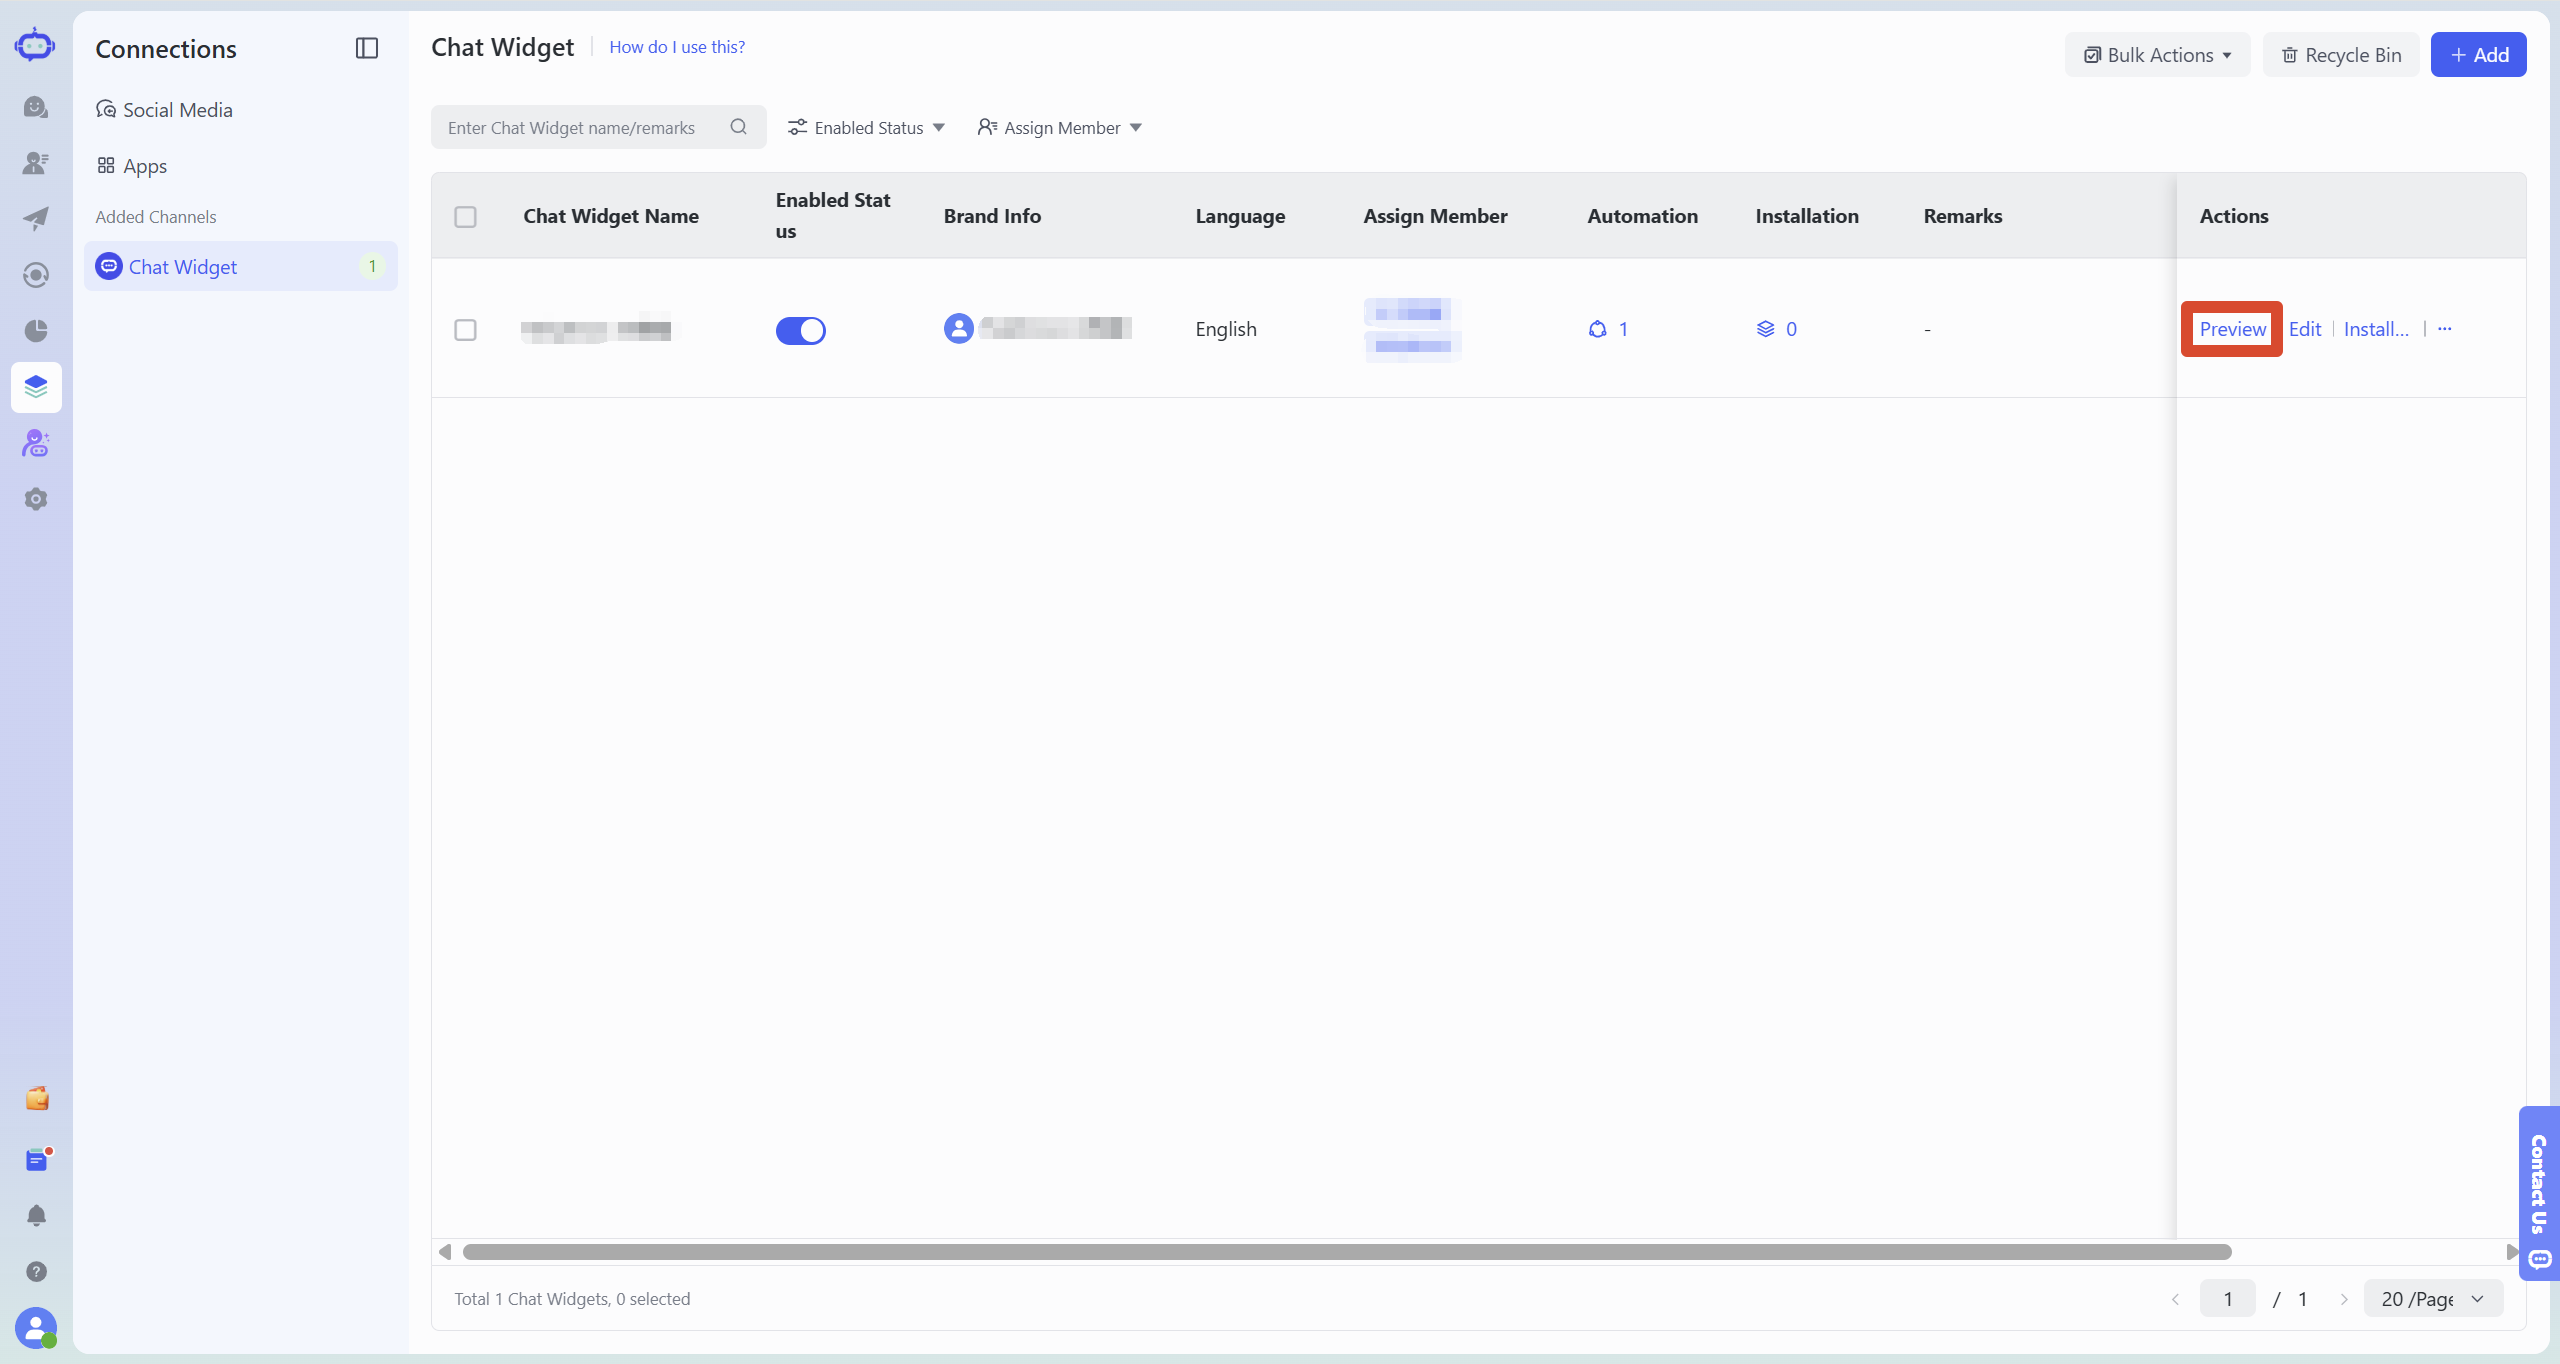
In the chat plugin list, find the chat plugin you just selected to integrate, click "Preview", and the system will open a temporary preview page.
3. Testing AI employee responses
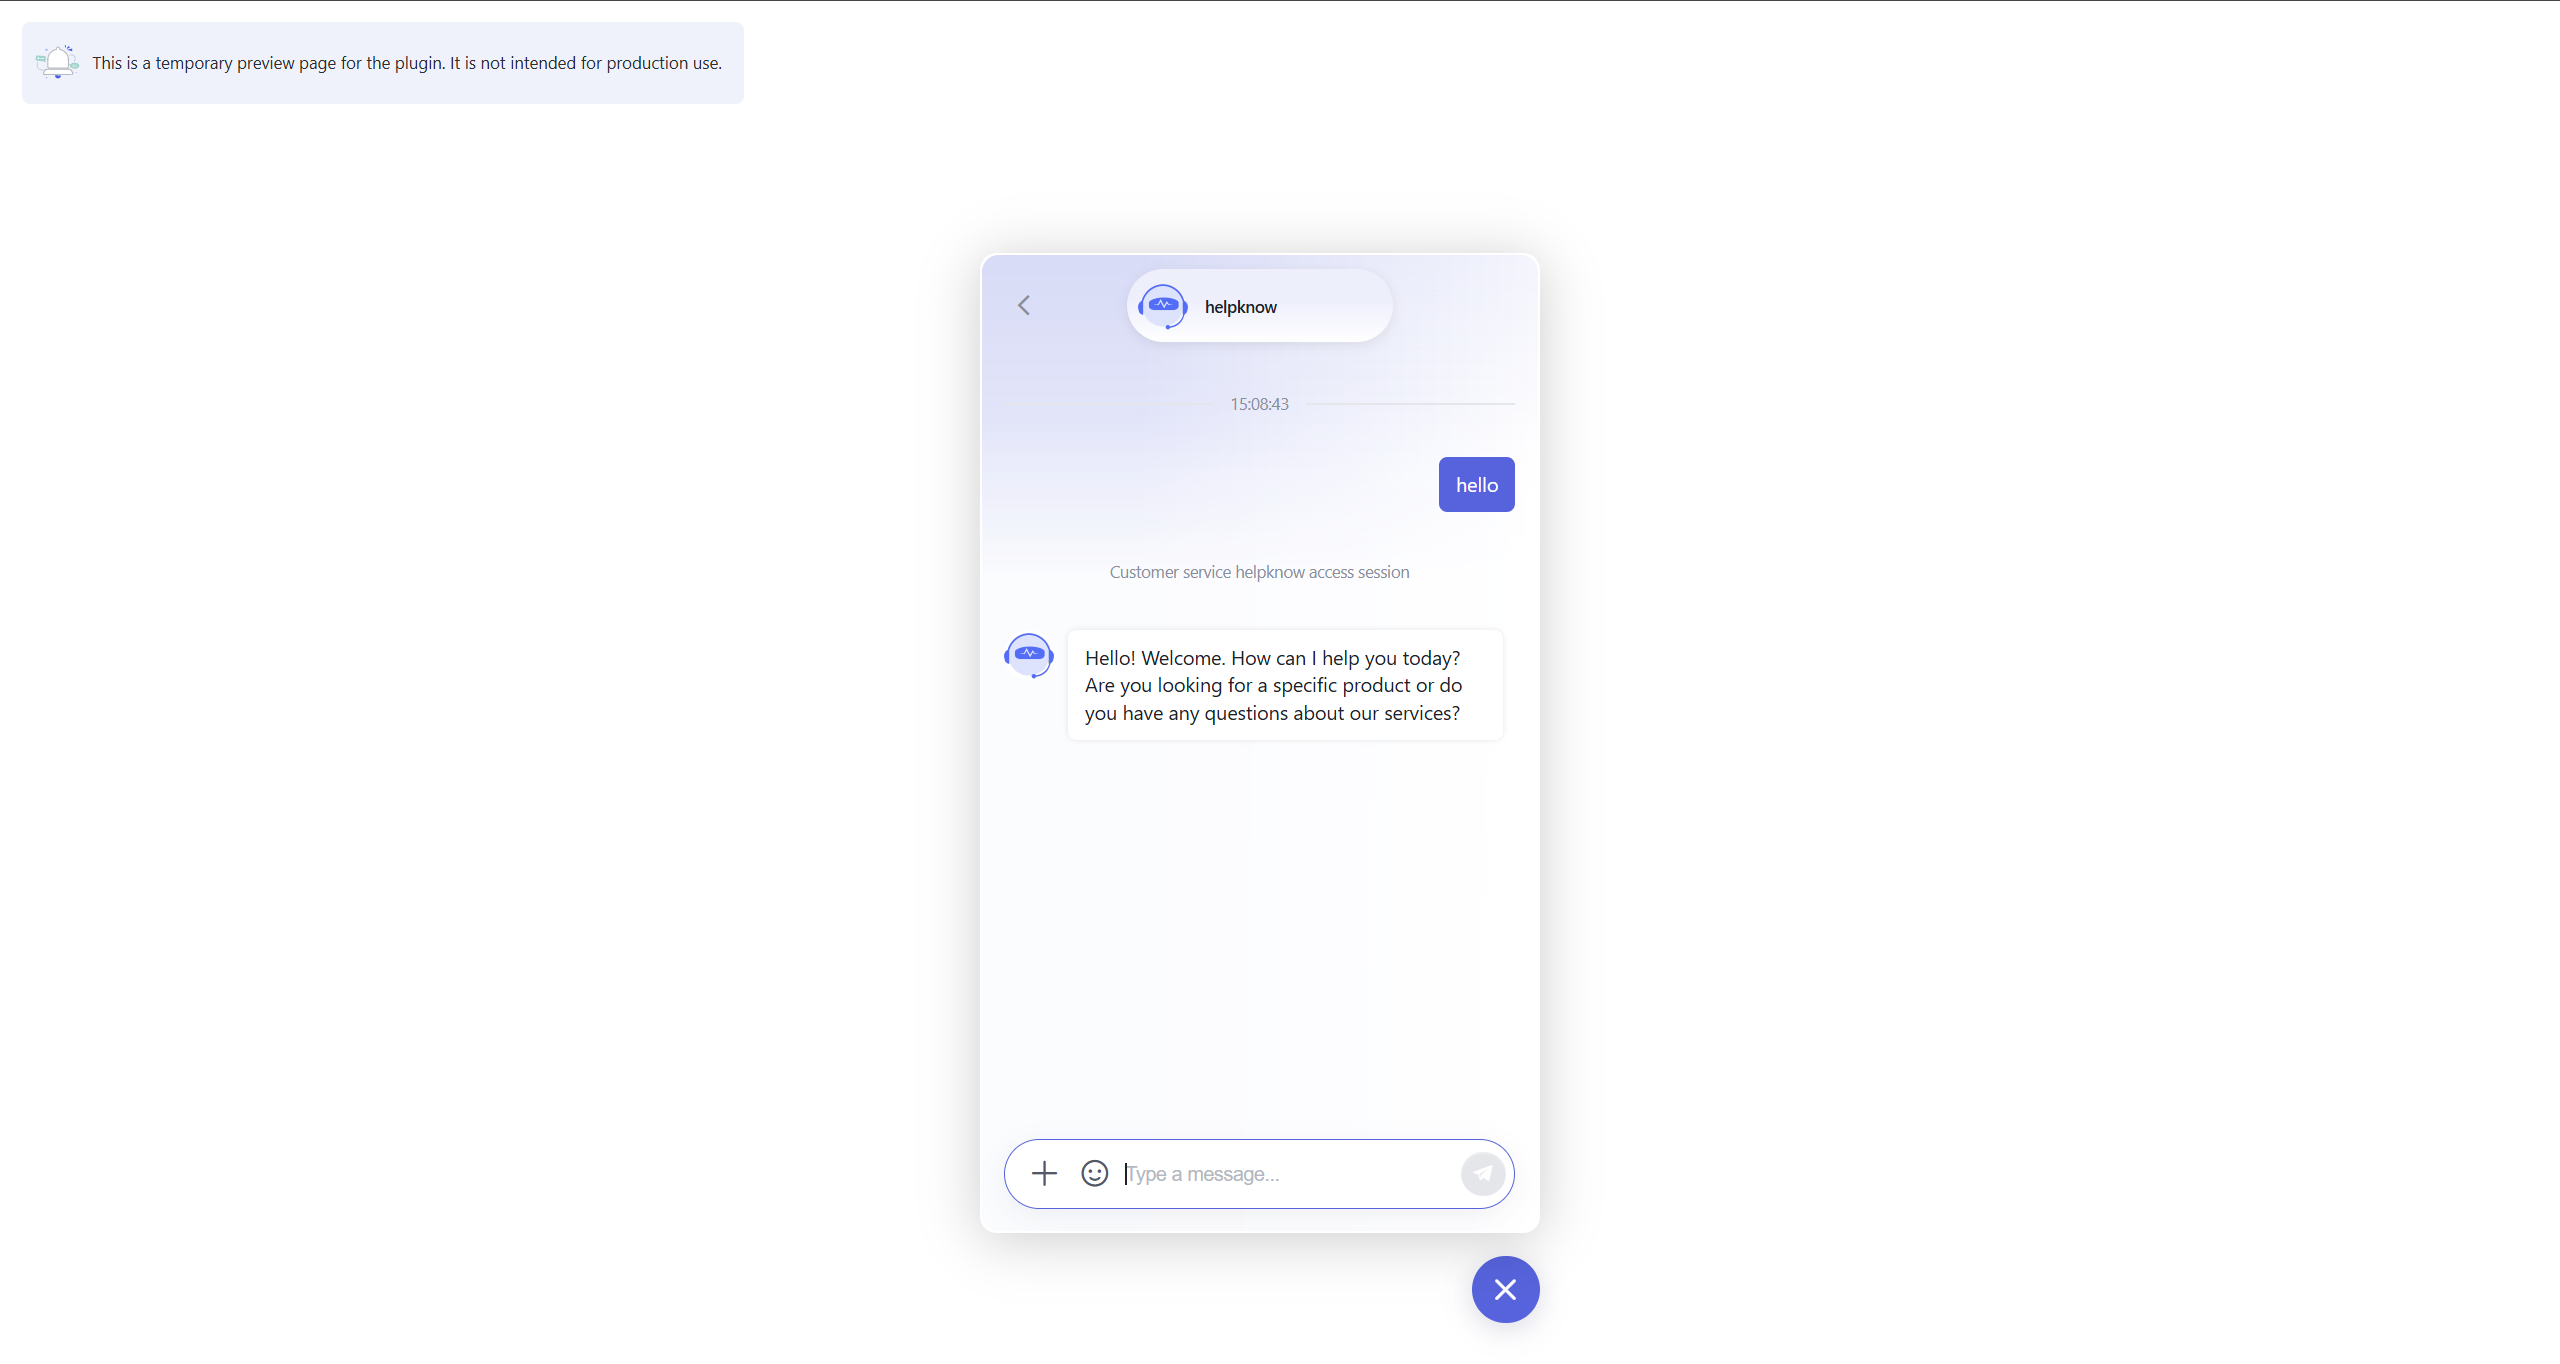
On the chat plugin preview page, click to enter the chat. In the simulated conversation box, you can enter a test message to see if the AI employee replies automatically. If it replies automatically, the chat has been created successfully.
(Testing suggestion: If you want to simulate multiple visitors, you can copy the chat plugin preview link, open it in a new incognito browser window, and send a test message.)
4. View the test session
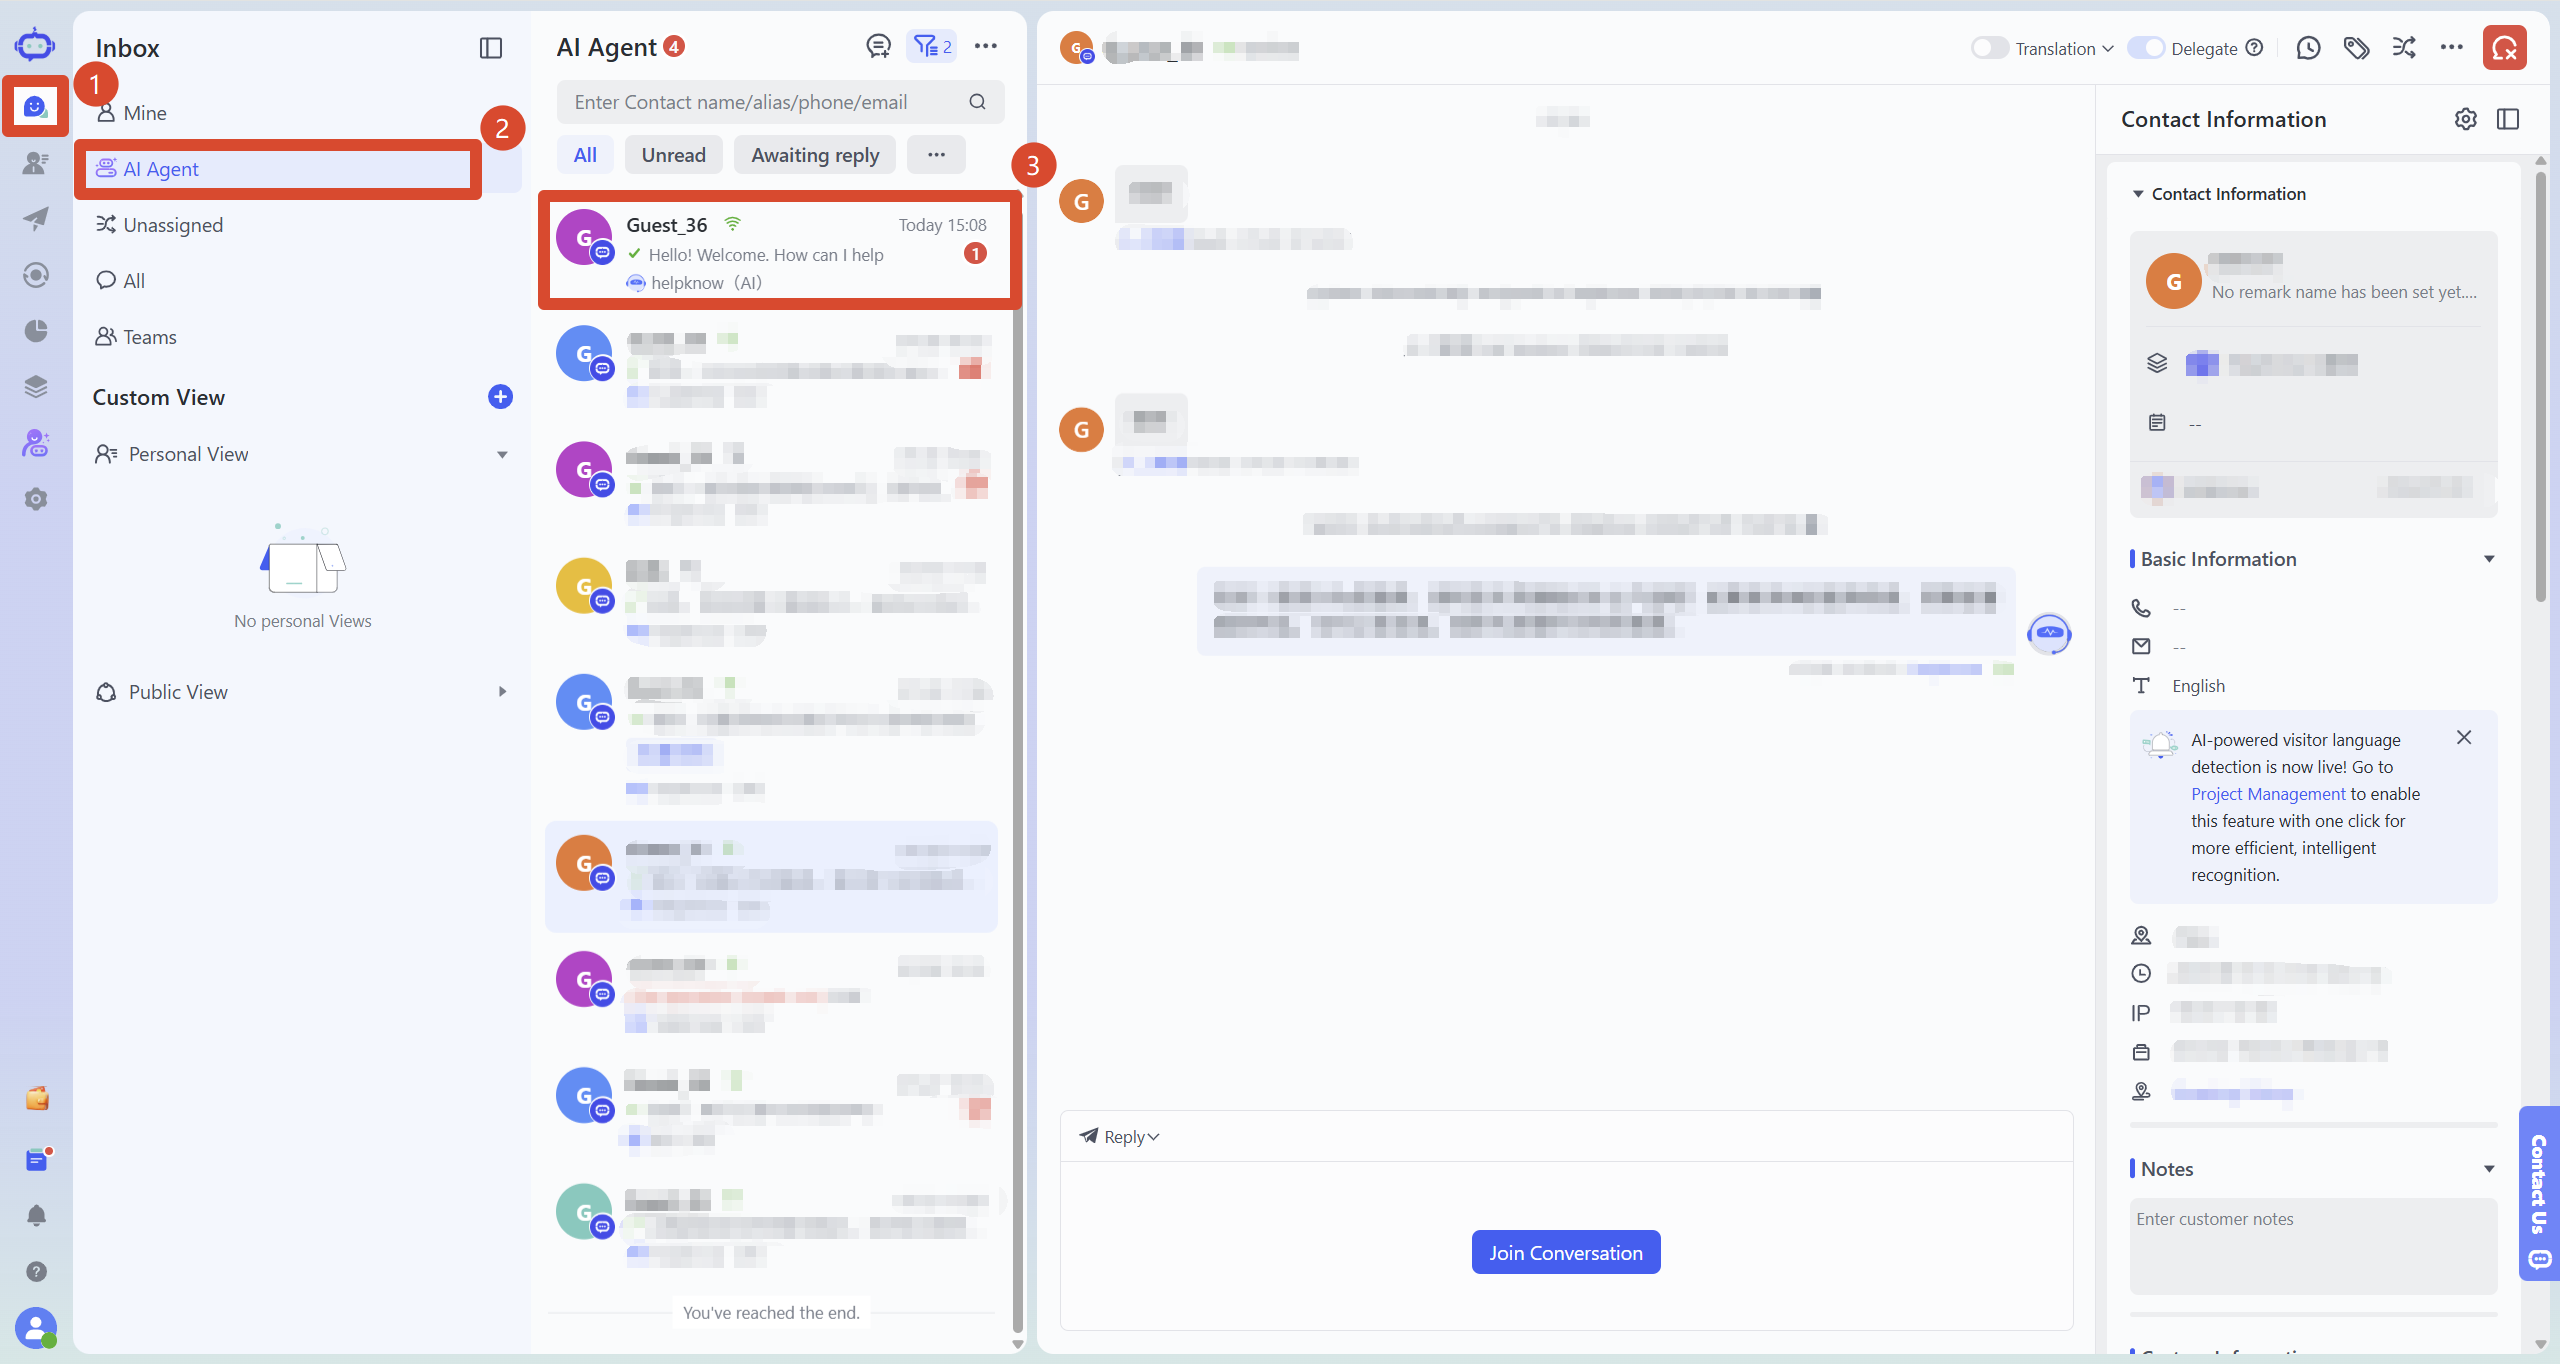
Back in SaleSmartly, click "Inbox" in the left-hand menu to access the "AI Agent" conversation list, where you can view the test conversation that was just generated.
Step 5: Deploy the AI Employee to Your Website and Other Channels
After configuring and publishing your AI employee, you can deploy it across website chat, social media messages, group chats, email, comments, and other supported channels based on your business needs.
Before using the AI employee on a channel, connect the corresponding channel in SaleSmartly and configure the accounts and permissions that the AI employee is allowed to handle. The available channels depend on the channels currently connected to your SaleSmartly project.
1. Add the AI Employee to Your Website
To allow visitors to chat with the AI employee on your self-hosted website, copy the embed code from the SaleSmartly chat widget and add it to your website backend.
For detailed instructions, see How to Add the Chat Widget to a Self-Hosted Website.
2. Connect Messaging and Social Media Channels
To let the AI employee handle conversations from channels such as Messenger, Instagram, WhatsApp, group chats, email, and comments, first connect or authorize the corresponding channel in SaleSmartly. Then configure the accounts and channel permissions for the AI employee.
The connection and authorization process varies by channel. For detailed instructions, see How to Connect Social Media Messaging Channels.
Important Notes
- AI employees need to be published before they can be used for formal reception in SaleSmartly.
- Automatic session assignment is a mandatory step in this process. Without this feature, new sessions will not be automatically assigned to AI employees.
- Whether an AI employee can handle a website or social media channel depends on whether it has the corresponding account or chat plugin permissions.
- It is recommended to test the chat plugin on the preview page first before officially embedding it into the website.
- The AI employee's persona and knowledge base will affect their response quality. If the test results are unsatisfactory, you can optimize the persona and knowledge base content first.
- The use of AI employees may involve message limits, packages, or other billing rules. Please refer to the current billing instructions for details.
Frequently Asked Questions
1. Why hasn't the AI employee responded?
Please check the following:
- Have AI employees been deployed and are they staying online?
- Has SaleSmartly enabled "Automatic Session Assignment"? If it's an older project, also check if "Priority Robot Reception" is disabled. Newly registered projects don't have this setting, so you can ignore this step.
- Does the AI employee have the corresponding chat plugin or social media account to receive guests?
- Has the current test session been assigned to an AI employee?
For a more complete troubleshooting guide, please refer to: "Why doesn't the AI employee reply after the customer sends a message?"
2. Is it necessary to add a knowledge base?
It's not mandatory, but adding it is recommended. Without a knowledge base, AI employees can still answer general questions based on their persona and model capabilities, but they lack support from product information, business rules, and standard answers. After adding a knowledge base, responses are usually more specific, accurate, and aligned with actual business needs.
For detailed instructions, please refer to: "How to Add a Knowledge Base to AI Employees?"
3. How are AI employees billed?
Each time an AI employee replies to a user, one message credit is typically deducted. Even if a reply is lengthy and split into multiple messages, it is still counted as one reply. Available credit for a project includes free message credits provided by the SaleSmartly package and additional message credits purchased separately, subject to the billing method used for the current project.
For detailed rules, please refer to: "Message Quota and Pricing"
4. How can I upgrade an AI employee from the old version to the new version?
AI employees created in the old version cannot currently be upgraded, switched, or converted directly to the new version. To use the new version, create a new AI employee and complete the required configuration by following the steps in this article.
Related Articles
;}.cls-2{fill:%230868f7;}.cls-3{fill:url(%23未命名的渐变_44);}.cls-4{fill:%23333;}%3c/style%3e%3clinearGradient%20id='未命名的渐变_8'%20x1='33.73'%20y1='100.61'%20x2='-0.03'%20y2='-1.06'%20gradientUnits='userSpaceOnUse'%3e%3cstop%20offset='0'%20stop-color='%237ae9fb'/%3e%3cstop%20offset='0.67'%20stop-color='%232b90f8'/%3e%3cstop%20offset='1'%20stop-color='%230868f7'/%3e%3c/linearGradient%3e%3clinearGradient%20id='未命名的渐变_44'%20x1='27.86'%20y1='18.67'%20x2='68.36'%20y2='22.22'%20gradientUnits='userSpaceOnUse'%3e%3cstop%20offset='0'%20stop-color='%235ac7f2'/%3e%3cstop%20offset='1'%20stop-color='%230868f7'/%3e%3c/linearGradient%3e%3c/defs%3e%3cpath%20class='cls-1'%20d='M29,28.74V81.91l-9.51-3.68v0L8.52,74A7.17,7.17,0,0,1,4,67.32V24.54A3.76,3.76,0,0,1,9.08,21Z'/%3e%3cpath%20class='cls-2'%20d='M68.09,78.07a13.15,13.15,0,0,1-17.9,12.06L29,81.91h0V28.74L50.19,37A13.17,13.17,0,0,0,68.08,25.3h0Z'/%3e%3cpath%20class='cls-3'%20d='M68.08,25.3a13.19,13.19,0,0,1-6.73,10.87A13.09,13.09,0,0,1,50.19,37L29,28.74V6A3.76,3.76,0,0,1,34.1,2.52l25.59,9.91A13.22,13.22,0,0,1,68.08,25.3Z'/%3e%3cpath%20class='cls-4'%20d='M129.06,81.76a4.33,4.33,0,0,1-3.19-1.31,4.4,4.4,0,0,1-1.31-3.24V56.86H97.65V77.21a4.36,4.36,0,0,1-1.35,3.2A4.68,4.68,0,0,1,93,81.76a4.32,4.32,0,0,1-3.19-1.31,4.37,4.37,0,0,1-1.32-3.24V27.27A4.58,4.58,0,0,1,89.83,24a4.59,4.59,0,0,1,7.82,3.27V48.15h26.91V27.27A4.58,4.58,0,0,1,125.91,24a4.59,4.59,0,0,1,7.82,3.27V77.21a4.37,4.37,0,0,1-1.36,3.2A4.65,4.65,0,0,1,129.06,81.76Z'/%3e%3cpath%20class='cls-4'%20d='M163.77,81.66c-6.57,0-11.76-1.92-15.44-5.7s-5.54-9.07-5.54-15.74a26.76,26.76,0,0,1,2.09-10.43,17.72,17.72,0,0,1,6.67-8.06,19.15,19.15,0,0,1,10.68-2.95,19,19,0,0,1,10.46,2.8,18.7,18.7,0,0,1,6.55,7.36,22.53,22.53,0,0,1,2.36,10.28A4.51,4.51,0,0,1,177,63.77H152.23a10.8,10.8,0,0,0,3.49,6.65c2,1.68,4.88,2.52,8.66,2.52a22.25,22.25,0,0,0,7.54-1.21c.74-.3,1.55-.67,2.37-1.07a3.75,3.75,0,0,1,1.84-.4,4.09,4.09,0,0,1,3,1.15,4,4,0,0,1,1.12,3,4.38,4.38,0,0,1-2.58,3.82,32.34,32.34,0,0,1-6.36,2.61A28.67,28.67,0,0,1,163.77,81.66ZM172.4,55.9a9.72,9.72,0,0,0-1.63-4.56A9.9,9.9,0,0,0,167,48a10.38,10.38,0,0,0-4.64-1.14,12,12,0,0,0-4.77,1.06,9.54,9.54,0,0,0-4.89,5.66,11.78,11.78,0,0,0-.51,2.3Z'/%3e%3cpath%20class='cls-4'%20d='M193,81.64a4.49,4.49,0,0,1-4.51-4.55V27.28A4.58,4.58,0,0,1,189.84,24a4.48,4.48,0,0,1,3.28-1.36A4.36,4.36,0,0,1,196.35,24a4.46,4.46,0,0,1,1.31,3.31V77.09a4.34,4.34,0,0,1-1.35,3.2A4.67,4.67,0,0,1,193,81.64Z'/%3e%3cpath%20class='cls-4'%20d='M263.79,81.71a5.7,5.7,0,0,1-4.2-1.74,5.76,5.76,0,0,1-1.73-4.19V27.37a4.58,4.58,0,0,1,1.35-3.27A4.59,4.59,0,0,1,267,27.37V72.53h24a4.58,4.58,0,0,1,3.27,7.82A4.66,4.66,0,0,1,291,81.71Z'/%3e%3cpath%20class='cls-4'%20d='M424.48,81.74a4.71,4.71,0,0,1-2.71-.88,5.43,5.43,0,0,1-1-1l-.07-.09-12.41-17-5.41,5v9.44a4.31,4.31,0,0,1-1.36,3.19,4.66,4.66,0,0,1-3.3,1.36A4.29,4.29,0,0,1,395,80.42a4.36,4.36,0,0,1-1.32-3.23V27.37A4.58,4.58,0,0,1,395,24.1a4.52,4.52,0,0,1,6.58.12,4.54,4.54,0,0,1,1.24,3.15V56.31l17.72-16.38.05,0a4.8,4.8,0,0,1,2.94-1.11,4.4,4.4,0,0,1,3.27,1.2,4.57,4.57,0,0,1,1.2,3.27,4.44,4.44,0,0,1-.77,2.33,7.45,7.45,0,0,1-1.43,1.65l-11,9.64,13.34,17.68a5,5,0,0,1,1,2.71,4.12,4.12,0,0,1-1.36,3.24A4.64,4.64,0,0,1,424.48,81.74Z'/%3e%3cpath%20class='cls-4'%20d='M317.93,81.76a21.5,21.5,0,1,1,21.17-21.5A21.37,21.37,0,0,1,317.93,81.76Zm0-34.1a12.61,12.61,0,1,0,12.42,12.6A12.52,12.52,0,0,0,317.93,47.66Z'/%3e%3cpath%20class='cls-4'%20d='M212.18,101.22a4.12,4.12,0,0,1-3.05-1.26,4.17,4.17,0,0,1-1.26-3.1V43.34a4.37,4.37,0,0,1,1.3-3.14,4.26,4.26,0,0,1,3.13-1.3,4.19,4.19,0,0,1,3.1,1.26,4.32,4.32,0,0,1,1.26,3.16,20.77,20.77,0,0,1,13-4.54,21.51,21.51,0,0,1,0,43,20.51,20.51,0,0,1-13-4.57V96.86a4.15,4.15,0,0,1-1.3,3.06A4.5,4.5,0,0,1,212.18,101.22Zm17.43-53.63c-6.23,0-12.93,4.11-12.93,12.72a12.73,12.73,0,0,0,25.46,0A12.71,12.71,0,0,0,229.61,47.59Z'/%3e%3cpath%20class='cls-4'%20d='M365.76,81.76a21.5,21.5,0,1,1,21.18-21.5A21.37,21.37,0,0,1,365.76,81.76Zm0-34.1a12.61,12.61,0,1,0,12.42,12.6A12.52,12.52,0,0,0,365.76,47.66Z'/%3e%3c/svg%3e)